FRAME ASSEMBLY
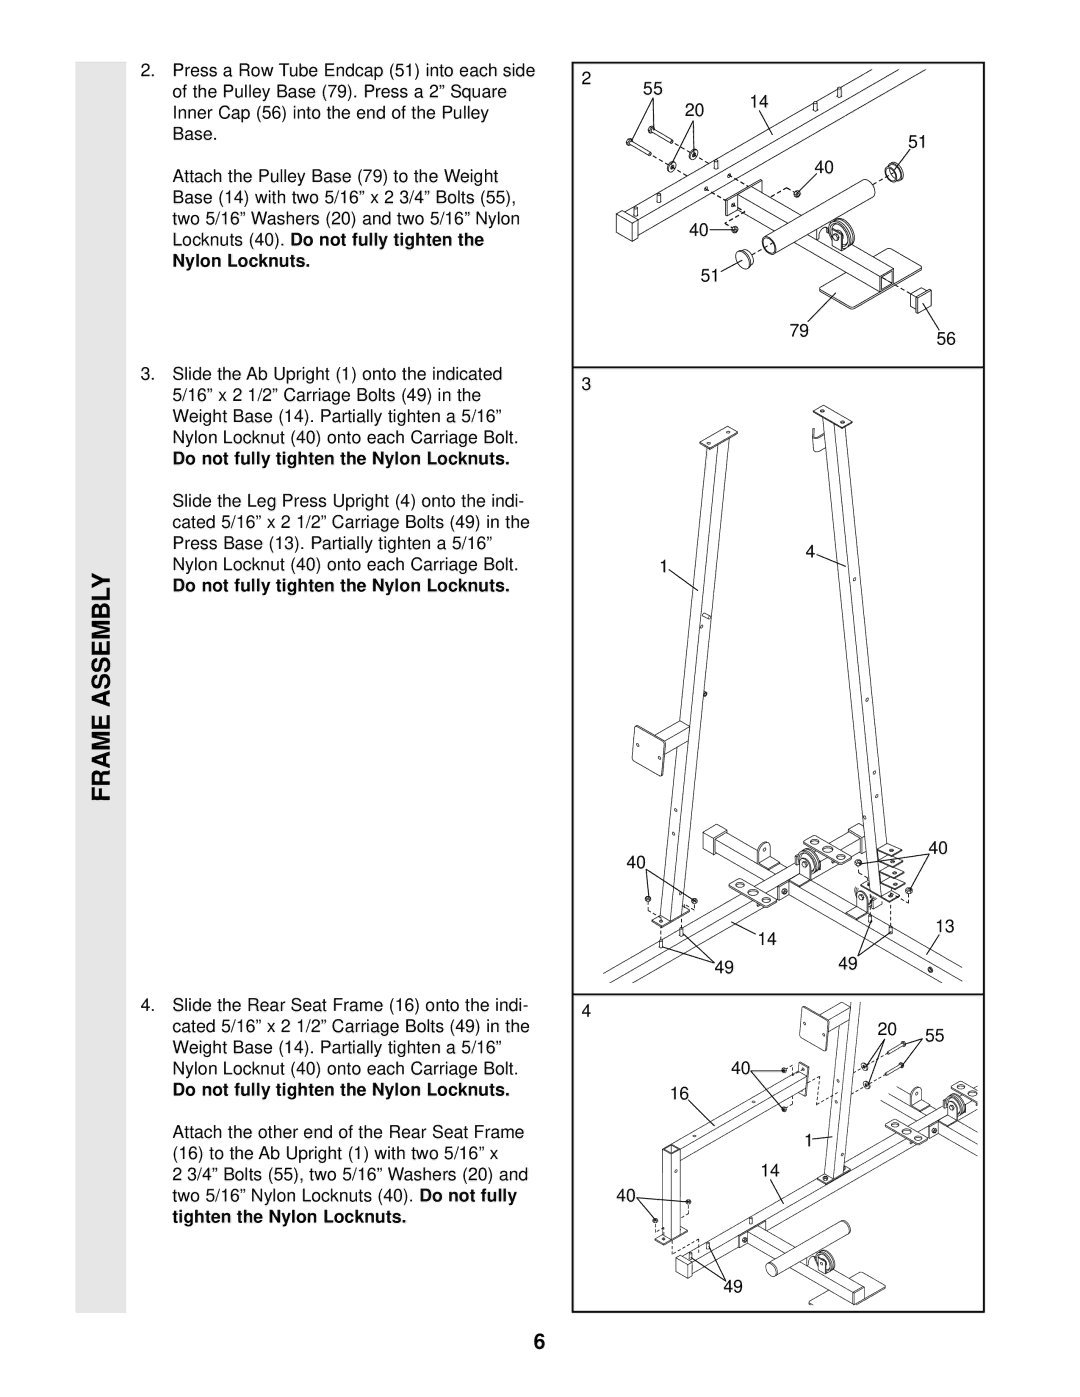
2.Press a Row Tube Endcap (51) into each side of the Pulley Base (79). Press a 2” Square Inner Cap (56) into the end of the Pulley Base.
Attach the Pulley Base (79) to the Weight Base (14) with two 5/16” x 2 3/4” Bolts (55), two 5/16” Washers (20) and two 5/16” Nylon Locknuts (40). Do not fully tighten the
Nylon Locknuts.
3.Slide the Ab Upright (1) onto the indicated 5/16” x 2 1/2” Carriage Bolts (49) in the Weight Base (14). Partially tighten a 5/16” Nylon Locknut (40) onto each Carriage Bolt.
Do not fully tighten the Nylon Locknuts.
Slide the Leg Press Upright (4) onto the indi- cated 5/16” x 2 1/2” Carriage Bolts (49) in the Press Base (13). Partially tighten a 5/16” Nylon Locknut (40) onto each Carriage Bolt.
Do not fully tighten the Nylon Locknuts.
4.Slide the Rear Seat Frame (16) onto the indi- cated 5/16” x 2 1/2” Carriage Bolts (49) in the Weight Base (14). Partially tighten a 5/16” Nylon Locknut (40) onto each Carriage Bolt.
Do not fully tighten the Nylon Locknuts.
Attach the other end of the Rear Seat Frame (16) to the Ab Upright (1) with two 5/16” x
2.3/4” Bolts (55), two 5/16” Washers (20) and two 5/16” Nylon Locknuts (40). Do not fully tighten the Nylon Locknuts.
6
2 | 55 |
|
|
|
|
| 14 |
|
|
| |
| 20 |
|
|
| |
|
|
|
|
| |
|
|
|
|
| 51 |
|
|
| 40 |
|
|
| 40 |
|
|
|
|
| 51 |
|
|
| |
|
|
| 79 |
| 56 |
|
|
|
|
| |
3 |
|
|
|
|
|
| 1 |
| 4 |
|
|
|
|
|
|
| |
| 40 |
|
|
| 40 |
|
|
|
|
| |
|
| 14 |
|
| 13 |
|
|
|
|
| |
|
| 49 |
| 49 |
|
4 |
|
|
| 20 |
|
|
|
|
| 55 | |
|
|
|
|
| |
|
| 40 |
|
|
|
| 16 |
|
|
|
|
|
|
| 1 |
|
|
|
| 14 |
|
|
|
| 40 |
|
|
|
|
|
| 49 |
|
|
|
