Frame Assembly
1.Before beginning assembly, be sure that you have read and understand the information in the box on page 5.
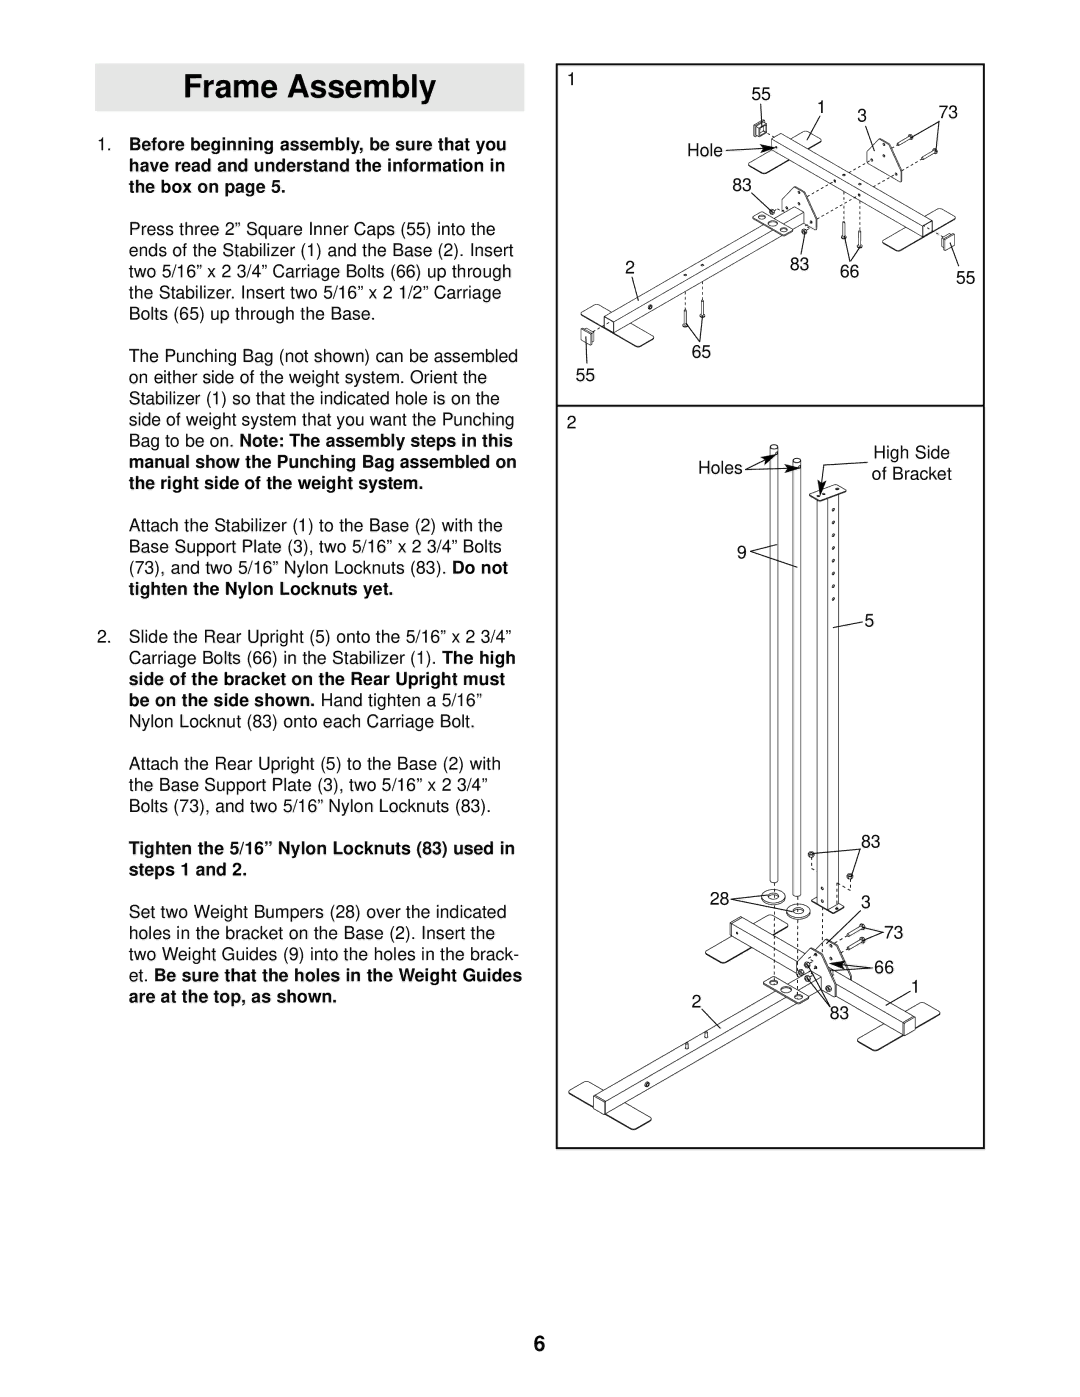
Press three 2” Square Inner Caps (55) into the ends of the Stabilizer (1) and the Base (2). Insert two 5/16” x 2 3/4” Carriage Bolts (66) up through the Stabilizer. Insert two 5/16” x 2 1/2” Carriage Bolts (65) up through the Base.
The Punching Bag (not shown) can be assembled on either side of the weight system. Orient the Stabilizer (1) so that the indicated hole is on the side of weight system that you want the Punching Bag to be on. Note: The assembly steps in this manual show the Punching Bag assembled on the right side of the weight system.
Attach the Stabilizer (1) to the Base (2) with the Base Support Plate (3), two 5/16” x 2 3/4” Bolts (73), and two 5/16” Nylon Locknuts (83). Do not tighten the Nylon Locknuts yet.
2.Slide the Rear Upright (5) onto the 5/16” x 2 3/4” Carriage Bolts (66) in the Stabilizer (1). The high side of the bracket on the Rear Upright must be on the side shown. Hand tighten a 5/16” Nylon Locknut (83) onto each Carriage Bolt.
Attach the Rear Upright (5) to the Base (2) with the Base Support Plate (3), two 5/16” x 2 3/4” Bolts (73), and two 5/16” Nylon Locknuts (83).
Tighten the 5/16” Nylon Locknuts (83) used in steps 1 and 2.
Set two Weight Bumpers (28) over the indicated holes in the bracket on the Base (2). Insert the two Weight Guides (9) into the holes in the brack- et. Be sure that the holes in the Weight Guides are at the top, as shown.
1 |
|
|
|
|
55 |
| 1 |
| 73 |
|
| 3 | ||
|
|
| ||
Hole |
|
|
|
|
83 |
|
|
|
|
2 | 83 |
| 66 | 55 |
|
|
|
| |
65 |
|
|
|
|
55 |
|
|
|
|
2 |
|
|
|
|
Holes |
|
|
| High Side |
|
|
| of Bracket | |
|
|
|
| |
9 |
|
|
|
|
|
|
| 5 | |
|
|
| 83 | |
28 |
|
| 3 |
|
|
|
|
| 73 |
|
|
|
| 66 |
2 |
|
|
| 1 |
|
| 83 |
| |
|
|
|
| |
6
