SEAT ASSEMBLY
DECAL PLACEMENT
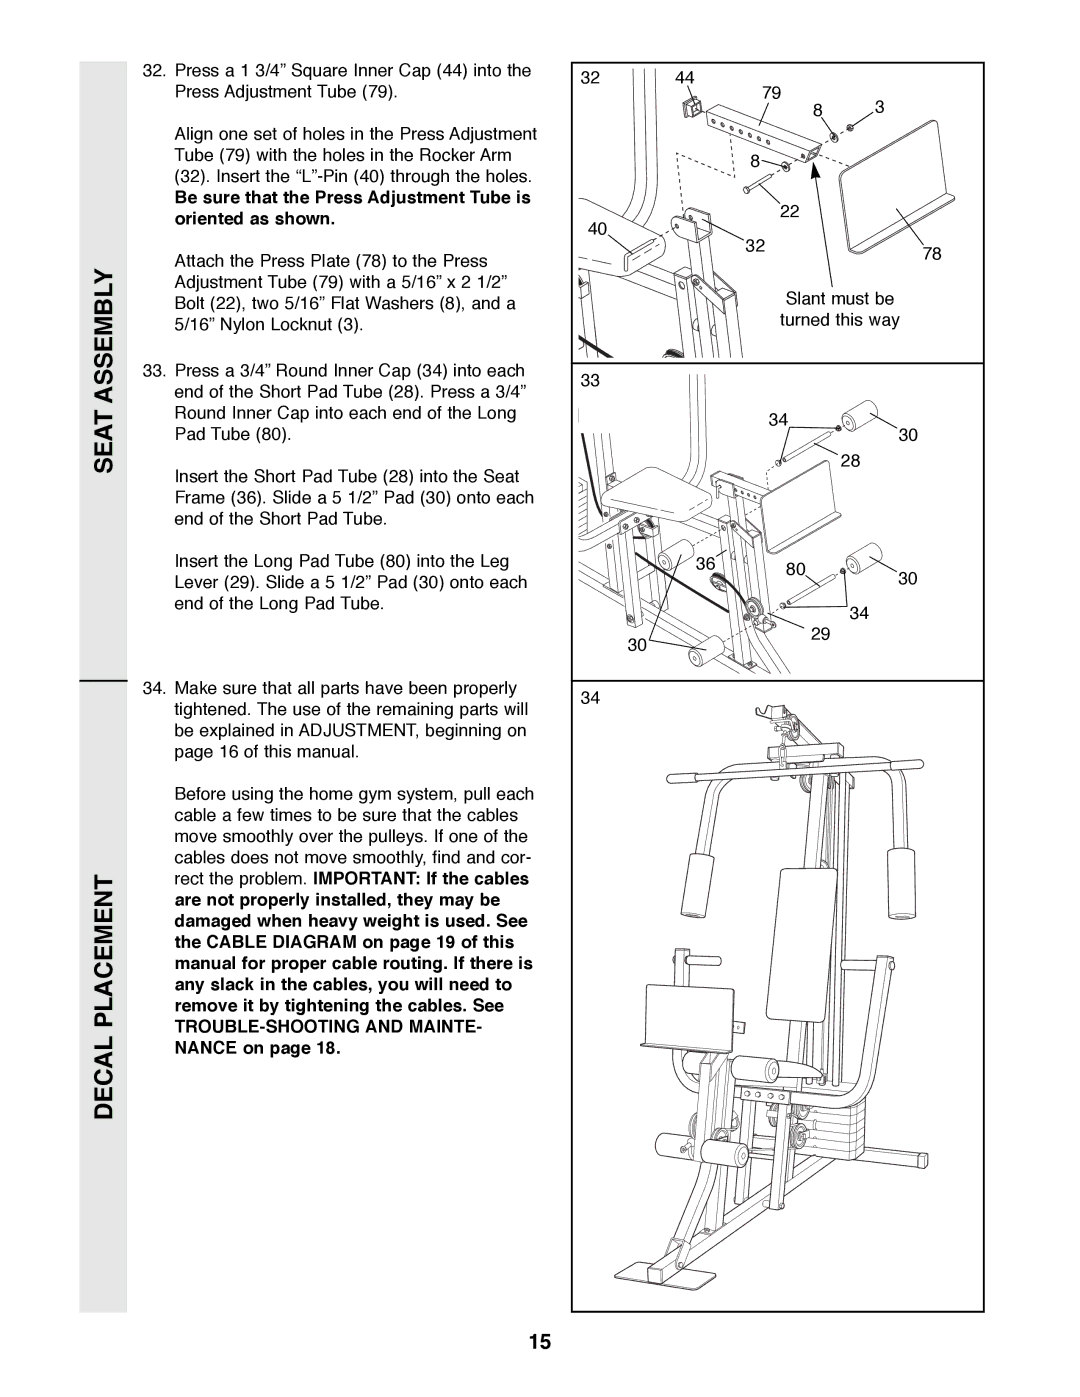
32. Press a 1 3/4Ó Square Inner Cap (44) into the | 32 |
| 44 |
|
|
Press Adjustment Tube (79). |
| 79 |
| ||
|
|
| 3 | ||
|
|
|
| 8 | |
Align one set of holes in the Press Adjustment |
|
|
|
|
|
Tube (79) with the holes in the Rocker Arm |
|
|
| 8 |
|
(32). Insert the |
|
|
|
| |
|
|
|
|
| |
Be sure that the Press Adjustment Tube is |
|
|
| 22 |
|
oriented as shown. | 40 |
|
|
| |
|
|
|
| ||
|
|
| 32 |
| |
Attach the Press Plate (78) to the Press |
|
|
| 78 | |
|
|
|
| ||
|
|
|
|
| |
Adjustment Tube (79) with a 5/16Ó x 2 1/2Ó |
|
|
| Slant must be | |
Bolt (22), two 5/16Ó Flat Washers (8), and a |
|
|
| ||
5/16Ó Nylon Locknut (3). |
|
|
| turned this way | |
33. Press a 3/4Ó Round Inner Cap (34) into each | 33 |
|
|
|
|
end of the Short Pad Tube (28). Press a 3/4Ó |
|
|
|
| |
|
|
|
|
| |
Round Inner Cap into each end of the Long |
|
|
| 34 |
|
Pad Tube (80). |
|
|
| 30 | |
|
|
|
| ||
Insert the Short Pad Tube (28) into the Seat |
|
|
|
| 28 |
|
|
|
|
| |
Frame (36). Slide a 5 1/2Ó Pad (30) onto each |
|
|
|
|
|
end of the Short Pad Tube. |
|
|
|
|
|
Insert the Long Pad Tube (80) into the Leg |
|
| 36 | 80 | 30 |
Lever (29). Slide a 5 1/2Ó Pad (30) onto each |
|
|
| ||
|
|
|
| ||
end of the Long Pad Tube. |
|
|
|
| 34 |
|
|
|
|
| |
|
| 30 |
| 29 |
|
|
|
|
|
| |
34. Make sure that all parts have been properly | 34 |
|
|
|
|
tightened. The use of the remaining parts will |
|
|
|
| |
|
|
|
|
| |
be explained in ADJUSTMENT, beginning on |
|
|
|
|
|
page 16 of this manual. |
|
|
|
|
|
Before using the home gym system, pull each |
|
|
|
|
|
cable a few times to be sure that the cables |
|
|
|
|
|
move smoothly over the pulleys. If one of the |
|
|
|
|
|
cables does not move smoothly, find and cor- |
|
|
|
|
|
rect the problem. IMPORTANT: If the cables |
|
|
|
|
|
are not properly installed, they may be |
|
|
|
|
|
damaged when heavy weight is used. See |
|
|
|
|
|
the CABLE DIAGRAM on page 19 of this |
|
|
|
|
|
manual for proper cable routing. If there is |
|
|
|
|
|
any slack in the cables, you will need to |
|
|
|
|
|
remove it by tightening the cables. See |
|
|
|
|
|
|
|
|
|
|
|
NANCE on page 18. |
|
|
|
|
|
15