The Temperature & Pressure Relief Valve:

Must be connected to an adequate discharge line.

Must not be in contact with any electrical part.

Must not be rated higher than the working pressure shown on the data plate of the water heater.

The Discharge Line:

Must not be smaller than the pipe size of the relief valve or have any reducing coupling installed in the discharge line.

Must not be capped, blocked, plugged, or contain any valve between the relief valve and the end of the discharge line.

Must terminate a maximum of six inches above a

floor drain or external to the building. In cold climates, it is recommended that the discharge pipe be termi- nated at an adequate drain inside the building.

Must be capable of withstanding 250° F (121° C) without distortion.

Must be installed to allow complete drainage of both the valve and discharge line.

T&P Relief Valve and Pipe Insulation:

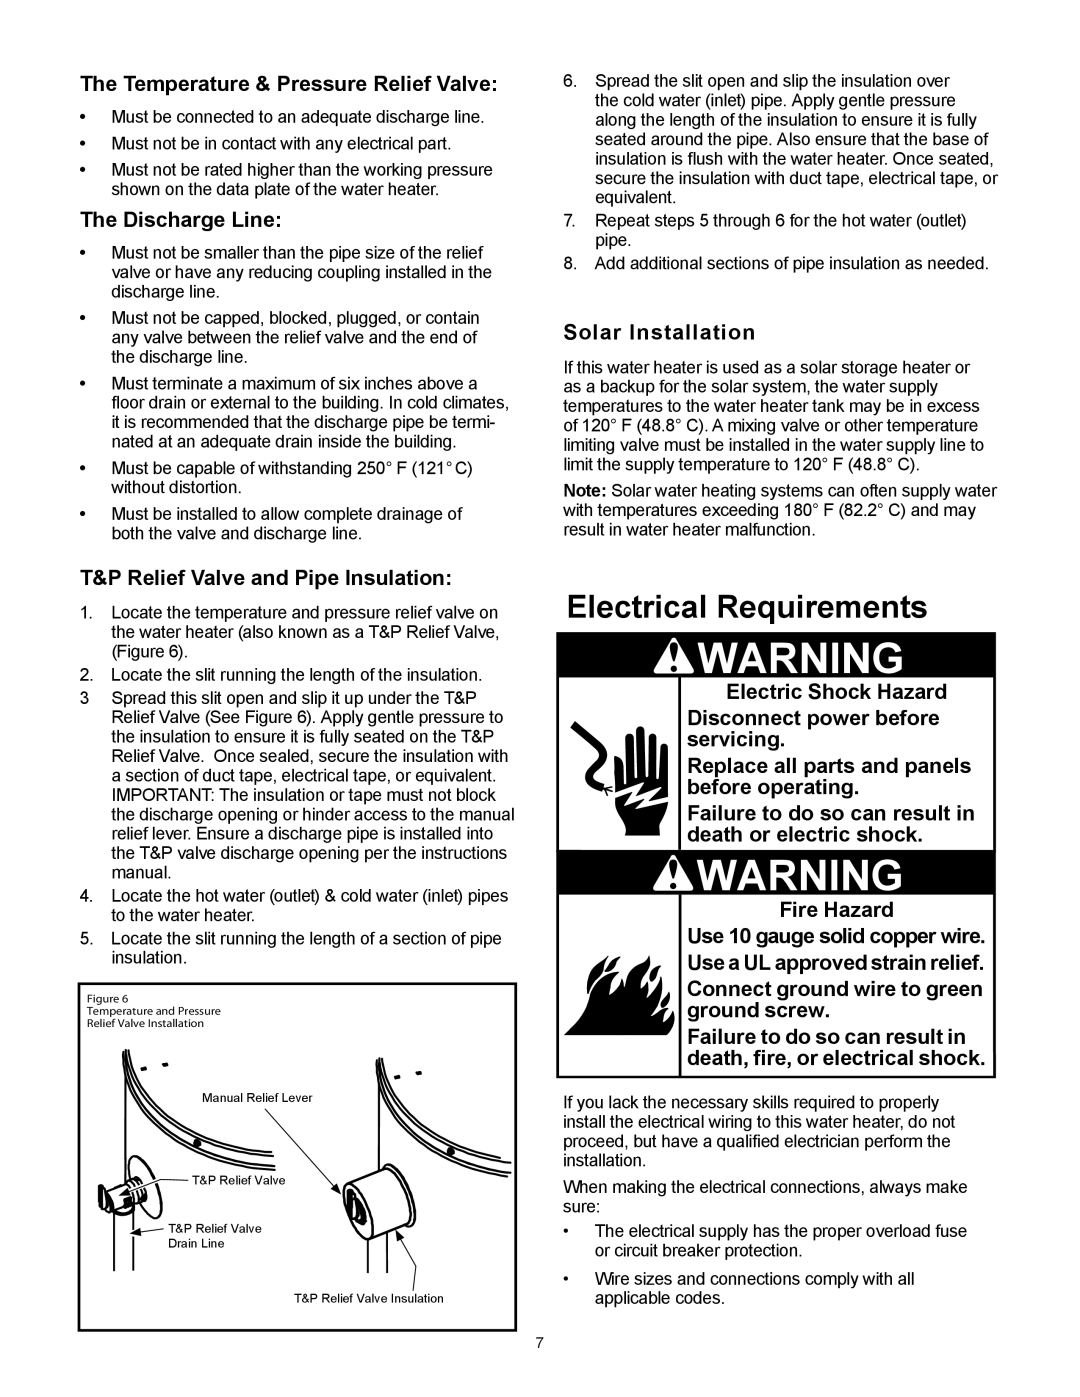
1.Locate the temperature and pressure relief valve on the water heater (also known as a T&P Relief Valve, (Figure 6).

2.Locate the slit running the length of the insulation.

3Spread this slit open and slip it up under the T&P Relief Valve (See Figure 6). Apply gentle pressure to the insulation to ensure it is fully seated on the T&P Relief Valve. Once sealed, secure the insulation with a section of duct tape, electrical tape, or equivalent. IMPORTANT: The insulation or tape must not block the discharge opening or hinder access to the manual relief lever. Ensure a discharge pipe is installed into the T&P valve discharge opening per the instructions manual.

4.Locate the hot water (outlet) & cold water (inlet) pipes to the water heater.

5.Locate the slit running the length of a section of pipe insulation.

Figure 6

Temperature and Pressure

Relief Valve Installation

Manual Relief Lever

T&P Relief Valve

T&P Relief Valve

Drain Line

T&P Relief Valve Insulation

6.Spread the slit open and slip the insulation over the cold water (inlet) pipe. Apply gentle pressure along the length of the insulation to ensure it is fully seated around the pipe. Also ensure that the base of insulation is flush with the water heater. Once seated, secure the insulation with duct tape, electrical tape, or equivalent.

7.Repeat steps 5 through 6 for the hot water (outlet) pipe.

8.Add additional sections of pipe insulation as needed.

Solar Installation

If this water heater is used as a solar storage heater or as a backup for the solar system, the water supply temperatures to the water heater tank may be in excess of 120° F (48.8° C). A mixing valve or other temperature limiting valve must be installed in the water supply line to limit the supply temperature to 120° F (48.8° C).

Note: Solar water heating systems can often supply water with temperatures exceeding 180° F (82.2° C) and may result in water heater malfunction.

Electrical Requirements

WARNING

Electric Shock Hazard Disconnect power before servicing.

Replace all parts and panels before operating.

Failure to do so can result in death or electric shock.

WARNING

Fire Hazard

Use 10 gauge solid copper wire. Use a UL approved strain relief. Connect ground wire to green ground screw.

Failure to do so can result in death, fire, or electrical shock.

If you lack the necessary skills required to properly install the electrical wiring to this water heater, do not proceed, but have a qualified electrician perform the installation.

When making the electrical connections, always make sure:

The electrical supply has the proper overload fuse or circuit breaker protection.

Wire sizes and connections comply with all applicable codes.

7

Page 7
Image 7
Whirlpool 318686-000 Electrical Requirements, Temperature & Pressure Relief Valve, Discharge Line, Solar Installation

318686-000 specifications

The Whirlpool 318686-000 is a highly regarded appliance part that plays an essential role in modern kitchen functionality. Designed with the user in mind, it boasts several features and technologies that enhance its performance and reliability.

One of the primary characteristics of the Whirlpool 318686-000 is its compatibility with a wide range of Whirlpool ovens and ranges, making it a versatile choice for many households. This part is commonly known as the surface element, which provides the necessary heat for cooking a variety of dishes. Its design ensures even heat distribution, which is vital for achieving perfectly cooked meals every time.

The Whirlpool 318686-000 is engineered with durability in mind. Constructed from high-quality materials, this part is built to withstand the daily stresses of cooking while maintaining its performance. This longevity translates into reduced replacement costs and increased satisfaction for users, making it an economical choice for homeowners.

In terms of safety, the Whirlpool 318686-000 features advanced technology to minimize risks associated with cooking. It typically includes integrated thermal protection, which helps prevent overheating. This feature not only prolongs the lifespan of the component but also ensures a safer cooking environment for users.

Installation of the Whirlpool 318686-000 is designed to be user-friendly. Homeowners can replace this part without needing specialized tools or professional assistance, allowing for convenient maintenance. This ease of installation is especially appealing for those who prefer a DIY approach to home repairs.

Efficiency is another hallmark of the Whirlpool 318686-000. The design optimizes energy consumption, allowing users to cook efficiently while saving on utility costs. The element heats up quickly, reducing wait times and enhancing overall cooking experiences.

Whirlpool is a brand synonymous with innovation, and the 318686-000 reflects this commitment to excellence. The part combines modern technology with practical design, ensuring it meets the needs of contemporary cooking. With its blend of durability, safety, efficiency, and ease of use, the Whirlpool 318686-000 is an essential addition to any kitchen, providing reliable performance that cooks can depend on for years to come. Whether replacing a worn-out part or upgrading to enhance cooking capabilities, this surface element is a top choice for Whirlpool appliance users.