Wiring is enclosed in approved conduit (if required by local codes).

The water heater and electrical supply are properly grounded.

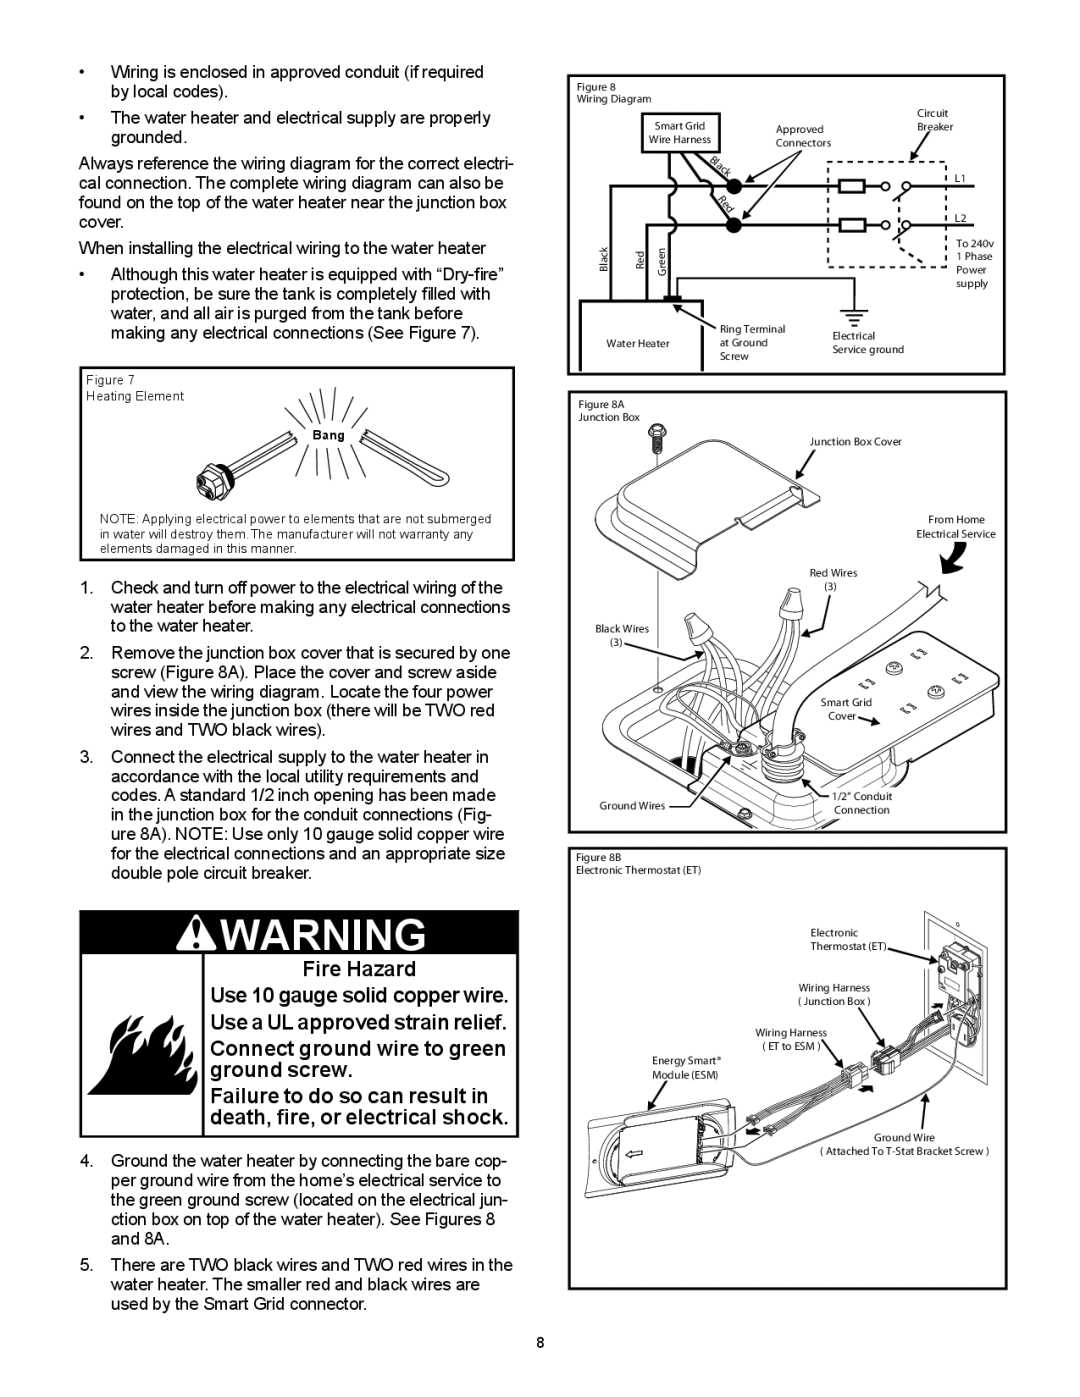
Always reference the wiring diagram for the correct electri- cal connection. The complete wiring diagram can also be found on the top of the water heater near the junction box cover.

When installing the electrical wiring to the water heater

Although this water heater is equipped with “Dry-fire” protection, be sure the tank is completely filled with water, and all air is purged from the tank before making any electrical connections (See Figure 7).

Figure 7

Heating Element

Bang

NOTE: Applying electrical power to elements that are not submerged in water will destroy them. The manufacturer will not warranty any elements damaged in this manner.

1.Check and turn off power to the electrical wiring of the water heater before making any electrical connections to the water heater.

2.Remove the junction box cover that is secured by one screw (Figure 8A). Place the cover and screw aside and view the wiring diagram. Locate the four power wires inside the junction box (there will be TWO red wires and TWO black wires).

3.Connect the electrical supply to the water heater in accordance with the local utility requirements and codes. A standard 1/2 inch opening has been made in the junction box for the conduit connections (Fig- ure 8A). NOTE: Use only 10 gauge solid copper wire for the electrical connections and an appropriate size double pole circuit breaker.

WARNING

Fire Hazard

Use 10 gauge solid copper wire. Use a UL approved strain relief. Connect ground wire to green ground screw.

Failure to do so can result in death, fire, or electrical shock.

4.Ground the water heater by connecting the bare cop- per ground wire from the home’s electrical service to the green ground screw (located on the electrical jun- ction box on top of the water heater). See Figures 8 and 8A.

5.There are TWO black wires and TWO red wires in the water heater. The smaller red and black wires are used by the Smart Grid connector.

Figure 8


Wiring Diagram


Smart Grid


Circuit


Approved

Breaker


Wire Harness

Connectors


B


l


a


c


k

L1


Red


L2

Black

Red

Green


To 240v


1 Phase


Power


supply


Ring Terminal

Electrical


Water Heater


at Ground


Service ground


Screw


Figure 8A


Junction Box


Junction Box Cover


From Home


Electrical Service


Red Wires


(3)

Black Wires


(3)


Smart Grid


Cover

Ground Wires

1/2” Conduit

Connection


Figure 8B

Electronic Thermostat (ET)

Electronic

Thermostat (ET)

Wiring Harness

( Junction Box )

Wiring Harness

( ET to ESM )

Energy Smart®

Module (ESM)

Ground Wire

( Attached To T-Stat Bracket Screw )

8

Page 8
Image 8
Whirlpool 318686-000 installation instructions Red

318686-000 specifications

The Whirlpool 318686-000 is a highly regarded appliance part that plays an essential role in modern kitchen functionality. Designed with the user in mind, it boasts several features and technologies that enhance its performance and reliability.

One of the primary characteristics of the Whirlpool 318686-000 is its compatibility with a wide range of Whirlpool ovens and ranges, making it a versatile choice for many households. This part is commonly known as the surface element, which provides the necessary heat for cooking a variety of dishes. Its design ensures even heat distribution, which is vital for achieving perfectly cooked meals every time.

The Whirlpool 318686-000 is engineered with durability in mind. Constructed from high-quality materials, this part is built to withstand the daily stresses of cooking while maintaining its performance. This longevity translates into reduced replacement costs and increased satisfaction for users, making it an economical choice for homeowners.

In terms of safety, the Whirlpool 318686-000 features advanced technology to minimize risks associated with cooking. It typically includes integrated thermal protection, which helps prevent overheating. This feature not only prolongs the lifespan of the component but also ensures a safer cooking environment for users.

Installation of the Whirlpool 318686-000 is designed to be user-friendly. Homeowners can replace this part without needing specialized tools or professional assistance, allowing for convenient maintenance. This ease of installation is especially appealing for those who prefer a DIY approach to home repairs.

Efficiency is another hallmark of the Whirlpool 318686-000. The design optimizes energy consumption, allowing users to cook efficiently while saving on utility costs. The element heats up quickly, reducing wait times and enhancing overall cooking experiences.

Whirlpool is a brand synonymous with innovation, and the 318686-000 reflects this commitment to excellence. The part combines modern technology with practical design, ensuring it meets the needs of contemporary cooking. With its blend of durability, safety, efficiency, and ease of use, the Whirlpool 318686-000 is an essential addition to any kitchen, providing reliable performance that cooks can depend on for years to come. Whether replacing a worn-out part or upgrading to enhance cooking capabilities, this surface element is a top choice for Whirlpool appliance users.