Timed Cooking

(on some models)

WARNING

Food Poisoning Hazard

Do not let food sit in oven more than one hour before or after cooking.

Doing so can result in food poisoning or sickness.

Timed Cooking allows the oven to be set to turn on at a certain time of day, cook for a set length of time, and/or shut off automatically. Delay start should not be used for food such as breads and cakes because they may not bake properly.

To Set a Cook Time:

1.Press BAKE. The bake oven indicator light will light up.

2.Set the temperature (optional).

Press the TEMP/TIME “up” or “down” arrow pad to enter a temperature other than the one displayed.

3.Press COOK TIME. The cook time oven indicator light will light up.

4.Press TEMP/TIME “up” or “down” arrow pad to enter the length of time to cook.

5.Press START/ENTER.

The display will count down the time.

When the time ends, the oven will shut off automatically and “End” will appear on the display.

6.Press OFF or open the oven door to clear the display.

To Set a Delayed Cook Time:

Before setting, make sure the clock is set to the correct time of day. See “Clock” section.

1.Press BAKE.

2.Set the temperature (optional).

Press the TEMP “up” or “down” arrow pads to enter a temperature other than the one displayed.

3.Press COOK TIME.

The cook time oven indicator light will light up.

4.Press the TEMP/TIME “up” or “down” arrow pad to enter the length of time to cook.

5.Press START TIME.

The start time/delay oven indicator light will light up.

6.Press the TEMP/TIME “up” or “down” arrow pad to enter the time of day to start.

7.Press START/ENTER.

When the start time is reached, the oven will automatically turn on.

The temperature and/or time settings can be changed any time after pressing START/ENTER by repeating steps 1-6.

When the set cook time ends, the oven will shut off automatically and “End” will appear on the display.

8.Press OFF/CANCEL or open the oven door to clear the display.

MANUAL OVEN

CONTROL

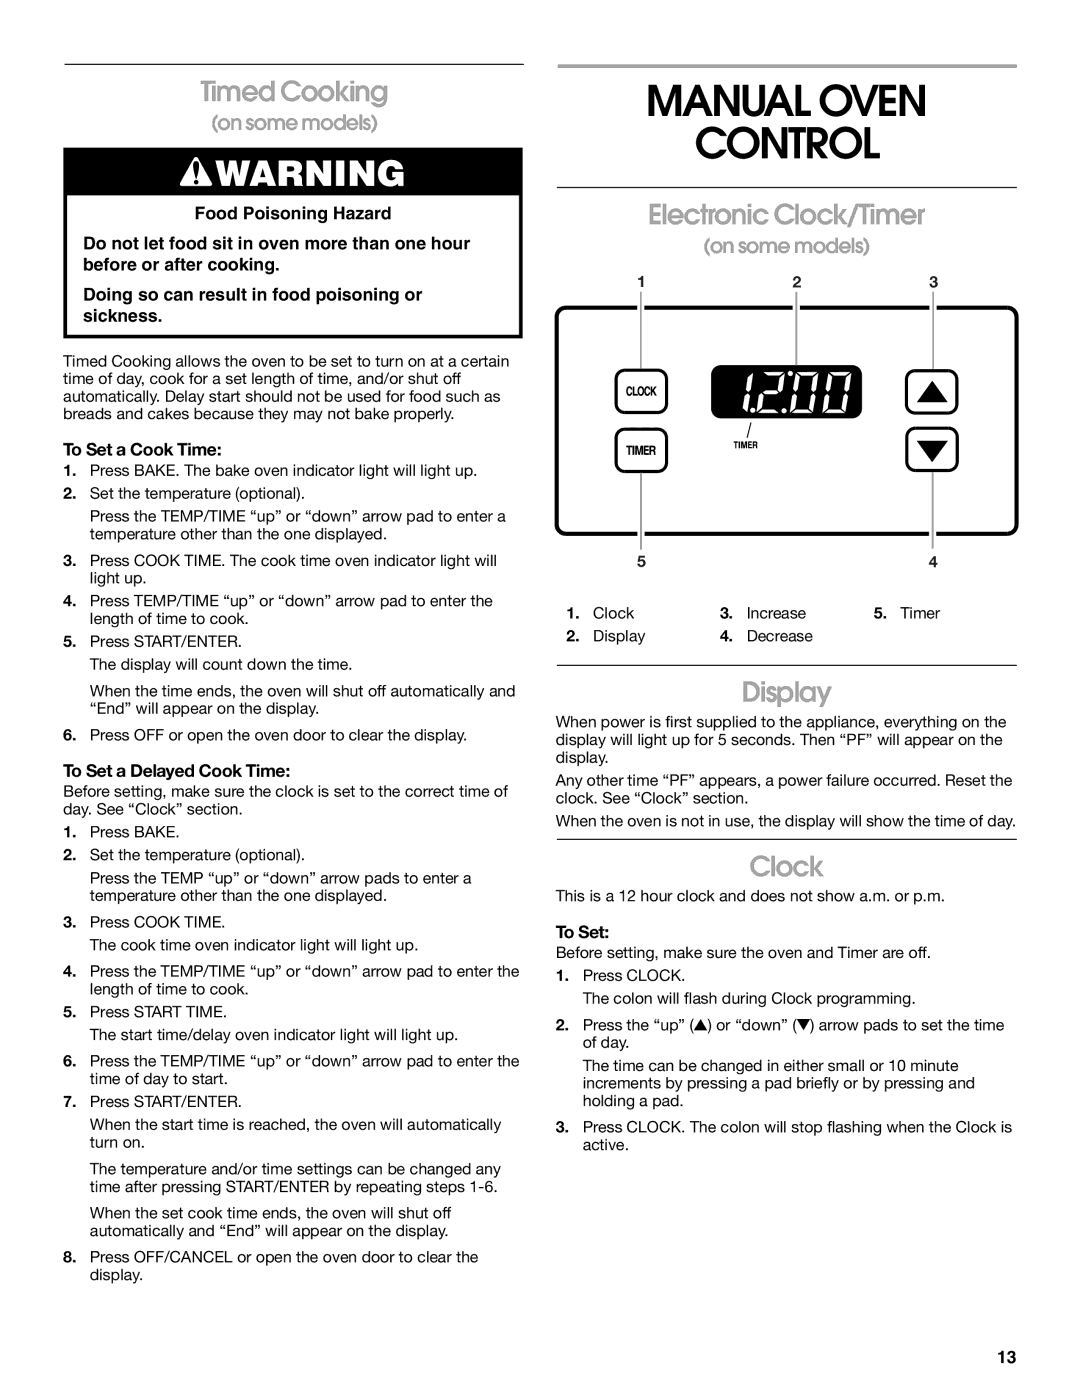
Electronic Clock/Timer

(on some models)

1

2

3


5


4

1.

Clock

3.

Increase

5. Timer

2.

Display

4.

Decrease


Display

When power is first supplied to the appliance, everything on the display will light up for 5 seconds. Then “PF” will appear on the display.

Any other time “PF” appears, a power failure occurred. Reset the clock. See “Clock” section.

When the oven is not in use, the display will show the time of day.

Clock

This is a 12 hour clock and does not show a.m. or p.m.

To Set:

Before setting, make sure the oven and Timer are off.

1.Press CLOCK.

The colon will flash during Clock programming.

2.Press the “up” (￿) or “down” (￿) arrow pads to set the time of day.

The time can be changed in either small or 10 minute increments by pressing a pad briefly or by pressing and holding a pad.

3.Press CLOCK. The colon will stop flashing when the Clock is active.

13

Page 13
Image 13
Whirlpool TGP302, TGP310, TGP325 manual Manual Oven Control, Timed Cooking, Electronic Clock/Timer, To Set a Cook Time

TGP325, TGP302, TGP310 specifications

Whirlpool is a renowned name in the home appliance industry, famous for its commitment to quality and innovation. Their line of gas ranges, including the TGP310, TGP302, and TGP325 models, exemplifies the brand's dedication to enhancing cooking experiences in the kitchen. Each model comes with a unique set of features tailored to meet diverse culinary needs while ensuring reliability and convenience.

The Whirlpool TGP310 gas range is designed for the home cook who values precision and control in their cooking. This model features continuous corner-to-corner grates that allow you to slide pots and pans effortlessly from one burner to another. It is equipped with powerful burners that deliver high heat for searing and fast boiling, as well as lower heat options for simmering sauces and soups. The TGP310 also integrates Whirlpool's TimeSavor Convection Cooking technology, promoting even heating and reducing cooking times, making it ideal for busy home chefs.

Moving on to the TGP302, this model enhances the cooking experience with its Smart Oven technology. It features an advanced control panel that offers precise temperature settings and pre-programmed cooking options. The TGP302 is particularly noted for its spacious oven capacity, allowing for large holiday meals or family gatherings. The ovens are designed with a self-cleaning feature, reducing the hassle of maintenance and ensuring that you have a hygienic cooking space. Additionally, the TGP302 comes with safety measures, such as a flame failure device, which automatically shuts off the gas supply if the flame goes out.

Lastly, the Whirlpool TGP325 appeals to those who appreciate efficient performance without compromising style. It boasts a sleek stainless-steel finish, which not only enhances kitchen aesthetics but also provides durability. The TGP325 features an intuitive control knob layout, making it user-friendly for cooks of all skill levels. Its burners are designed for optimal heat distribution, and the model includes various cooking modes to accommodate everything from baking to broiling. With an energy-efficient design, the TGP325 ensures reduced energy consumption while delivering high cooking performance.

In summary, the Whirlpool TGP310, TGP302, and TGP325 gas ranges represent the brand's commitment to innovation, efficiency, and customer satisfaction. Each model comes equipped with powerful cooking technologies tailored to meet diverse needs, making them excellent choices for any modern kitchen. Whether you need precision cooking, enhanced safety features, or stylish design, Whirlpool has a gas range to match your culinary aspirations.