OVEN USE

Baking and Roasting

Before baking and roasting, position the racks according to the “Positioning Racks and Bakeware” section. When roasting, it is not necessary to wait for the oven to preheat before putting food in, unless recommended in the recipe.

To Bake or Roast:

1.Push in and turn the oven control knob to the desired temperature setting. The OVEN ON and OVEN HEATING lights will turn on and the set temperature will appear in the display for 5 seconds.

On some models, set the oven selector to BAKE and turn the oven temperature control knob to the desired temperature setting. The OVEN ON indicator light will turn on and will turn off once the oven is preheated.

2.Place food in oven.

The bake and roasting elements will turn on and off to keep the oven temperature at the setting. The OVEN ON indicator light(s) will turn on and off with the elements.

3.Push in and turn oven control knob to OFF when finished.

On some models, turn both the oven selector and oven temperature control knob to OFF. The OVEN ON indicator light will turn off.

Broiling

DROP DOWN BROILER (on some models)

The broiler is located below the oven door. Always broil with the broiler and oven doors closed.

Use only the broiler pan and grid provided with the range. It is designed to drain juices and help prevent spatter and smoke.

For proper draining, do not cover the grid with foil. The bottom of the pan may be lined with aluminum foil for easier cleaning.

Trim excess fat to reduce spattering. Slit the remaining fat on the edges to prevent curling.

Use tongs to turn food to avoid the loss of juices. Very thin cuts of fish, poultry or meat may not need to be turned. You should rotate the broiler pan back to the front at the same time you turn the foods.

Do not step on or apply weight to the broiler door when it is open. This could damage the door.

After broiling, remove the pan from the oven when removing the food. Drippings will bake on the pan if left in the heated oven, making cleaning more difficult.

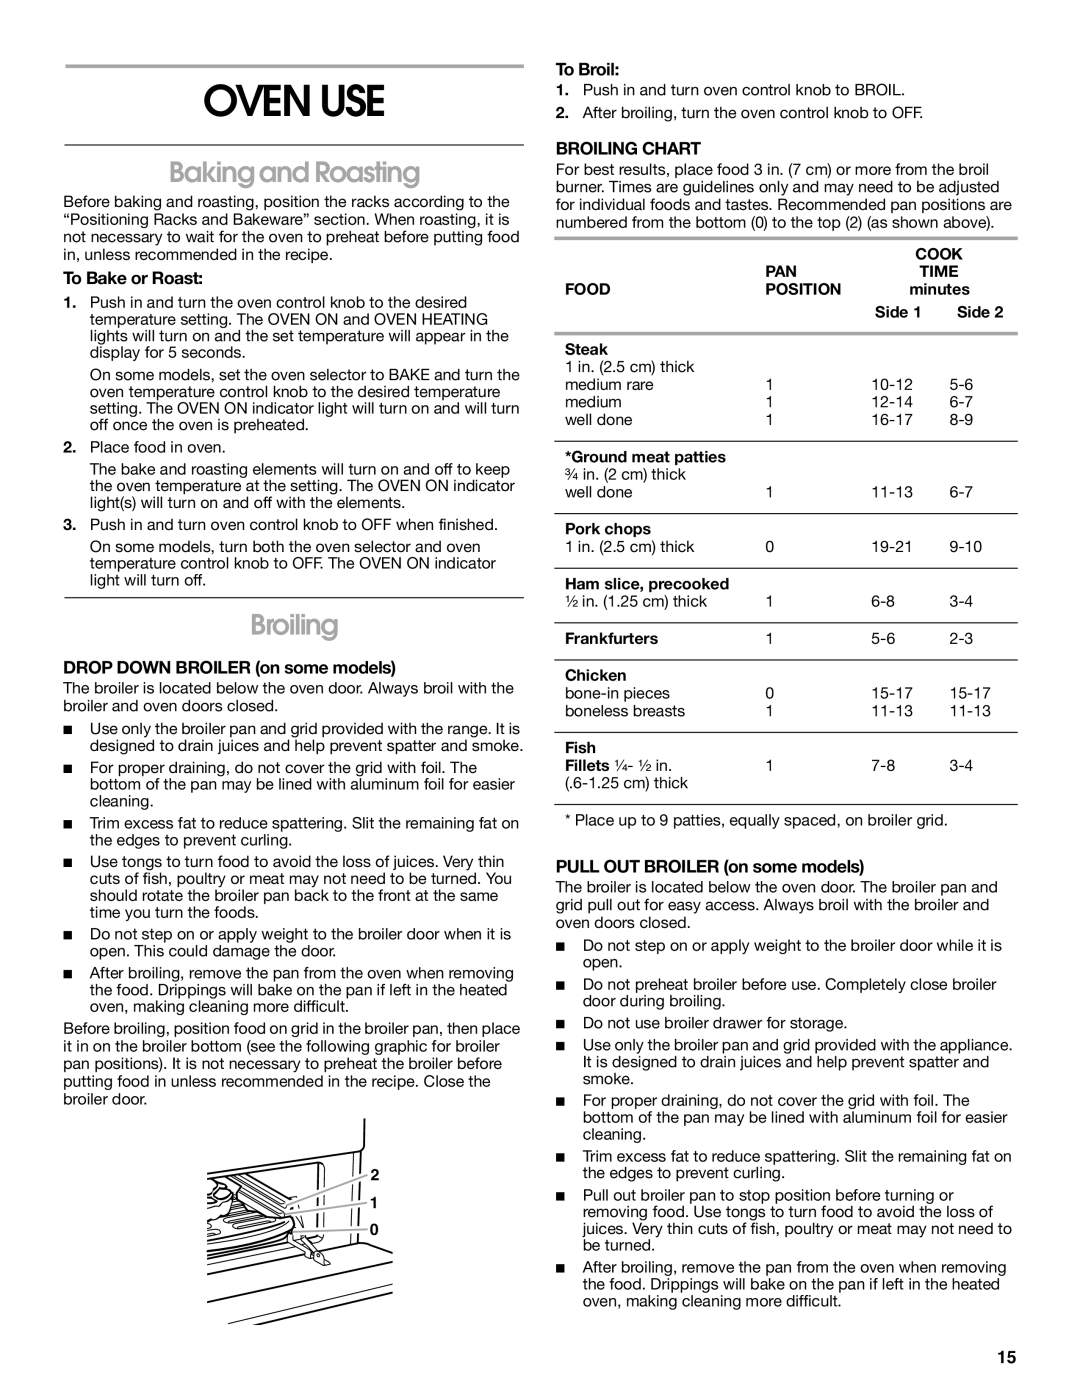
Before broiling, position food on grid in the broiler pan, then place it in on the broiler bottom (see the following graphic for broiler pan positions). It is not necessary to preheat the broiler before putting food in unless recommended in the recipe. Close the broiler door.

2

1

0

To Broil:

1.Push in and turn oven control knob to BROIL.

2.After broiling, turn the oven control knob to OFF.

BROILING CHART

For best results, place food 3 in. (7 cm) or more from the broil burner. Times are guidelines only and may need to be adjusted for individual foods and tastes. Recommended pan positions are numbered from the bottom (0) to the top (2) (as shown above).


COOK


PAN

TIME

FOOD

POSITION

minutes


Side 1

Side 2


Steak


1 in. (2.5 cm) thick


medium rare

1

10-12

5-6

medium

1

12-14

6-7

well done

1

16-17

8-9


*Ground meat patties


³₄ in. (2 cm) thick


well done

1

11-13

6-7


Pork chops


1 in. (2.5 cm) thick

0

19-21

9-10


Ham slice, precooked


¹₂ in. (1.25 cm) thick

1

6-8

3-4


Frankfurters

1

5-6

2-3


Chicken


bone-in pieces

0

15-17

15-17

boneless breasts

1

11-13

11-13


Fish


Fillets ¹₄ - ¹₂ in.

1

7-8

3-4

(.6-1.25 cm) thick


* Place up to 9 patties, equally spaced, on broiler grid.

PULL OUT BROILER (on some models)

The broiler is located below the oven door. The broiler pan and grid pull out for easy access. Always broil with the broiler and oven doors closed.

Do not step on or apply weight to the broiler door while it is open.

Do not preheat broiler before use. Completely close broiler door during broiling.

Do not use broiler drawer for storage.

Use only the broiler pan and grid provided with the appliance. It is designed to drain juices and help prevent spatter and smoke.

For proper draining, do not cover the grid with foil. The bottom of the pan may be lined with aluminum foil for easier cleaning.

Trim excess fat to reduce spattering. Slit the remaining fat on the edges to prevent curling.

Pull out broiler pan to stop position before turning or removing food. Use tongs to turn food to avoid the loss of juices. Very thin cuts of fish, poultry or meat may not need to be turned.

After broiling, remove the pan from the oven when removing the food. Drippings will bake on the pan if left in the heated oven, making cleaning more difficult.

15

Page 15
Image 15
Whirlpool TGP310, TGP302 Broiling, To Bake or Roast, Drop Down Broiler on some models, Pull OUT Broiler on some models

TGP325, TGP302, TGP310 specifications

Whirlpool is a renowned name in the home appliance industry, famous for its commitment to quality and innovation. Their line of gas ranges, including the TGP310, TGP302, and TGP325 models, exemplifies the brand's dedication to enhancing cooking experiences in the kitchen. Each model comes with a unique set of features tailored to meet diverse culinary needs while ensuring reliability and convenience.

The Whirlpool TGP310 gas range is designed for the home cook who values precision and control in their cooking. This model features continuous corner-to-corner grates that allow you to slide pots and pans effortlessly from one burner to another. It is equipped with powerful burners that deliver high heat for searing and fast boiling, as well as lower heat options for simmering sauces and soups. The TGP310 also integrates Whirlpool's TimeSavor Convection Cooking technology, promoting even heating and reducing cooking times, making it ideal for busy home chefs.

Moving on to the TGP302, this model enhances the cooking experience with its Smart Oven technology. It features an advanced control panel that offers precise temperature settings and pre-programmed cooking options. The TGP302 is particularly noted for its spacious oven capacity, allowing for large holiday meals or family gatherings. The ovens are designed with a self-cleaning feature, reducing the hassle of maintenance and ensuring that you have a hygienic cooking space. Additionally, the TGP302 comes with safety measures, such as a flame failure device, which automatically shuts off the gas supply if the flame goes out.

Lastly, the Whirlpool TGP325 appeals to those who appreciate efficient performance without compromising style. It boasts a sleek stainless-steel finish, which not only enhances kitchen aesthetics but also provides durability. The TGP325 features an intuitive control knob layout, making it user-friendly for cooks of all skill levels. Its burners are designed for optimal heat distribution, and the model includes various cooking modes to accommodate everything from baking to broiling. With an energy-efficient design, the TGP325 ensures reduced energy consumption while delivering high cooking performance.

In summary, the Whirlpool TGP310, TGP302, and TGP325 gas ranges represent the brand's commitment to innovation, efficiency, and customer satisfaction. Each model comes equipped with powerful cooking technologies tailored to meet diverse needs, making them excellent choices for any modern kitchen. Whether you need precision cooking, enhanced safety features, or stylish design, Whirlpool has a gas range to match your culinary aspirations.