Section 5: Maintenance
WARNING Before inspecting, cleaning or servicing the unit, shut off engine, wait for all parts to come to a complete stop, disconnect spark plug wire and move wire away from spark plug. Remove ignition key on electric start models. Failure to follow these instructions can result in serious personal injury or property damage.
WHEEL DRIVE BELT
REPLACEMENT
Follow this procedure to replace the wheel drive belt.
1. | Stop engine, wait for all parts to |
stop moving, and disconnect spark | |
plug wire. | |
2. | Release all mower controls. |
3. | Remove belt cover as described in |
“Belt Cover Removal” instructions. | |
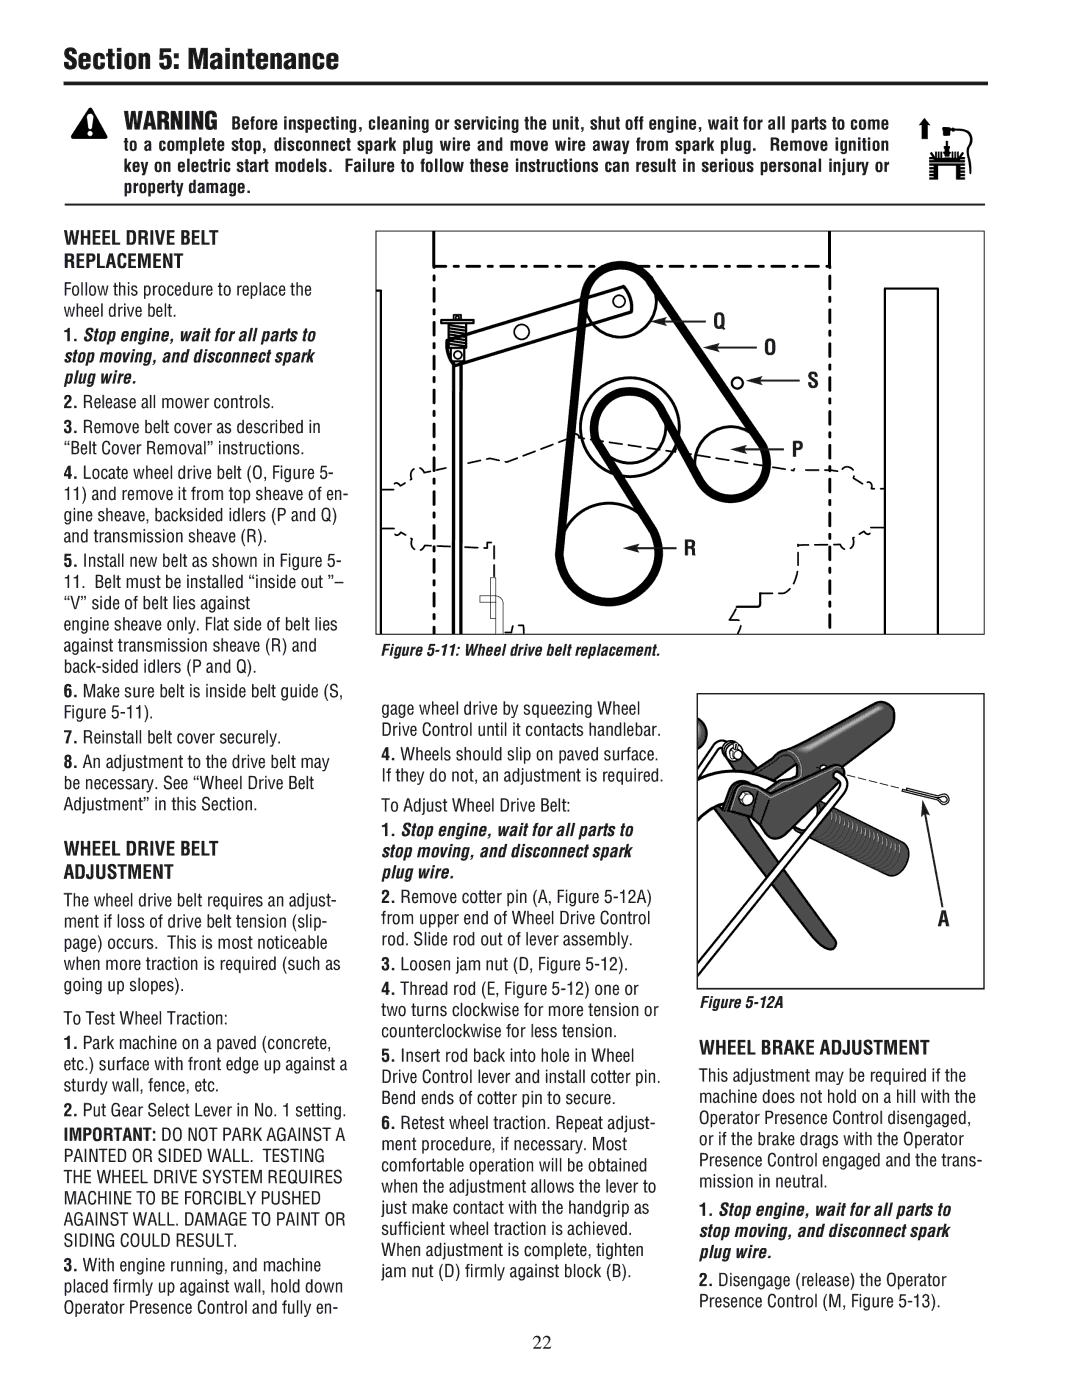
4. | Locate wheel drive belt (O, Figure 5- |
11) and remove it from top sheave of en- | |
gine sheave, backsided idlers (P and Q) | |
and transmission sheave (R). | |
5. | Install new belt as shown in Figure 5- |
11. Belt must be installed “inside out ”– | |
“V” side of belt lies against | |
engine sheave only. Flat side of belt lies | |
against transmission sheave (R) and | |
| |
6. | Make sure belt is inside belt guide (S, |
Q |
O |
S |
P |
R |
Figure 5-11: Wheel drive belt replacement.
Figure | |
7. | Reinstall belt cover securely. |
8. | An adjustment to the drive belt may |
be necessary. See “Wheel Drive Belt | |
Adjustment” in this Section. | |
WHEEL DRIVE BELT
ADJUSTMENT
The wheel drive belt requires an adjust- ment if loss of drive belt tension (slip- page) occurs. This is most noticeable when more traction is required (such as going up slopes).
To Test Wheel Traction:
1.Park machine on a paved (concrete, etc.) surface with front edge up against a sturdy wall, fence, etc.
2.Put Gear Select Lever in No. 1 setting.
IMPORTANT: DO NOT PARK AGAINST A PAINTED OR SIDED WALL. TESTING THE WHEEL DRIVE SYSTEM REQUIRES MACHINE TO BE FORCIBLY PUSHED AGAINST WALL. DAMAGE TO PAINT OR SIDING COULD RESULT.
3.With engine running, and machine placed firmly up against wall, hold down Operator Presence Control and fully en-
gage wheel drive by squeezing Wheel Drive Control until it contacts handlebar.
4.Wheels should slip on paved surface. If they do not, an adjustment is required.
To Adjust Wheel Drive Belt:
1.Stop engine, wait for all parts to stop moving, and disconnect spark plug wire.
2.Remove cotter pin (A, Figure
3.Loosen jam nut (D, Figure
4.Thread rod (E, Figure
two turns clockwise for more tension or counterclockwise for less tension.
5.Insert rod back into hole in Wheel Drive Control lever and install cotter pin. Bend ends of cotter pin to secure.
6.Retest wheel traction. Repeat adjust- ment procedure, if necessary. Most comfortable operation will be obtained when the adjustment allows the lever to just make contact with the handgrip as sufficient wheel traction is achieved. When adjustment is complete, tighten jam nut (D) firmly against block (B).
A
Figure 5-12A
WHEEL BRAKE ADJUSTMENT
This adjustment may be required if the machine does not hold on a hill with the Operator Presence Control disengaged, or if the brake drags with the Operator Presence Control engaged and the trans- mission in neutral.
1.Stop engine, wait for all parts to stop moving, and disconnect spark plug wire.
2.Disengage (release) the Operator Presence Control (M, Figure
22
