Kyocera copier manual Setting paper on the multi-bypass tray, Code number Size, Inch Specification

Page 27

Section 3 PREPARATIONS

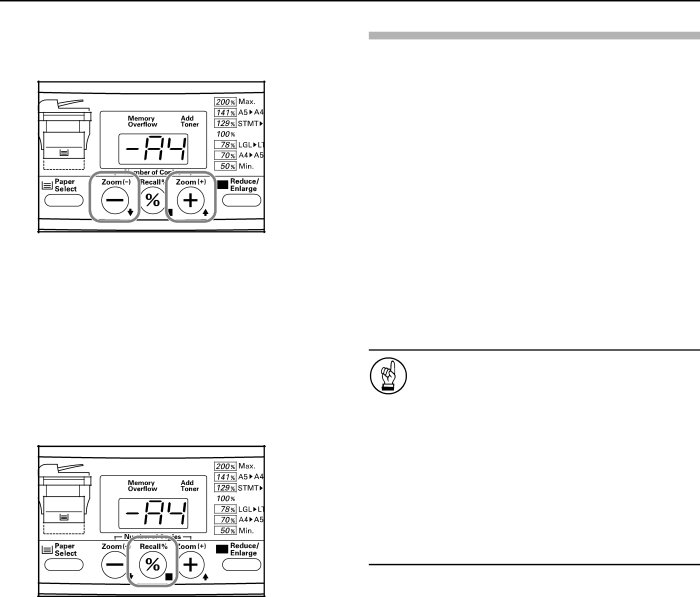
4 Press the Number of Copies / Zoom(+) or Number of Copies / Zoom(-) key to select the appropriate paper size. The displayed code numbers refer to the available paper sizes as explained in the following table.

Code number

Size

-A4

A4


-A5

A5


-Fo

Folio


-Lg

Legal (8 1/2" × 14")


-Lt

Letter (8 1/2" × 11")


-o2

Oficio II (8 1/2" × 13")


5 Press the Recall%/Enter key.

The displayed numbers will flash and the copier will return to a copy-ready state.

Setting paper on the multi-bypass tray

Standard copy paper (60 g/m² – 90 g/m²), thick paper (90 g/m² – 163 g/m²), color paper, OHP transparencies and letterhead paper can be set on the multi-bypass tray.

ALWAYS use the multi-bypass tray when copying onto special paper.

The sizes of paper that can be set on the multi-bypass tray are as follows:

Inch Specification

81/2" × 14" (Legal) – 5 1/2" × 8 1/2" (Statement)

Metric Specification A4 – A6R, and Folio

The types of paper and the number of sheets that can be set on the multi-bypass tray at one time are as follows:

Standard paper (80 g/m²): 50 sheets

Thick paper (120 g/m²): 25 sheets

Thick paper (160 g/m²): 10 sheets

OHP transparencies: 1 sheet

IMPORTANT!

After setting paper on the multi-bypass tray, be sure to use the operation panel to select the size of that paper. (See page 3-7.)

If you want to copy onto non-standard size paper, be sure to use the “F15” (Non-Standard Size Paper Width) default item to register the paper size. (See page 6-3.)

When using thick copy paper (90 g/m² – 105 g/m²), be sure to select the Thick Paper mode. (See page 3-9.)

When using OHP transparencies, be sure to use a type of film that can withstand the heat of the fixing process. The following products are recommended: Arkwright (LTR)

3M PP2500 (A4)

3-5

Image 27
Contents 1500 Page IMPORTANT! Please Read First Copy Default SettingsTroubleshooting Maintenance and Operation InformationContents Iii Preset Zoom mode Image quality selectionEco-Copy mode See 200%Paper Recycling Low Power ModeOff Mode About the International Energy Star ProgramSymbols Page Label IMPORTANT! Please Read FirstOther precautions Installation PrecautionsPrecautions for USE Other precautions Cdrh Act Safety of laser beamMaintenance Safety switchPage Limited Warranty for NEW Copier Model Page Main Body Names of PartsStopper extension lock DrawerPaper width guides Paper stopperRight cover anchor pin Power switchPower cord Document Processor connector Face-up trayOperation panel Auto Clear function Auto Drawer Switching functionNames of Parts Preparations Loading paperLoading paper into a drawer Preparations Preparations Selecting the paper size Code number Size Setting paper on the multi-bypass trayInch Specification Metric Specification A4 A6R, and FolioPreparations XXX Selecting the paper size standard settingSelecting the paper size temporary setting Thick Paper mode Attaching the face-up tray Basic Operation Basic copying procedureStart copying Adjusting the copy exposureSetting the number of copies to be made Setting an originalAt the end of copying Zoom mode Making enlarged and reduced copies50% Preset Zoom mode Low Power mode More about the Off mode Off modeBasic Operation In-1 Metric specificationCopy Functions Layout modesCopy Functions When setting the originals on the platenWhen setting the originals in the Document Processor Press the 2in1/4in1 key until the 2in1 indicator lights Press the 2in1/4in1 key until the 4in1 indicator lights Selecting the borderline Code number Borderline types Selecting the order of 4-in-1 layoutCopy Functions Original Copy Press the Sort key to light the Sort indicator Sort modeUsing programmed settings to make copies Program functionRegistering the program Copy Default Settings Available default itemsDefault Description Available settings Reference Number Copy Default Settings Non-Standard Size Paper Width and it Mode ON/OFF Copy Default Settings Accessing and changing the default settings Sample User Copy Setting List Copy Default Settings Copy Default Settings Copy Default Settings Copy Default Settings Checking the total copy count and printing out a report Names of parts Optional EquipmentDocument Processor Acceptable originalsOptional Equipment Setting originals in the Document ProcessorSetting originals on the platen Additional Memory Paper FeederTroubleshooting Indication Procedure ReferenceIf one of the following indications is displayed Troubleshooting If paper jams Misfeed location indicatorsPaper jam inside the copier Removal proceduresPaper jam in a drawer Paper jam in the paper eject section Original jam in the optional Document Processor Paper jam in the multi-bypass trayTroubleshooting If other trouble occurs Trouble Checkpoint Procedure ReferenceTroubleshooting Cleaning the copier Maintenance and Operation InformationReplacing the toner container Maintenance and Operation Information Cleaner Home Position Cleaning the charger and the registration rollerClose the front cover Close the upper front cover Main Body SpecificationsDocument Processor option Paper Feeder optionAdditional Memory option Environmental Specifications Duplex 2-sided copyingPaper feed Additional Memory Paper Feeder Document Processor Optional equipmentAvailable options Document ProcessorFunction selected first Function selected second Appendix Functions and settings combination chartNumerics IndexToner Coverage Report default setting Total copy count Memo Page Page 2003