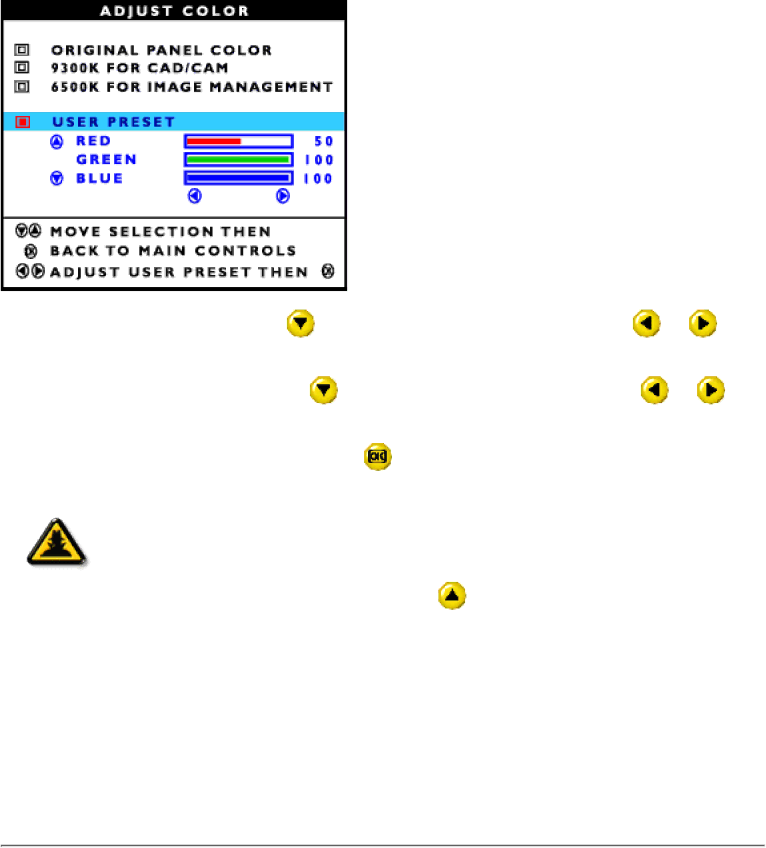
Philips 140S user manual OSD Settings

Page 63

The OSD Controls

6.2)

When finished with RED, press the

button to highlight GREEN. Next, press the

or

button to adjust the color green.


6.3)

When finished with GREEN, press the

button to highlight BLUE. Next, press the

or

button to adjust the color blue.


6.4)

When all adjustments are complete, press the

button to confirm your adjustments and return to

the MAIN CONTROLS window. CLOSE MAIN CONTROLS is highlighted.

Smart Help

After returning to MAIN CONTROLS…

Smart

… to continue to OSD SETTINGS, press the

button until OSD SETTINGS is

Help

highlighted. Next, start with step 3 under OSD SETTINGS and follow the directions.

… to exit completely, press the button.

RETURN TO TOP OF THE PAGE

OSD SETTINGS

You can place the MAIN CONTROLS window almost any place on the screen that is convenient for you. OSD SETTINGS allows you to do this. It is composed of HORIZONTAL and VERTICAL adjustments you can make by simply following the step below.

file:///E/Potomac/english/140S/osd/osd_cont.htm (11 of 16) [4/19/2000 4:35:09 PM]

Image 63
Contents File///E/Potomac/english/140S/index.htm 4/19/2000 42402 PM Safety and Troubleshooting Information Safety precautions and maintenanceInstallation Locations Correct handling of the monitor Return to TOP About This Guide Other Documents You May NeedNotational Descriptions Return to TOP Product Features Technical SpecificationsProduct Information Resolution & Preset Modes Optical CharacteristicsMacintosh Automatic Power SavingPin Assignment Physical SpecificationsFront View Product Description ViewsFront View Installing your LCD MonitorOptimizing Performance Description of the On Screen Display On-Screen DisplayOSD Tree Return to TOP Page North America Canada USA Customer Care & WarrantyGlossary Color temperatureLCD Liquid Crystal Display Download and Print Installing FPadjust ProgramTo install FPadjust Program Installing Your LCD monitor driverReturn to TOP General FAQs FAQs Frequently Asked QuestionsFAQs Frequently Asked Questions Page Screen Adjustments Compatibility with other Peripherals LCD Panel Technology FAQs Frequently Asked Questions Ergonomics, Ecology, and Safety Standards Return to TOP Common Problems TroubleshootingImaging Problems Return to TOP Regulatory Information Philips Federal Communications Commission FCC Notice U.S. Only EN 55022 Compliance Czech Republic Only Varning Earthed How to connect a plug Other Related Information Information for Users in the U. SInformation for Users outside the U.S Philips Flat Panel Monitors Pixel Defect Policy Philips Pixel Defect PolicyProximity of Pixel Defects Return to TOP Connecting to Your PC Connecting to Your PC Connecting to Your PC Replace the back cover on the monitor Return to TOP Getting Started Getting StartedBrightness OSD ControlsLanguage Adjust Position Brightness & Contrast Brightness & Contrast Video Noise not available on all Models OSD Controls Adjust Color not available on all models OSD Controls OSD Controls OSD Settings OSD Controls Product Information Reset to Factory Settings … to exit completely, press Button Close Main Controls Thank you for purchasing this Philips monitor Your International Philips F1rst Choice WarrantyYour International Guarantee WHO is COVERED? What is COVERED? Limited Warranty Computer MonitorBefore Requesting Service Philips Customer Care Center, P. O. Box 2976, Longview, TX