Philips 140S user manual How to connect a plug

Page 42

Regulatory Information

3-pin plug fitted in its place.

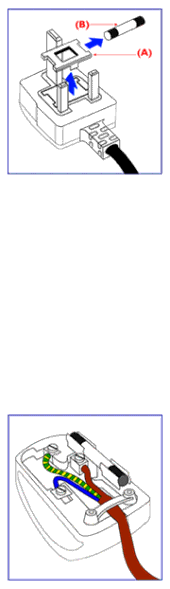
If the mains plug contains a fuse, this should have a value of 5A. If a plug without a fuse is used, the fuse at the distribution board should not be greater than 5A.

Note: The severed plug must be destroyed to avoid a possible shock hazard should it be inserted into a 13A socket elsewhere.

How to connect a plug

The wires in the mains lead are coloured in accordance with the following code:

BLUE - "NEUTRAL" ("N") BROWN - "LIVE" ("L")

GREEN & YELLOW - "EARTH" ("E")

1. The GREEN AND YELLOW wire must be connected to the terminal in the plug which is marked with the letter "E" or by the Earth symbol

or coloured GREEN or GREEN AND YELLOW.

2. The BLUE wire must be connected to the terminal which is marked with the letter "N" or coloured BLACK.

3. The BROWN wire must be connected to the terminal which marked with the letter "L" or coloured RED.

Before replacing the plug cover, make certain that the cord grip is clamped over the sheath of the lead - not simply over the three wires.

RETURN TO TOP OF THE PAGE

file:///E/Potomac/english/140S/safety/regs/regulat.htm (7 of 7) [4/19/2000 4:34:30 PM]

Image 42
Contents File///E/Potomac/english/140S/index.htm 4/19/2000 42402 PM Safety and Troubleshooting Information Safety precautions and maintenanceInstallation Locations Correct handling of the monitor Return to TOP About This Guide Other Documents You May NeedNotational Descriptions Return to TOP Product Features Technical SpecificationsProduct Information Optical Characteristics Resolution & Preset ModesAutomatic Power Saving MacintoshPhysical Specifications Pin AssignmentViews Front View Product DescriptionInstalling your LCD Monitor Front ViewOptimizing Performance On-Screen Display Description of the On Screen DisplayOSD Tree Return to TOP Page Customer Care & Warranty North America Canada USAColor temperature GlossaryLCD Liquid Crystal Display Installing FPadjust Program Download and PrintInstalling Your LCD monitor driver To install FPadjust ProgramReturn to TOP FAQs Frequently Asked Questions General FAQsFAQs Frequently Asked Questions Page Screen Adjustments Compatibility with other Peripherals LCD Panel Technology FAQs Frequently Asked Questions Ergonomics, Ecology, and Safety Standards Return to TOP Troubleshooting Common ProblemsImaging Problems Return to TOP Regulatory Information Philips Federal Communications Commission FCC Notice U.S. Only EN 55022 Compliance Czech Republic Only Varning Earthed How to connect a plug Other Related Information Information for Users in the U. SInformation for Users outside the U.S Philips Pixel Defect Policy Philips Flat Panel Monitors Pixel Defect PolicyProximity of Pixel Defects Return to TOP Connecting to Your PC Connecting to Your PC Connecting to Your PC Replace the back cover on the monitor Return to TOP Getting Started Getting StartedOSD Controls BrightnessLanguage Adjust Position Brightness & Contrast Brightness & Contrast Video Noise not available on all Models OSD Controls Adjust Color not available on all models OSD Controls OSD Controls OSD Settings OSD Controls Product Information Reset to Factory Settings … to exit completely, press Button Close Main Controls Your International Philips F1rst Choice Warranty Thank you for purchasing this Philips monitorYour International Guarantee Limited Warranty Computer Monitor WHO is COVERED? What is COVERED?Before Requesting Service Philips Customer Care Center, P. O. Box 2976, Longview, TX