IOGear GCS138 installation manual Setup and Installation Port Connections on back of Computer

Page 19

Installation

Setup and Installation (Port Connections on back of Computer)

3

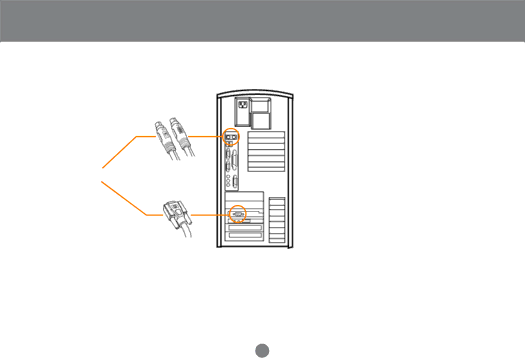
Step. 4 (Connecting the PCs)

3.Plug in the remaining PS/2 mouse and PS/2 keyboard connectors into your PC’s keyboard and mouse ports.

4.Repeat steps 1-3 for any additional computers you wish to connect to the MiniViewTM ULTRA.

NOTE: You may need to attach a PS/2 to AT adapter on the keyboard cable if your computer has an AT keyboard connection. Also, if you do not have a PS/2 mouse port you will need to use our PS/2 to Serial adapter to connect the mouse cable. You can use any manufacturer’s PS/2 to AT adapter but you must use our PS/2 to Serial adapters for the mouse.

15

Image 19
Contents MiniView Ultra IOGEAR. All Rights Reserved Page Page Table of Contents Package Contents Overview OverviewFeatures FeaturesRequirements RequirementsConsole Requirements Introduction on MiniViewTM Ultra IntroductionFront View Port Selection SwitchesPort LEDs Power LED MiniViewTM Ultra ResetSound Opening Back View Power JackConsole Port Section Introduction Setup and Installation Power Adapter InstallationStep Power Adapter Connection Step Console Connection Setup and Installation Console Port Connection on KVM SwitchStep CPU Port Connection Setup and Installation CPU Port Connection on KVM SwitchStep Connecting the PCs Setup and Installation Port Connections on back of ComputerStep Cascading MiniViewTM Ultra Units Setup and Installation Cascading MiniViewTM UltraStep Cascading Congratulations! You have now completed the installationCascading in pyramid format Cascading DiagramStep Cascading In Pyramid format OSD Operation OSD OperationName OSD Main Menu HeadingsHotKey Navigation When you key in the Port ID, note the followingSetting a password Access authorizationPower Off and Restarting Power OffHot Plugging CPU Ports Hot PluggingHot Plugging Console Ports Port ID Numbering HotKey In Examples Port SelectionPort Selection HotKey Hotkey SummaryTableManual Quick View ScanningF2 Scan Function KeysFunction Keys F1 GoToChoice Meaning F3 ListTo select/deselect a port F4 QVF5 Edit Setti ng Functi on F6 SetSetti ng Func ti on MiniView Ultra PC Connection Table PC Connection TableNo response Troubleshooting Model GCS138Appendix Pressing the Hot Keys getsTurn of all MiniViewTM Ultra units and wait five Product Specification Model GCS138 SpecificationHousing ResolutionOperating Temperature Storage TemperatureRadio & TV Interference Statement Radio & TV Interference StatementLimited Warranty Limited WarrantyPage Contact info