Dukane 9015 manual Aspect

Page 45

Operating the Main Menu (Cont.)

Setting and Adjusting Other Functions (OPTIONS) (Cont.)
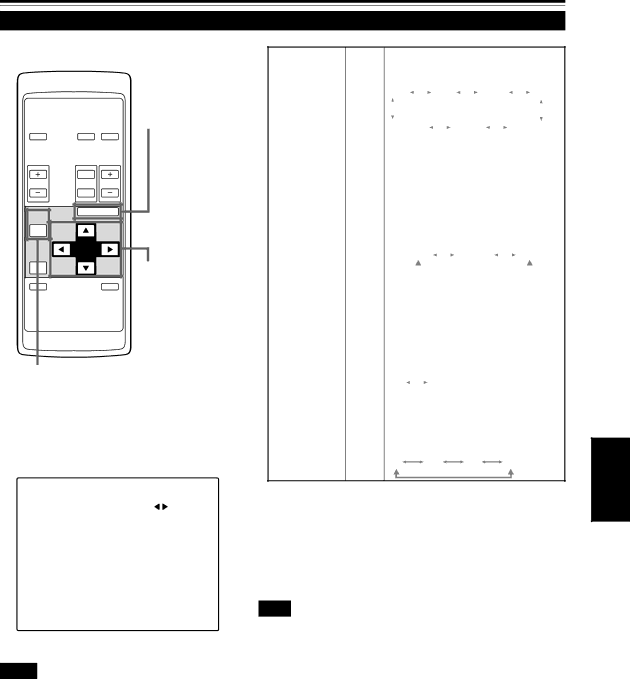
Remote control unit

MENU/ENTER

OPERATE

button

COMPUTER VIDEO


T


VOL.

ZOOM

FOCUS


W


PAGE

MENU/ENTER


BACK


PRESET


Cursor buttons

QUICK


AV

ALIGN.


MUTING

PAGE BACK button

Submenu items

[OPTIONS menu]

Adjustment item

Button

Adjustment content


Sets background color when there is no input


signal. (Factory setting : BLUE)


BACK COLOR

2/3

BLUE


CYAN


BLACK


GREEN


YELLOW


RED


MAGENTA


Sets the color temperature of the video image


being projected. Make adjustment when the


image becomes reddish or bluish. (Factory


setting : MIDDLE)


LOW : Color temperature decreases

COLOR

2/3


(video image becoming reddish).

TEMP.

MIDDLE : Results in middle color


temperature.


HIGH : Color temperature increases


(video image becoming bluish).


LOW


MIDDLE


HIGH


Sets the vertical-to-horizontal ratio (4 : 3 or 16

:9) of the video image projected. (Factory setting : 4 : 3)

4 : 3 : The aspect ratio of the screen

ASPECT

2/3


becomes 4 : 3. Set it to 4 : 3 for video

CHANGE


of NTSC, NTSC4.43, PAL, SECAM.


16 : 9: The aspect ratio of the screen


becomes 16 : 9. Set it to 16 : 9 for Hi-


Vision devices (W-VHS VCR, etc.)


4 : 3


16 : 9


Sets the length of sleep time which


automatically brings the projector into stand-


by state. You can select one of the following

SLEEP TIME

2/3

sleep times : 10 minutes, 20 minute, 30

minutes, and 60 minutes. (Factory setting :


30 minutes)


10

20

30

60

ENGLISH

O P T I O N S

M E N U A U T O O F F

N O

L I N E D I S P L A Y

O N

R I G H T L E F T R E V .

O F F

T O P B O T T O M I N V .

O F F

C L A M P

B P

R E S I Z E

O N

B A C K C O L O R

B L U E

C O L O R T E M P .

M I D D L E

A S P E C T C H A N G E

4 : 3

S L E E P T I M E

3 0 M I n .

L A M P T I M E

1 0 H .

Notes

The selected item is shown in magenta color. Items shown in gray color cannot be operated or set in the current mode.

Items to be set (adjusted) are different when AV signals are input and when computer-system signals are input.

¦To return to the main menu, press the PAGE BACK button. To finish the main menu, press PAGE BACK again.

To finish the menu display from the submenu display (OPTIONS menu), press PAGE BACK twice.

Note

When you view a conventional (normal) 4 :3 video picture, which is not wide video picture, on the projector’s screen the aspect change function, the upper and lower parts of the video picture become partially invisible. View such an original video picture in 4 :3 mode, respecting the producer’s intention.

45

Image 45
Contents ImagePro About burning-in of the D-ILA device Safety PrecautionsLamp directly by opening the cabinet while the illumination Safety PrecautionsContents Accessories Front Side / Top Surface / Right Side Controls and FeaturesMain Power switch AC in power input terminalConnector panel Adjustable foot for horizontal angle adjustmentAir intake area filter Bottom SurfaceOpening for replacing the light-source lamp Fixing foot Position selecting screw for ceiling mountingControl Panel When a menu is shown Setting buttonVideo button Computer buttonC S video input terminal Mini DIN 4 pin Connector PanelRS-232C terminal D-sub 9 pin Computer OUT computer output terminal D-sub 3-row 15 pinProjector’s speakers Audio input terminal stereo mini jackComputer in computer input -1 terminal D-sub 3- row 15 pin Audio audio input terminal stereo mini jackRemote Control Unit Install the batteries Installing BatteriesPrecautions for using batteries Open the back coverPrecautions for Installation Installing the ProjectorDo not install the projector in the following places When installing the projector, observe the followingsProjection screen size diagonal length Projection Distance and Screen SizeCenter line of the lens Projection59.04 ft 18.0 m 311 Approx cm 469 55.76 ft 17.0 m 294 Approx cm 44362.32 ft 19.0 m 328 Approx cm 495 65.6 ft 20.0 m 345 Approx cm 521Effective Range and Distance of the Remote Control Unit Setting the position selecting screw for Ceiling MountingEffective range and distance of the remote control unit Signals that Can Be Input to the Projector Connecting to Various DevicesVideo signals Computer signalsConnecting to Hi-Vision Devices Connecting to Video DevicesVideo devices Hi-Vision devicesConnecting to Devices which Control the Projector Connecting to Other DevicesDesktop type To Audio OUTConnection to an IBM PC or IBM-compatible computer Connecting to Computer DevicesRead the manual which comes with each device thoroughly OUTTo monitor connector Supplied Connection to MacintoshPersonal computer connection cable To use the projector Connecting the Power Cord SuppliedRemove the lens cap To prevent fire and electric shock, observe the followingWhen Turning On the Devices Connected to the Projector Turn on the Main Power switch Turning on the PowerTurning off the Power Basic OperationsWhen you press Video Adjust the screen sizeWhen you press Computer FollowsAdjust focus Adjust sound volumeAdjust focus with the remote control’s Focus +/- buttons To use the quick alignment function To turn off video image and audio sound temporarilyProjector’s button Press onceTo use the remote control’s Preset button Remote control unit To display the Setting menuProjector button To display the Main menuMaking Basic Settings Operating the Setting MenuPress the Setting button of the projector Press the Setting button to select the desired itemOperating the Main Menu Configuration of the Main Menu Computer-related input Operating the Main Menu Basic Operation of the Main Menu Select Decoder with the cursor button 5 or ∞ Changing the Color SystemSet the color system with the cursor button 2 or To finish the main menu, press the page Back buttonSet the desired language with the cursor button 2 or Changing the Language DisplayLanguage display About language displayAdjusting the Pixel Clock Adjust Tracking and Phase with the cursor buttonsButton Adjustment content Adjusting the Screen Position Adjust H. POS. and V. POS. with the cursor buttonsSelect Position with the cursor button 5 or ∞ Select the item to adjust with the cursor button 5 or ∞ Adjusting Picture QualityWhen AV signals are input When computer-related signals are inputFor video system input Submenu itemsFor computer system input Picture menuNormal TEXT1 TEXT2 Adjust Treble and Bass with the cursor buttons Adjusting Sound QualitySelect the Sound with the cursor Button 5 or ∞Select the item to set adjust with the cursor button 5 or ∞ Setting and Adjusting Other Functions OptionsFollowing optional functions can be set adjusted Select the Options with the cursor button 5 or ∞Options menu Set adjust the desired item with the cursor button 2 orAspect Select the item to set using the cursor buttons 5/∞ or 2/3 Changing Setting the SourceInput mode Factory setting Source item shown in text is indicated in magenta colorWhen other than Auto is selected When Auto is selectedFix it Submenu itemLoosen the two screws with a flat-end screwdriver Replacing the Light-Source LampInsert the new lamp unit fully inside and fasten the screws Fasten the two screws with a flat-end screwdriverHandle Lamp unit Turn on the Main Power switch to go into stand-by mode Resetting the Lamp Use TimeProjector’s button At the same time for six seconds or moreTurn off the Main Power switch Cleaning and Replacing the FilterClean the filter Reinstall the filterTroubleshooting Maintenance Specifications AV in AV in inputComputer in Computer input Other DTV-format signals Outside dimensionsTop FrontTerminal Pin assignment Specifications for terminalsRS-232C terminal Computer IN-1 PC / Computer OUT Terminal