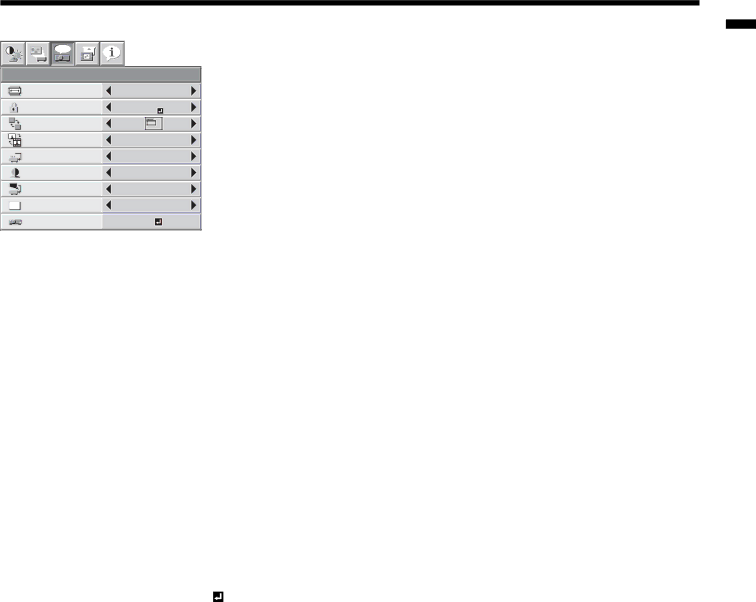
Mitsubishi Electronics XL650U user manual EN-25

Page 25

3. FEATURE menu


opt.


FEATURE


ASPECT

AUTO


PASSWORD

DISPLAY


FUNCTION

INPUT


MENU POSITION

1.


CINEMA MODE

AUTO

?

VIDEO SIGNAL

AUTO


SETUP

AUTO


SCART INPUT

OFF

A Ë

LANGUAGE

English


RESET ALL

OK

ENGLISH

ITEM

SETTING

FUNCTION

ASPECT

AUTO

Select to change the aspect ratio automatically depending on the input


16:9


signal. (Select this option for normal use.)


This option allows you to select the display position of squeezed (or


horizontally compressed) images stored on DVD discs. By pressing the


ENTER button, you can select the display position among CENTER,


UPPER, and LOWER.


REAL

Select to project images in their original size as input.

PASSWORD FUNCTION


Use to enable or cancel the password lock. See page 31 for details.

MENU POSITION

2 options

Use to change the position of the menu.

CINEMA MODE

AUTO

The film mode will be automatically activated when a film source signal is


input.


OFF

The film mode will not be activated.

VIDEO SIGNAL

8 options

When AUTO is selected, the appropriate video format is automatically


selected depending on the input signal. If the image isn’t displayed


correctly, select the desired video format manually.

SETUP

AUTO

Select to change the SETUP mode automatically.


OFF

Select to make black lighter.


3.75% / 7.5%

Select to make black thicker.


• When 7.5% is chosen, the brightness is decreased by the set-up can-


cel function for the U.S. Choose OFF when the image is dark.

SCART INPUT

ON / OFF

Choose ON when connecting the projector with a device equipped with


the SCART terminal that can output RGB signal. SCART terminal is used


mainly in Europe. Choose OFF normally. (Available only for the input signal


from the COMPUTER/COMPONENT VIDEO IN-1 terminal.)

LANGUAGE

10 languages

Use to select the language used in the menus.

RESET ALL

OK

Use to reset the settings of the menu (excluding IMAGE CAPTURE,


PASSWORD FUNCTION and LANGUAGE) to the factory setting values.

CINEMA MODE can be adjusted only when a TV60, TV50, 480i or 576i signal is being displayed.

When SCART INPUT is set to ON, nothing is output to the external monitor.

When SCART INPUT is set to ON, normal computer signals aren’t projected.

Use a SCART-BNC (or SCART-Mini D-SUB 15-pin) cable (option) when connecting this projector with an AV device equipped with the SCART terminal.

Some AV devices equipped with the SCART terminal aren’t compatible with this projector.

EN-25

Image 25
Contents XL650 XL550 EN-2 When using the projector in EuropeContents EN-4 Important safeguardsDo not look into the lens when it is operating Do not keep using the damaged projectorDo not unplug the power cord during op- eration Place of installationInserting the batteries into the remote control Checking accessoriesPreparing your projector Control area OverviewTerminal board EN-7Preparating your projector Remote controlBottom side EN-8Operational range of the remote control Using the remote controlReception angle EN-9Setting up the screen Setting up your projectorBasic setup Adjusting the projection angleEN-11 Wall screenFront projection, ceiling mounting Rear projectionWhen the aspect ratio of the screen is Setting up your projectorScreen size and projection distance EN-12Viewing computer images Connecting the projector to a computerEN-13 Viewing computer images Plugging the power cordEN-14 About DDCEN-15 Projecting imagesTo stop projecting When connecting to a notebook computerAV mute Auto Position buttonConnecting to a video player, etc Connecting the projector to video equipmentWhen a TV tuner or VCR is connected Viewing video imagesConnecting To video equipment having a DVI-D terminal Plugging in the power cordViewing video images Projector + DVD player or Hdtv decoderEN-19 Projecting imagesEN-20 Volume from the speakerHow to change the settings Setting the aspect ratioWhen projected images are distorted to a trapezoid EN-21EN-22 Menu operationAvailable settings in the menus How to set the menusEN-23 EN-24 EN-25 EN-26 Menu operationTo adjust the brightness Contrast and Brightness Adjusting projected imagesTo adjust the color Color and Tint To sharpen or soften the projected image SharpnessTo adjust the tone of white Color Temp Adjusting projected imagesAbout color temperature Color EnhancerEN-29 To adjust the vertical positionLPF Progressive filter Setting of the image displayed during startup or muting Advanced featuresEN-30 XL650UTo enable the password function Password functionTo cancel the password function EN-31EN-32 Advanced featuresExpand Picture in Picture PinPEN-33 Mouse remote controlOperation EN-34 Supervising and controlling by computerMajor functions ConnectionNormal condition IndicatorsAbnormal condition EN-35Replacing the lamp Interval of lamp replacementEN-36 When removing the lamp from the ceiling-mounted projector Reset of the lamp operation timeTo replace the lamp EN-37Cleaning of the air-filter MaintenanceCleaning of the projector and the ventilation slots Cleaning of the lensNo image appears on the screen Problem Solution TroubleshootingEN-39 Problem Solution TroubleshootingEN-40 Images are not displayed correctlyOthers Problem Solution Images are not displayed correctly Problem SolutionEN-41 Kensington LockSpecifications Replacement part Option/Not included in the boxEN-42 XGA85 EN-43EN-44 ConnectorsCOMPUTER/COMPONENT Video IN-1/IN-2 DVI-D Hdcp Mitsubishi Projector Contact Information