Enterasys Networks FN 100 manual Configuring Your Virtual Switch Settings, Update

Page 40

FN100 Virtual Switching

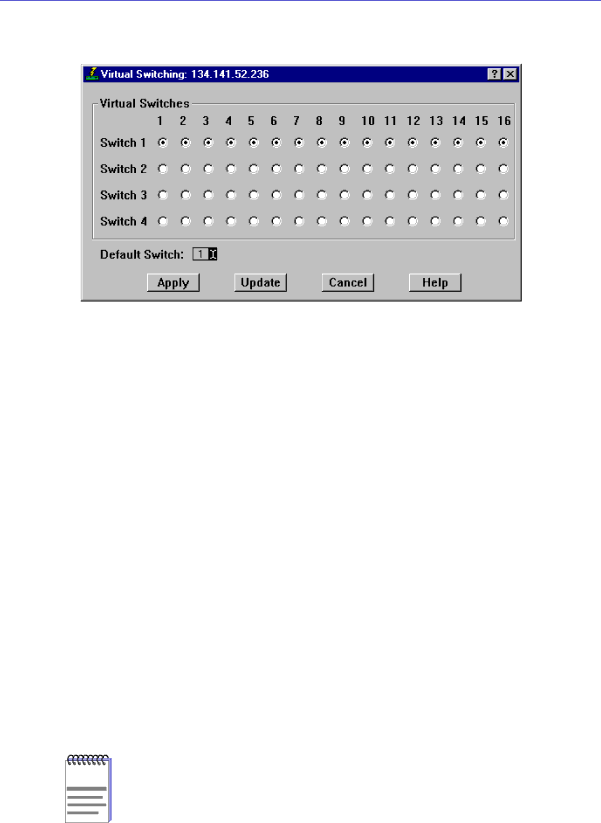
Figure 3-1. The Virtual Switching Window

The Virtual Switching window features a column of four radio buttons (one button for each virtual switch) for each of the FN100’s ports. The port indices are listed atop each column.

The Virtual Switching window also features:

Update

When the Update button is clicked, the FN100 will be queried for its virtual switch settings, and any changes that have occurred since the window was opened (or since the Update button was last clicked) will be reflected in the window.

Configuring Your Virtual Switch Settings

To assign the FN100’s ports to any of the four virtual switches:

1.For each port that you wish to assign to a virtual switch, click on the port’s radio button (in the column beneath the port’s index number) that corresponds to the desired switch setting.

2.Click Apply. The Virtual Switching window will update to reflect the new configuration.

NOTE

If you use the Virtual Switching window to assign ports to a virtual switch other than the one defined as the default switch, those ports will not be correctly represented in the Bridge Status window. This is because each virtual switch has a separate bridge ID and is treated as a separate bridge by Spanning Tree. To correctly view these ports in the Bridge Status window, you must change the default virtual switch setting using the Default Switch field.

3-2

Performing Virtual Switching

Image 40
Contents FN 100 User’s Guide Page Virus Disclaimer Page Restricted Rights Notice Page Contents Chapter Workgroup Configuration Chapter Using FN100 TrunkingIndex Using the FN100 User’s Guide IntroductionRelated Manuals Software ConventionsCommon FN100 Window Fields Device NameIP Address LocationUsing the Mouse MAC AddressPort Number UptimeUsing Window Buttons Getting Help Using On-line HelpGetting Help from the Global Technical Assistance Center Introduction Introduction Getting Help FN100 Chassis View Front Panel Information Viewing Chassis InformationConnection Status Boot Prom Port StatusFirmware TimeMenu Structure Device MenuPort Status Menu Help Menu Utilities MenuPort Menus Selecting a Port Status View FN100 Port Status DisplaysStatus Errors LoadMapping SpeedType Chassis Manager WindowPort Status Color Codes Viewing the Device Type Viewing Hardware TypesViewing the Port Description Using Device Find Source Address Managing the HubComponent Port InstanceViewing I/F Summary Information Index DescriptionPhysical Status Logical StatusRaw Counts Rate Viewing Interface DetailError AddressUnicast Non-UnicastMaking Sense of Detail Statistics Viewing Csmacd Statistics Receive ErrorsAlignment Transmission Errors Collision Errors Enabling and Disabling PortsTo enable or disable a bridge port FN100 Virtual Switching Performing Virtual SwitchingConfiguring Your Virtual Switch Settings UpdateDefining a Default Switch Change Default Switch WindowFN100 Virtual Switching Performing Virtual Switching Using FN100 Trunking Port Trunking Window StateRmt Bridge Id Last ErrorRmt IP Address Link Ordinal Link CountLast Change ClearEnabling and Disabling Trunking Using FN100 Trunking Port Trunking Window Workgroup Configuration Configuring a Workgroup Workgroup ConfigurationDeleting a Workgroup Workgroup Configuration Configuring a Workgroup Index Index-2