TAG 1000 manual Install Device Driver for Windows 2000/Windows XP, Installing Drivers

Page 40

MIL-BOOK™

OPERATORS MANUAL

NOTES:

The drivers may have been updated after this manual was published. For driver’s upgrade, please contact your dealer.

You can always find README or document files on the CD. These files contain the latest information from the software supplier. Please read the files together with this chapter.

This driver CD supports Windows 2000 and Windows XP only.

The available items may differ according to your computer model and Operating System.

NOTE:

If driver CD version is not the same as the one shown on the Operation Manual, please refer to the User Guide file on the driver CD for the latest driver installation action steps and sequence.

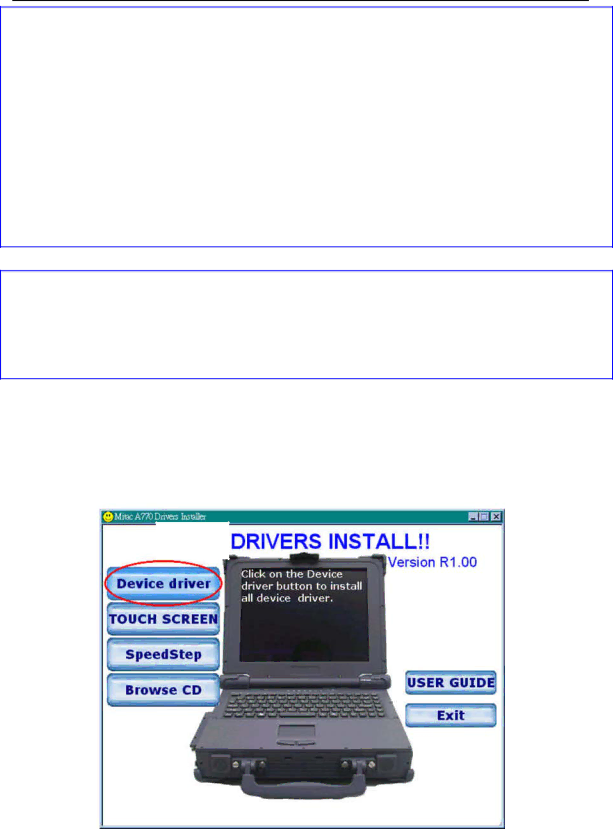
2.4.2 Install Device Driver for Windows 2000/Windows XP

To install the necessary driver, just click on the particular option and follow the onscreen instructions to continue and complete installation.

Figure 2-11 Installing Drivers

- 2-10 -

Image 40
Contents MIL-BOOK 1000 Series Notebook MIL-BOOK Operators Manual Iii Class B Regulations Page Preface Specifications reference only Viii Safety Summary Table of Contents Chapter Operation Xii Table of Figures System Configuration Standard ConfigurationIntroduction System DescriptionMIL-BOOK Unpacking Options and AccessoriesSystem Identification Features of the MIL-BOOK Feature Description I/O Access Door of the MIL-BOOKRear Components KeyboardKeyboard Keys Cursor Control Keys Additional Keyboard Functions Cursor Control KeysHot Key is Fn +F7 to toggle the RX/TX direction Status Row Indicators Fn+F9Status Row Descriptions AC Power AdapterStatus Row Battery Pack Low Battery IndicationBattery Charger Charge LED Indicator StatusConnections Serial PortVGA Port Parallel Port17 USB2.0 Port Power Port 23 1-5.5 Battery PackIrDA Port Replicator PortDiskette Drive and CD-ROM/DVD/COMBO /DVD-RW 10 Diskette Drive and CD-ROM/DVD/COMBO/DVD-RWOpening the Cover Opening and Closing the NotebookClosing the Cover Opening the PCMCIA, FDD, CD ROM/DVD/COMBO, DVD RW Door Connecting and Installing DevicesClosing the PCMCIA, FDD, CD ROM/DVD/COMBO, DVD RW Door External Power Adapter Serial and Parallel PortFloppy Disk Drive/CD-ROM/DVD/COMBO/DVD RW Removing a FDD/CD-ROM/DVD/COMBO /DVD RW ModulePcmcia Cards Loading and Remove DiskettesHard Disk Hard Disk Drive Module Removing a Pcmcia Cards Ieee Removing a Hard Disk Drive ModuleEMI Accessory Descriptions Removing Ieee 1394 PortInstalling Software Drivers First Time UseInstall Device Driver for Windows 2000/Windows XP 11 Installing DriversInstall Touch Screen Driver for Windows Device DriverInstall Touch Screen Driver for Windows XP 12 Installing Drivers14 Control Panel 17 Device Manager 18 Unknown Device Properties 20 Hardware Update Wizard 22 Finish Touch screen Utility Daily Operation Starting the ComputerUsing the Notebook in the Car Turning Off The NotebookUsing External Power Sources Using AC External AdapterRunning On Battery Power Charging the BatteriesSetup Configuration Utility Running Setup and Moving AroundMain Moving Around and Making SelectionsMain Menu Internal Num Lock Keyboard Backlight Geyserville Support IR Ports Security Menu 12 LPT PortSystem Password Boot Menu 16 Boot MenuExit Menu 17 Exit MenuBattery Maintenance CleaningConserving Power Changing the Battery Pack