TAG 1000 manual Features of the MIL-BOOK

Page 17

MIL-BOOK™

OPERATORS MANUAL

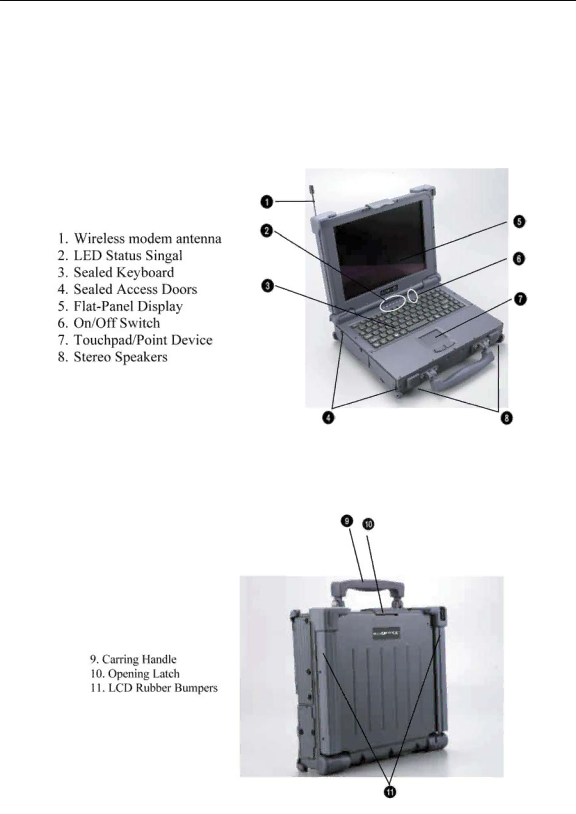
1.5Notebook Features

Items 1 through 18 identify the major features designed into the MIL-BOOK 1000 computer. A brief description will accompany each call-out to help you get stated and become familiar with your MIL-BOOK 1000. Some of the features described in this section might vary from your individual MIL-BOOK 1000 due to the different configuration and optional items available.

Figure 1-1 Features of the MIL-BOOK 1000

Figure 1-2 Features of the MIL-BOOK 1000

- 1-4 -

Image 17
Contents MIL-BOOK 1000 Series Notebook MIL-BOOK Operators Manual Iii Class B Regulations Page Preface Specifications reference only Viii Safety Summary Table of Contents Chapter Operation Xii Table of Figures Standard Configuration System ConfigurationIntroduction System DescriptionMIL-BOOK System Identification Options and AccessoriesUnpacking Features of the MIL-BOOK I/O Access Door of the MIL-BOOK Feature DescriptionKeyboard Rear ComponentsKeyboard Keys Cursor Control Keys Cursor Control Keys Additional Keyboard FunctionsHot Key is Fn +F7 to toggle the RX/TX direction Fn+F9 Status Row IndicatorsStatus Row AC Power AdapterStatus Row Descriptions Low Battery Indication Battery PackCharge LED Indicator Status Battery ChargerConnections Serial Port17 USB2.0 Port Parallel PortVGA Port 23 1-5.5 Battery Pack Power PortIrDA Port Replicator Port10 Diskette Drive and CD-ROM/DVD/COMBO/DVD-RW Diskette Drive and CD-ROM/DVD/COMBO /DVD-RWClosing the Cover Opening and Closing the NotebookOpening the Cover Closing the PCMCIA, FDD, CD ROM/DVD/COMBO, DVD RW Door Connecting and Installing DevicesOpening the PCMCIA, FDD, CD ROM/DVD/COMBO, DVD RW Door Serial and Parallel Port External Power AdapterRemoving a FDD/CD-ROM/DVD/COMBO /DVD RW Module Floppy Disk Drive/CD-ROM/DVD/COMBO/DVD RWHard Disk Loading and Remove DiskettesPcmcia Cards Removing a Pcmcia Cards Hard Disk Drive ModuleRemoving a Hard Disk Drive Module IeeeRemoving Ieee 1394 Port EMI Accessory DescriptionsFirst Time Use Installing Software Drivers11 Installing Drivers Install Device Driver for Windows 2000/Windows XPDevice Driver Install Touch Screen Driver for Windows12 Installing Drivers Install Touch Screen Driver for Windows XP14 Control Panel 17 Device Manager 18 Unknown Device Properties 20 Hardware Update Wizard 22 Finish Touch screen Utility Starting the Computer Daily OperationTurning Off The Notebook Using the Notebook in the CarUsing AC External Adapter Using External Power SourcesCharging the Batteries Running On Battery PowerRunning Setup and Moving Around Setup Configuration UtilityMoving Around and Making Selections MainMain Menu Internal Num Lock Keyboard Backlight Geyserville Support IR Ports 12 LPT Port Security MenuSystem Password 16 Boot Menu Boot Menu17 Exit Menu Exit MenuCleaning Battery MaintenanceConserving Power Changing the Battery Pack