Toshiba TDP-P8 manual Remote Control, Front Rear

Page 18

User Controls (Continued)
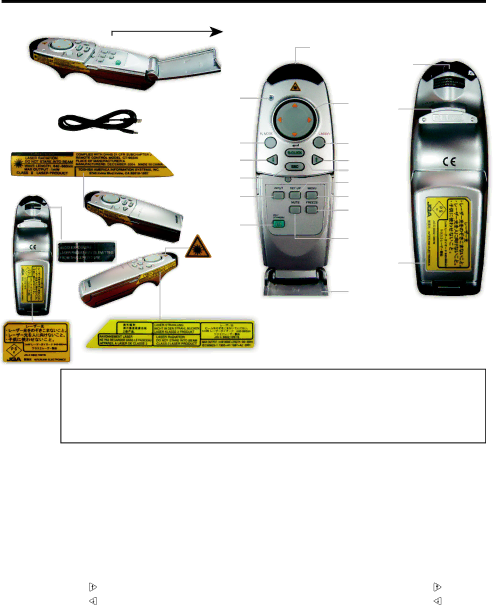


Remote Control


Front


Rear


Remote control transmitter


Laser emitte

Mouse remote control receiver

(5)

(8)

(15)


CAUTION Label (LASER)

(12)

(9)


(11)

(10)


(7)

(1)


Remote Control

(3)


(6)

(2)


(13)


(4)


(14)


Battery


ASER WARNING

cover

Control

button cover

CAUTION Label (LASER)

CAUTION Label

(LASER)CAUTION

Do not look into the laser light source of the remote control or direct the laser pointer toward a person or a mirror.

Handing and adjusting other than described here may lead to dangerous exposure to laser.

Name

: Main Function


(1)

ENTER button

: Accepts the selected mode.


(2)

MENU button

: Displays menus.


(3)

Set up

: Set up image and mode.


(4)

ON/STANDBY button

: Turns the power on/off (standby).


(5)

Transmission indicator

: Lights when remote control transmitting.


(6)

INPUT button

: Selects input.


(7)

ESC

: Quit the current screen.


(8)

Selection button

: Menu selections and adjustments,etc.


(9)

LASER button

: Displays laser point.

button.

(10)

button

: This control functions as a computer’s

(11)

button

: This control functions as a computer’s

button.

(12)

PJ MODE button

: Switches remote control mode.


(13)

FREEZE button

: Pauses image.


(14)

MUTE button

: Cuts off the picture.


(15)

L-CLICK button

: Left button click of remote control mouse.

19

Image 18
Contents Safety Precautions Model Name TDP- P8 USA onlyPage Source of Light Important Safety InstructionsPower Sources VentilationHeat Power-Cord ProtectionCleaning Water and MoistureImportant Safety Instructions Accessories Damage Requiring ServiceServicing Safety Check Important Safety InstructionsReplacement Parts Do not use the product Closed installation statePlace and Manner of Installation Power Supply Cord SelectionImportant Precautions Save Original Packing MaterialsImportant Precautions Exemption ClausesAvoid Volatile Liquid Disposal Other Cautions and InformationsCopyrights TrademarksRemote Control Batteries Table of Contents Package Overview Installing Acrobat ReaderIntroduction Viewing the manualProduct Overview Main Unit Control Panel Connection Ports Control Panel & Remote Control User ControlsRemote Control Front RearPreparing and using the remote control Loading dry-cell batteries into Remote controlOperating the remote control Switching operation mode Switching the remote control operation modeOperating a computer using the remote control Installation Connecting the ProjectorTurning the power on and off Turning the power on Press the ON/STANDBY buttonTurning the power off Press the ON/STANDBY button Press the ON/STANDBY button againAdjusting the Projected Image Adjusting the Projector Image HeightAdjusting the Projector Zoom / Focus Adjusting Projection Image SizeAdjusting the screen size and focus Press the Menu Using the menusHow to use the menus ButtonUsing the menu Image adjustment menuDisplay setting menu Screen sizeBlue Default setting menu Manual adjustments and settings Displaying Information Status display Problem Partial, scrolling or incorrectly displayed image Trouble shootingProblem No image appears on screen AppendicesProblem Image is unstable or flickering Problem Image has vertical flickering barProblem Image is reversed Problem Image is out of focusProblem The image is stretched when displaying 16 9 DVD Problem Lamp burns out or makes a popping soundTo replace the lamp module, reverse the previous steps Lamp Replacing ProcedureReplacing the lamp Used LampsAppendices Computer Compatibility Analog RemarkSpecifications List of general specificationsConnection terminal When the lamp is broken About LampAbout Lamp Lamp replacement Lens cleaningMain unit cleaning