Toshiba TDP-P8 manual Using the menu, Image adjustment menu

Page 29

Using the menu (Continued)

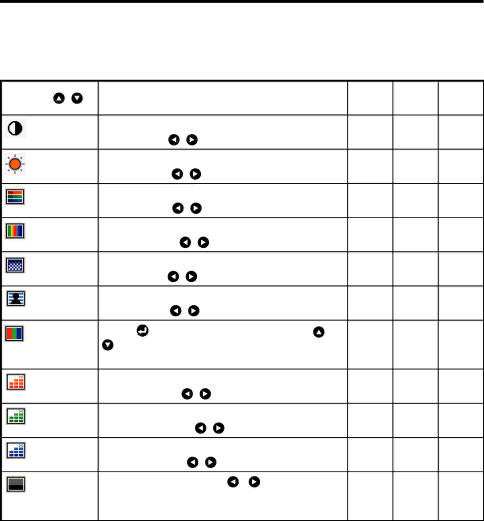
The image adjustment menu

Use this menu to adjust image-related items.

Items that can be adjusted are marked with “Yes”, and those that cannot are marked with “No”.

Item


Description

Computer

Y/PB/PR

Video


S-video


Contrast

Adjust the image contrast.

Yes

Yes

Yes


Lower

Higher


Brightness

Adjust the brightness of the image.

Yes

Yes

Yes


Darker

Brighter


Color

Adjust the color of the image.

No

Yes

Yes


Lighter

Deeper


Tint *1

Adjust the tint of the image color.

No

No

Yes


Reddish

Greenish


Sharpness

Adjust the sharpness of the image.

No

Yes

Yes


Softer

Sharper


Noise

Set the function to reduce screen noise.

No

Yes

Yes

reduction

On (Enable)

Off (Disable)


Picture

Press

. Toggle the picture mode with /

Yes

No

No

mode

Bright/True color


R-level

Adjust red of the image color.

Yes

Yes

Yes


Less red

More red


G-level

Adjust green of the image color.

Yes

Yes

Yes


Less green

More green


B-level

Adjust blue of the image color.

Yes

Yes

Yes


Less blue

More blue


NTSC

Set the black level with / button.

No

No

Yes

mode*1

US:

NTSC (US) mode


Japan:

NTSC (JAPAN) mode


*1: [Tint] and [NTSC mode] can be displayed and adjusted only when the video signal is set to [NTSC] and [NTSC4.43] . (NTSC mode is set to JAPAN when the language is set to Japanese. It is set to US for other languages.)

30

Image 29
Contents Model Name TDP- P8 USA only Safety PrecautionsPage Power Sources Important Safety InstructionsSource of Light VentilationCleaning Power-Cord ProtectionHeat Water and MoistureImportant Safety Instructions Servicing AccessoriesDamage Requiring Service Replacement Parts Important Safety InstructionsSafety Check Do not use the product Closed installation stateImportant Precautions Power Supply Cord SelectionPlace and Manner of Installation Save Original Packing MaterialsAvoid Volatile Liquid Important PrecautionsExemption Clauses Copyrights Other Cautions and InformationsDisposal TrademarksRemote Control Batteries Table of Contents Introduction Installing Acrobat ReaderPackage Overview Viewing the manualMain Unit Product OverviewControl Panel Connection Ports User Controls Control Panel & Remote ControlFront Rear Remote ControlOperating the remote control Preparing and using the remote controlLoading dry-cell batteries into Remote control Switching the remote control operation mode Switching operation modeOperating a computer using the remote control Connecting the Projector InstallationTurning the power on Press the ON/STANDBY button Turning the power on and offPress the ON/STANDBY button again Turning the power off Press the ON/STANDBY buttonAdjusting the Projector Image Height Adjusting the Projected ImageAdjusting Projection Image Size Adjusting the Projector Zoom / FocusAdjusting the screen size and focus How to use the menus Using the menusPress the Menu ButtonImage adjustment menu Using the menuBlue Display setting menuScreen size Default setting menu Manual adjustments and settings Displaying Information Status display Problem No image appears on screen Trouble shootingProblem Partial, scrolling or incorrectly displayed image AppendicesProblem Image has vertical flickering bar Problem Image is unstable or flickeringProblem The image is stretched when displaying 16 9 DVD Problem Image is out of focusProblem Image is reversed Problem Lamp burns out or makes a popping soundReplacing the lamp Lamp Replacing ProcedureTo replace the lamp module, reverse the previous steps Used LampsAppendices Remark Computer Compatibility AnalogConnection terminal SpecificationsList of general specifications About Lamp When the lamp is brokenAbout Lamp Main unit cleaning Lamp replacementLens cleaning