Toshiba TDP-P8 manual Default setting menu

Page 31

Using the menu (Continued)

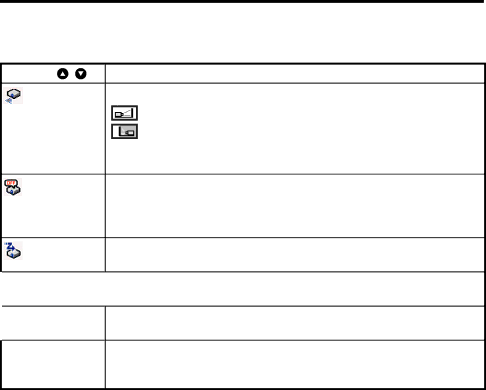
The default setting menu

This menu shows placement status and other settings.

Item

Projection mode

No signal power off

Auto input search

Lamp power [Note 1]

Fan mode [Note 2]

Reset all

Description

Sets projection mode in accordance with Placement Style.

Standard : The factory default setting.

Rear-Desktop:When you select this function, the projector reverses the image so you can project behind a translucent

screen.

Set the timer to wait for the power to be turned off after signal input stops.

Press . Switch with and

Off (not turned off)/1 min./5 min./10 min./30 min./60 min.

Set whether the input with signals is only selected or not.

On Off

Sets the lamp power.

Low Standard

Sets the cooling fan speed.

Standard High

Press

Resets all adjustments and settings to their factory settings.

Yes No

Notes

1:When Lamp power is set to Low, the screen becomes a little darker, but the cooling fan noise gets quieter.

2:Setting [Fan mode] to [High] increases the cooling fan speed. Set this option to use the projector, for example, at high altitude (over 1,500 meters above sea level).

32

Image 31
Contents Model Name TDP- P8 USA only Safety PrecautionsPage Ventilation Important Safety InstructionsPower Sources Source of LightWater and Moisture Power-Cord ProtectionCleaning HeatImportant Safety Instructions Damage Requiring Service AccessoriesServicing Do not use the product Closed installation state Important Safety InstructionsReplacement Parts Safety CheckSave Original Packing Materials Power Supply Cord SelectionImportant Precautions Place and Manner of InstallationExemption Clauses Important PrecautionsAvoid Volatile Liquid Trademarks Other Cautions and InformationsCopyrights DisposalRemote Control Batteries Table of Contents Viewing the manual Installing Acrobat ReaderIntroduction Package OverviewMain Unit Product OverviewControl Panel Connection Ports User Controls Control Panel & Remote ControlFront Rear Remote ControlLoading dry-cell batteries into Remote control Preparing and using the remote controlOperating the remote control Switching the remote control operation mode Switching operation modeOperating a computer using the remote control Connecting the Projector InstallationTurning the power on Press the ON/STANDBY button Turning the power on and offPress the ON/STANDBY button again Turning the power off Press the ON/STANDBY buttonAdjusting the Projector Image Height Adjusting the Projected ImageAdjusting Projection Image Size Adjusting the Projector Zoom / FocusAdjusting the screen size and focus Button Using the menusHow to use the menus Press the MenuImage adjustment menu Using the menuScreen size Display setting menuBlue Default setting menu Manual adjustments and settings Displaying Information Status display Appendices Trouble shootingProblem No image appears on screen Problem Partial, scrolling or incorrectly displayed imageProblem Image has vertical flickering bar Problem Image is unstable or flickeringProblem Lamp burns out or makes a popping sound Problem Image is out of focusProblem The image is stretched when displaying 16 9 DVD Problem Image is reversedUsed Lamps Lamp Replacing ProcedureReplacing the lamp To replace the lamp module, reverse the previous stepsAppendices Remark Computer Compatibility AnalogList of general specifications SpecificationsConnection terminal About Lamp When the lamp is brokenAbout Lamp Lens cleaning Lamp replacementMain unit cleaning