JVC HR-VP78U manual Setting DBS receiver output channel & brand, Turn on DBS receiver, Plus #

Page 19
DBS RECEIVER SET
OFF
PRESS (5,), THEN (OK)
PRESS (MENU) TO END
INITIAL SET
CLOCK SET
LANGUAGE ENGLISH GUIDE CHANNEL SET CABLE BOX SET
=DBS RECEIVER SET
SELECT WITH (5,) AND (OK)
PRESS (MENU) TO END


EN 19

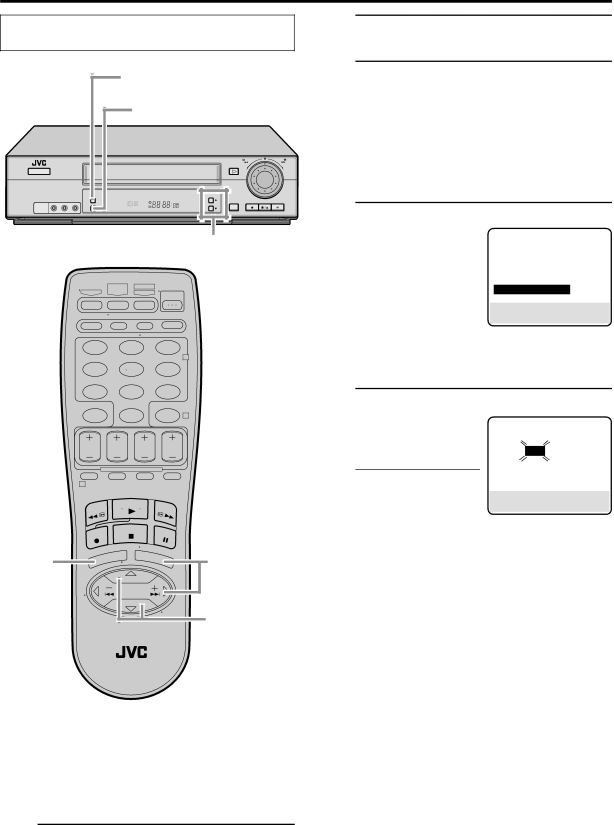
Turn on the VCR and the TV, and select the VCR


2Access Main Menu screen on VCR

channel 3 or 4 (or AV mode) on the TV.


3Press MENU.

2


Access Initial Set screen

34


On the front panel:


Press CH 5∞ to move the highlight bar (arrow) to


“INITIAL SET”, then press OK.


On the Remote:

REW

FF

Press SHUTTLE PLUS %fi to move the highlight

PLAY


bar (arrow) to “INITIAL SET”, then press OK or


4SHUTTLE PLUS #.

POWER


VIDEO (MONO)L—AUDIO—R


OK

SP EP

3CH


VCR

REC

STOP/EJECT PAUSE


SP/EP

Access DBS Receiver Set screen

5

1 2 3

2

On the front panel: Press CH 5∞ to move the highlight bar (arrow) to “DBS RECEIVER SET”, then press OK.

On the Remote:

Press SHUTTLE PLUS

%fi to move the highlight bar (arrow) to “DBS RECEIVER SET”, then press OK or SHUTTLE

4 5 6

7 8 9

0

4

5PLUS #.

Select DBS receiver output channel

Your selection depends on how your DBS receiver is connected to your VCR.

1

2 34

5

Setting DBS receiver output channel & brand

After installation, set the DBS receiver’s output channel and its brand correctly; otherwise, the Controller cannot work1correctly.

If your DBS receiver

is connected to your VCR’s ANT. IN terminal on the rear

Press CH 5∞ on the front panel or SHUTTLE PLUS %fi on the Remote until the channel number representing the DBS receiver’s output (CH3 or CH4) appears on the screen.

If your DBS receiver is connected to your VCR’s AUDIO/VIDEO IN connectors on the front panel Press CH 5∞ on the front panel or SHUTTLE PLUS %fi on the Remote until “ON F-1 (FRONT)” appears on the screen.

If your DBS receiver is connected to your VCR’s AUDIO/VIDEO IN connectors on the rear panel Press CH 5∞ on the front panel or SHUTTLE PLUS %fi on the Remote until “ON L-1 (REAR)” appears on the screen.

If you do not use a DBS receiver

Press CH 5∞ on the front panel or SHUTTLE PLUS %fi on the Remote until “OFF” appears on the screen.

CONTINUED ON NEXT PAGE \

Turn on DBS receiver

Select a channel other than channel 55, 100 or 205 on your DBS receiver.

Image 19
Contents HR-VP78U Telephone Number Dear CustomerGrounding or Polarization Power SourcesPower Lines Power Cord ProtectionReplacement Parts AccessoriesDamage Requiring Service CleaningContents Back of VCR Basic ConnectionsANT. Video OUTConnect VCR to TV Check contentsConnect VCR to power source Situate VCRDuring Initial Auto Clock Set During Auto Channel Set Plug & Play SettingPerform Plug & Play setup What to do if Plug & Play setting failedLanguage SettingSelect clock set Clock SettingPressAccessMENUMain Menu screen Access Initial Set screen Preparations1Select host channel Setting clock semiautomaticallySelect D.S.T. mode Set Auto Clock to on12 EN Setting clock manuallyPerform Auto Channel Set Tuner SettingAutomatically Auto Channel Set Setting channels Access Tuner Set screen14 EN Setting channels manuallyManual Channel Set Connect cable box to VCR Cable Box Control SettingSituate Controller Attach Controller Select cable box output channel Access Cable Box Set screen Turn on cable box Enter cable box brand Access Cable Box Brand Set screenController How to control the DBS receiver18 EN Connect DBS receiver to VCRSelect DBS receiver output channel Setting DBS receiver output channel & brandChannel 3 or 4 or AV mode on the TV 3Press Menu Turn on DBS receiver20 EN Access DBS Receiver Brand Set screenEnter DBS Receiver’s brand Start playback BasicPlayback Load a cassetteChecking tape position Basic Playback Features22 EN Changing display informationSelecting monitor sound Adjusting tracking conditionAutomatic operations after Locating beginning Locating beginning of timerAccess distant code 24 ENStart recording Basic RecordingSelect recording channel Set tape speedWatching one program while recording another Basic Recording Features26 EN Specifying recording lengthAccidental erasure prevention Showing on-screen displayDisplay VCR status on TV screen Erase on-screen displayRapidly Picture Search High-Speed Picture Search Special Effect Playback28 EN Locating particular scenePause during playback Viewing still pictureSkipping unwanted portions Viewing slow motion pictureEnter PlusCode number VCR Plus+ Timer ProgramingAccess VCR Plus+ screen 30 ENCheck program date Engage timer recording standby modeTo use the VCR while it is in timer recording standby mode Input receiving channel numberVCR Plus+ guide channel matching SetupVCR Plus+ 32 ENInput guide channel number Access Guide Channel Set screenTo Initial SET, then Press OK 34 EN Express Timer ProgramingCatv To timer-record daily Monday-Friday or weekly serialsDBS 36 EN Checking program settingsSelect program to modify Confirm overlapping programsOverlapping programs blink on the screen Useful Function Settings38 EN When this function is set to OFF When this function is set to onFor Example 40 ENVCR only Video OUT Pause This VCRTelevision Link Video42 EN PreventingConnection Edit To Or From AnotherCamcorder for playback Edit From Camcorder44 EN This VCR for recordingSelect Edit for Picture Control Select input mode on this VCRAccess Main Menu screen on this VCR Enable remote pause functionSet TV brand code TV Brand Setting46 EN Turn on the TVOperate cable box Cable Box Brand SettingTurn on the cable box Enter cable box brand codeEnter DBS receiver brand code DBS Receiver Brand Setting48 EN Turn on the DBS receiverTurn on VCR Remote Control CodeUnplug VCR Plug in VCR50 EN TroubleshootingTimer Recording 52 EN Other ProblemsWhat happens if the tape reaches its end during recording? Can the VCR indefinitely remain in still mode?List of terms 54 ENVCR PLUS+ Record Pause Front panel1Still Play Slow RecordRear panel1 56 EN78Tape speed indication 5496783 How to use the RemoteCompact VHS* TC-20 ST-C20 TC-30 ST-C30 TC-40 ST-C40 58 ENUsable cassettes Full-Size VHS 30 ST-30HOW to Locate Your JVC Service Center 60 EN Limited WarrantyMemo 62 EN Page HR-VP78U