JVC HR-E939EG specifications Engage RECORDER’S, Timer Mode, Access Showview Program Screen

Page 25

EN25

SP/LP


8

3

• • •

• • •


TIMER

TIMEADD 2

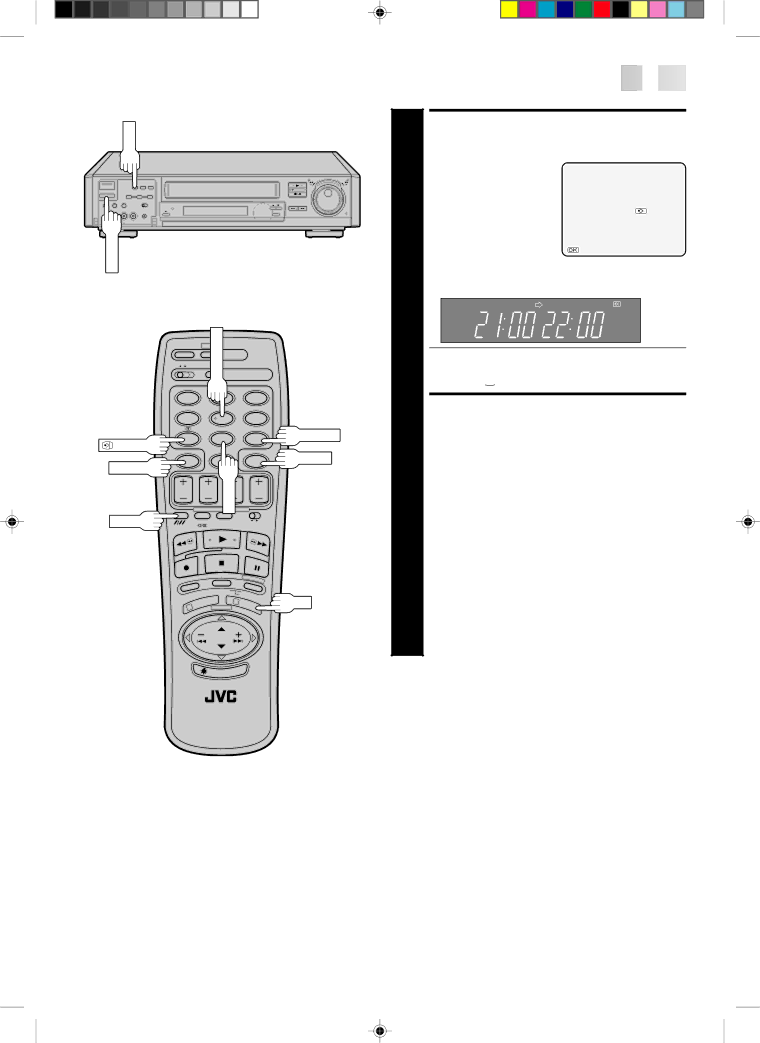
ACCESS SHOWVIEW PROGRAM SCREEN

Press OK, and the


– P1 –

ShowView Program screen

SHOWVIEW

12345678

appears (if you’re just

START

STOP

starting out, “P1” appears).

21 : 00

= 22 : 00


SP


ON


If the number you

DATE

TV PROG

entered is invalid,

25. 12

1

“ERROR” appears. Press

:OK


ARD


CANCEL and input a


valid ShowView number.


The front display panel looks like this:

SP

If you are using the Illumi-Guide feature, OK blinks.

If you’re not receiving PDC/VPS, press NUMBER key “7” to set to "OFF" (pg. 28).


1

2

3


4

5

6


:PDC/VPS

7

8

9

WEEKLY


CANCEL


0


TIMER


DAILY


SP/LP


3

OK

1

4

SET TAPE SPEED

Press SP/LP to set the tape speed.


RETURN TO NORMAL

5

SCREEN

Press OK.

Repeat steps 15for each additional programme.


ENGAGE RECORDER’S

6

TIMER MODE

Press TIMER.

NOTE:

For safety, your recorder disables all other functions while in the Timer mode. If you want to use the recorder but its Timer mode is engaged, press TIMER and all other functions are operable.

To re-engage the timer, press TIMER.

To Delay The Stop Time . . .

. . . press ADD TIME (NUMBER Key "5") after pressing OK in step 3. Each time you press, the Stop time is delayed by 5 minutes (meaning that 5 minutes of recording time is added). You can easily compensate for anticipated programme schedule delays this way.

To Timer-Record Weekly Or Daily Serials . . .

. . . after pressing OK in step 3, press WEEKLY (NUMBER key “9”) for weekly serials or DAILY (NUMBER key “8”) for daily serials (Monday–Friday).

You can programme this recorder to timer-record as many as 8 programmes. If you try to programme the recorder to record a ninth, "PROGRAM FULL" appears on screen and "FULL" appears on the front display panel. To record the extra programme, you must first cancel any unnecessary programmes (pg. 28).

Image 25
Contents HR-E939EG/EH For Italy Safety PrecautionsDo not place the recorder Connections BasicTune The TV To Your Video Recorder Connecting Using a Decoder Tuner Set Access Language ScreenSelect Language Select CountryFine tuning is performed automatically when you select EN Initial SettingsView Confirmation Screen Return to Normal ScreenTurn the Recorder on Clock SetPreparation Return to Normal SET ClockScreen SET Date and TimeLoad a Cassette PlaybackPoint Start PlaybackPause During Playback Playback FeaturesActivate HIGH-SPEED Search Override Automatic Tracking Adjust TrackingManually Activate Instant ReviewStop Scene Finder Activate Scene FinderActivate Index Search EN PlaybackRE-SUPPLY Power SET A/B Code SwitchActivate Counter MemoryTime Scan Shuttle Indicator Time Scan Indicator Audio signal during TimeScanTimeScan Variable-Speed Search/ Reverse PlaySpeed SP Speed LP TimeScanAudio output Recording S.T. Picture Access Mode SelectSystem Confirm B.E.S.T. StatusPlayback Close Mode Select ENABLE/DISABLEOn-Screen Displays ON-SCREEN DisplayEN Recording Recording FeaturesReceiving Stereo And Bilin- gual Programmes To Record Stereo And Bilin- gual Programmes A2Engage ITR Mode Reset CounterLevel Select Channel to Watch EN Timer Recording Access CH. SET Mode Menu Screen Information On ShowView Make List of Stored Station Names Channel PositionsEnter Showview Number When Using a Satellite TunerClose Menu PreparationEN Timer RECORDINGcont ShowView Timer RecordingAccess Timer PROGRAM- Ming Screen When Using The Illumi-Guide FeatureAccess Showview Program Screen Timer ModeEngage RECORDER’S Access Programme Screen Regular Timer ProgrammingEnter Programme Start Time Time Engage RECORDER’S Timer ModeEnter Channel Position ScreenTimer Access Programme ScreenRevise Programme IN- Formation Engage Auto SP/LPRemote Control EN Multi-Brand Remote ControlSET TV Brand Code TRY Operating TVEdit To Or From Another Video Recorder SET Recording DECK’S Input ModeMake Connections Start Source PlayerEdit From a Camcorder SET RECORDER’S Input ModeStart Camcorder Start RecorderSemble Editing Random AsStart R.A. Edit Locate EDIT-OUT PointEND R.A. Edit Prepare Recording DeckReset the Counter SET Input ModeLocate Start Point Locate END PointStart Editing Engage Insert EditingEND Insert Editing Engage Audio Dubbing Audio DubbingStart Dubbing END Audio DubbingPause Select Mode Access CH. SET ModeMenu Select PositionAccess Manual CH. SET Switch StationsPerform Tuning Select NEW StationStation Name Clear Troubleshooting E NOubleshooting Timer againQuestions and Answer S Ä remain lit on the display panel. Is there a problem?44 EN Open the lid to access covered connectors and buttonsRear View Indicator will blink during turbo searchHow To Use Installing BatteriesIndex E RSpeci Fications EN RCA connectors VideoMaximum recording time HR-E939EG/EH