Onkyo DR-S2.0 instruction manual Precautions, For British model

Page 3

21.

Replacement Parts – When replacement parts are required, be


sure the service technician has used replacement parts


specified by the manufacturer or have the same characteristics


as the original part. Unauthorized substitutions may result in


fire, electric shock, or other hazards.

22.

Safety Check – Upon completion of any service or repairs to


the appliance, ask the service technician to perform safety


checks to determine that the appliance is in proper operation


condition.

23.

Wall or Ceiling Mounting – The appliance should be mounted


to a wall or ceiling only as recommended by the manufacturer.
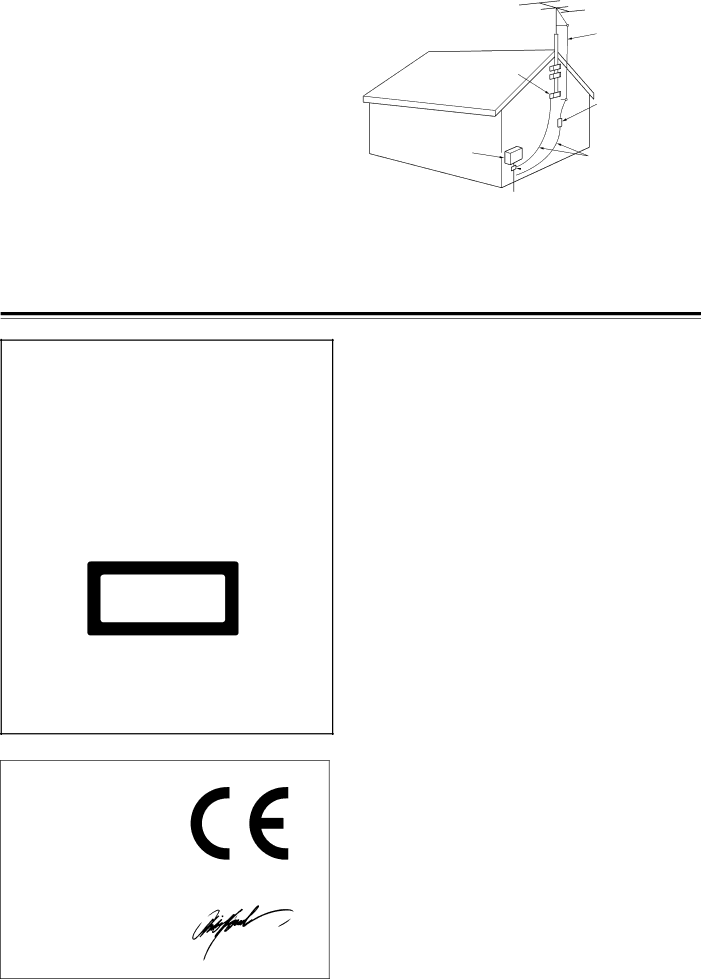
FIGURE 1:

EXAMPLE OF ANTENNA (AERIAL) GROUNDING AS PER NATIONAL ELECTRICAL CODE, ANSI/NFPA 70

ANTENNA

LEAD IN

WIRE

GROUND

CLAMP

24. Heat – The appliance should be situated away from heat

sources such as radiators, heat registers, stoves, or other

appliances (including amplifiers) that produce heat.

ELECTRIC

SERVICE EQUIPMENT

ANTENNA DISCHARGE UNIT (NEC SECTION 810-20)

GROUNDING CONDUCTORS (NEC SECTION 810-21)

GROUND CLAMPS

POWER SERVICE GROUNDING

ELECTRODE SYSTEM

(NEC ART 250, PART H)

NEC – NATIONAL ELECTRICAL CODE

S2898A

Precautions

CAUTION:

VISIBLE LASER RADIATION WHEN OPEN AND INTERLOCK FAILED OR DEFEATED. DO NOT STARE INTO BEAM.

CAUTION:

THIS PRODUCT UTILIZES A LASER. USE OF CONTROLS OR ADJUSTMENTS OR PERFORMANCE OF PROCEDURES OTHER THAN THOSE SPECIFIED HEREIN MAY RESULT IN HAZARDOUS RADIATION EXPOSURE.

This unit contains a semiconductor laser system and is classified as a “CLASS 1 LASER PRODUCT.” So, to use this model properly, read this Instruction Manual carefully. In case of any trouble, please contact the store where you purchased the unit. To prevent being exposed to the laser beam, do not try to open the enclosure.

“CLASS 1 LASER

PRODUCT”

This label on the rear panel states that:

1.This unit is a CLASS 1 LASER PRODUCT and employs a laser inside the cabinet.

2.To prevent the laser from being exposed, do not remove the cover. Refer servicing to qualified personnel.

For British model

Replacement and mounting of an AC plug on the power supply cord of this unit should be performed only by qualified service personnel.

IMPORTANT

The wires in the mains lead are coloured in accordance with the following code:

Blue : Neutral

Brown : Live

As the colours of the wires in the mains lead of this apparatus may not correspond with the coloured markings identifying the terminals in your plug, proceed as follows:

The wire which is coloured blue must be connected to the terminal which is marked with the letter N or coloured black.

The wire which is coloured brown must be connected to the terminal which is marked with the letter L or coloured red.

IMPORTANT

A 5 ampere fuse is fitted in this plug. Should the fuse need to be replaced, please ensure that the replacement fuse has a rating of 5 amperes and that it is approved by ASTA or BSI to BS1362. Check for the ASTA mark or the BSI mark on the body of the fuse.

IF THE FITTED MOULDED PLUG IS UNSUITABLE FOR THE SOCKET OUTLET IN YOUR HOME THEN THE FUSE SHOULD BE REMOVED AND THE PLUG CUT OFF AND DISPOSED OF SAFELY. THERE IS A DANGER OF SEVERE ELECTRICAL SHOCK IF THE CUT OFF PLUG IS INSERTED INTO ANY 13 AMPERE SOCKET.

If in any doubt, please consult a qualified electrician.

Declaration of Conformity

We, ONKYO EUROPE ELECTRONICS GmbH

INDUSTRIESTRASSE 20 82110 GERMERING, GERMANY

declare in own responsibility, that the ONKYO product described in this instruction manual is in compliance with the corresponding technical standards such as EN60065, EN55013, EN55020 and EN61000-3-2, -3-3 (or EN60555-2, -3)

GERMERING, GERMANY

A.HORIUCHI

ONKYO EUROPE ELECTRONICS GmbH

3

Image 3
Contents DVD Receiver ContentsAvis Important SafeguardsFor British model PrecautionsAbout This Manual Warranty ClaimPower Regional Restriction Codes Region NumberTable of Contents Memory Preservation FeaturesReceiver Features DVD/CD Player FeaturesSupplied Accessories Switching the remote controller function modes Preparing the Remote ControllerUsing the Remote Controller Pointing the remote controller in the right directionAbout Video CDs Cleaning DiscsPlayable Discs Storing DiscsConnecting to a TV CD Recorder, etc Connecting to Audio/Video EquipmentAbout the Video 1 and Video 2 jacks/connectors MD Recorder, DATPositioning Speakers Speaker Connecting SpeakersConnecting to Speakers a Front speakers How to connect to the speaker connectorsAdjusting the position of the AM indoor antenna aerial Connecting the Supplied FM and AM Indoor Antennas AerialsConnecting an AM Outdoor Antenna Aerial Adjusting the position of the FM indoor antenna aerialDirectional linkage type splitter To DVD Receiver Connecting an FM Outdoor Antenna AerialDirectional Iinkage Onkyo cassette tape deckStandby indicator goes off Connecting the Power/Turning on the DVD ReceiverDVD Receiver enters standby mode Standby indicator lights upBefore operating the remote controller Speaker SetupSetting up the Speaker Configuration Setting the Subwoofer ModeSpeaker Setup Press CH SEL repeatedly to select Adjusting Each Speakers Relative Volume Balance Test ToneDown to adjust the volume level Press Test ToneBasic Playback Basic OperationTo pause playback still mode To remove the discTo stop playback Playing DVD Videos / Video CDs / Audio CDs To play in fast forward or fast reverseTo play in slow-motion Locating a Specific Title/Chapter/Track/Location Locating a title using the title menuLocating a specific track directly Playing DVD Videos/VIDEO CDs/Audio CDsEntering the time Locating a specific chapter or trackConsecutively Locating a specific location byTuning Manually Presetting Radio StationsListening to the Radio Various Functions While Listening to Radio Programs Selecting Preset StationsErasing a Preset Station Receiving RDSEnjoying the picture with the sound of another source Playing the Connected SourceVarious Functions While Playing the Connected Source About digital soundMD recorder Press Mode TV firstPress Mode TA/MD first Operate your TVAdjusting the Volume Turning on/off the Speakers A/ Speakers B SystemsMuting the Sound Controlling the Brightness Lights on the DVD Receiver Listening Through HeadphonesUsing the Sleep Timer Canceling the Sleep TimerOnkyo’s original Digital Signal Processing DSP modes Enjoying the Sound EffectsDolby PRO Logic Surround Listening Modes Theater-Dimensional T-D* modeImportance of the speaker setup Input Sources and AvailableEnjoying the Sound Effects Choosing Theater-Dimensional ModeAdjusting Theater-Dimensional mode Activating Theater-Dimensional modePress Stereo Using Dolby Pro Logic Onkyo’s Original DSP ModesStereo indicator lights up Changing the Sound to StereoAdjusting Each Speakers Relative Volume Balance Temporarily Saving the adjusted valuesRemote controller Press Test TONE. only Using the Late NIGHT/FRONT Effect Function Boosting the Super Bass Sounds/High Frequency SoundsPress Late Night Playing Repeatedly Advanced DVD/VIDEO CD/Audio CD OperationTo resume normal playback To program during playback Setting Titles, Chapters, or Tracks in a Favorite OrderTo change or cancel the entered program Playing in a Favorite OrderPlaying in Random Order You can magnify areas within a picture Zooming in on a PictureZooming in on a Picture and Shifting the Zoom Point Press Zoom during normal, slow, or still playbackTo turn off the angle number display To disable the angle icon display on the TVSelecting the Camera Angle Changing the Camera AngleTo turn off the subtitle setting display Turning Subtitles on/offSelecting a Subtitle Language About recording systems Selecting a Playback Audio SettingTo turn off the audio setting display Selecting Sound Channels on Video CDsChanging the Sound Signal Conversion Method Temporarily Changing the Sound Signal Conversion MethodSound from the speakers Symbols in the tablesReproducing MPEG2 Sounds from DVD Videos Output sound conversion tablesWhen the disc is inserted in the DVD Receiver Remote controller Press Display while the disc is stoppedDVD video Video CD/Audio CD DVD video e.g Press Display during playbackTo return to the previously displayed menu Setting StepsPress Setup Press / to change the setting, the press EnterCategory Symbol Menu item Related to Details Reference Table of the Setting MenuCustomizing the Function Settings Explanation of Each Item in the Language CategoryChoosing Another Language TV Shape Explanation of Each Item in the Picture Category96k Sound Normally use this settingExplanation of Each Item in the Audio Category BitstreamOSD Background Color Further Steps When you selectExplanation of Each Item in the Operation Category To change the parental lock levelTo change your 4-digit security code Title StopTable of Languages and Their Abbreviations Table of LanguagesRecording Using the Connected Equipment Basic Recording ProcedureAdditional Operation Recording Using the Connected Equipment CH + Programming the Remote ControllerSEND/LEARN indicator Before programming the remote controllerPress Mode TV Programming the Remote Controller to Your TVUsing the Programmed Buttons Press and hold Mode TV, then press Search twiceSymptoms Causes Remedies Pages TroubleshootingTroubleshooting Symptoms Causes RemediesTuner Remote controller Recording Specifications Index to Parts and Controls Front panel and its displayDisplay Remote controller T0008-1 Onkyo Europe Electronics GmbH