Kodak 4F3882 manual Using the Viewer, Global Options, To Quick Verify

Page 60

V i e w i n g a n d C u s t o m i z i n g L o o k s

Using the Viewer

The Viewer appears at full screen size with the image at the top and a toolbar at the bottom. To enlarge the viewing area, you can hide the toolbar.

To open What’s This topics in the Viewer, right-click (WINDOWS, IRIX, LINUX) or Control + click (MACINTOSH) an item in the toolbar.

Global Options

At the right-hand side of the toolbar are common Viewer options available at all times.

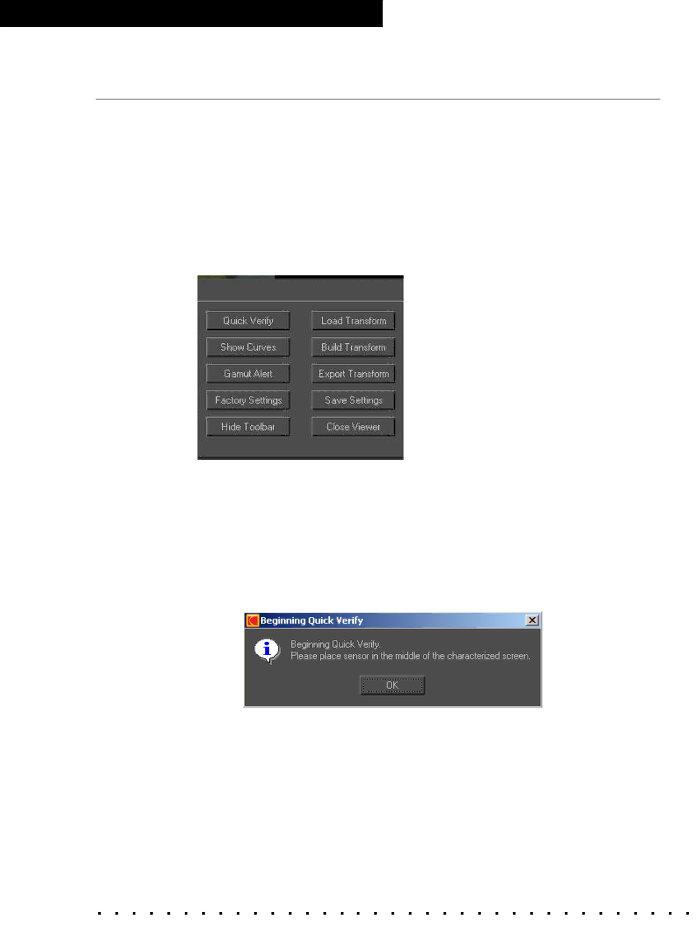
Quick Verify: Click to run a short verification to determine if your monitor is still within calibration. This process reads a few color patches and assesses against your original calibration aims. To perform a full verification, see “Verifying” on page 67.

To Quick Verify:

1)Click Quick Verify on the Viewer toolbar.

The Viewer becomes a black patch and the following window opens.

2) Position the sensor over the patch and click OK.

5 0

K O D A K D i s p l a y M a n a g e r S y s t e m V 4 . 1 U s e r ’ s G u i d e

Image 60
Contents Display Manager system User guide Page Display Manager System USER’S Guide Page AB O U T T H I S BO O K Page TA B L E O F CO N T E N T S Calibration Verifying Appendix C Regulatory Information T RO D U C T I O N Types of Licenses Print Film Edition VISION2 HD SystemHow it Works CalibrationCharacterization Viewing and Customizing a Look VerificationMain Window Enable Cable USB Cable ECC Supported HardwareGeneric Monitor Support Supported DisplaysSupported Sensors Windows MAC OS Irix OS Linux OSGetting Help Install the Software Windows and Macintosh Operating System InstallationTo install on a Windows or Macintosh Operating System Irix Installation To install on an Irix systemGunzip KDMV4Irix.tar.gz Tar xf KDMV4Irix.tar Linux Installation To install on a Linux systemConnect the Hardware To connect the enable cable Rite SensorsTo position the sensor during calibration Rite Monitor Optimizer DTP92+EK Do not apply a cleanser to the suction cup To connect the sensorSequel Sensors Sequel Chroma 4/C USB Sensor for CRT MonitorsSequel Chroma 4/L USB Sensor Sequel Chroma 4/C Serial Sensor for CRT Monitors Go to Options Setup Click Type and select PhotoResearch PR-650Click Type and select Minolta CS-100A Obtain Your License To purchase a licenseManager System/Licenses Open the Display Manager System Renewing Your LicensePage Be FO R E CA L I B R a T I N G Preparing the Viewing Environment and MonitorSetting the Options Print Film Calibration Setup Projector AimDisplay Aim Display Automatic CalibrationVideo Calibration Setup Aim SettingsWhite Patch Dark PatchSensor Setup Tolerances SetupDisplay Setup Use Video Calibration SettingsTiming Setup Directories SetupSaving and Loading Settings To load a customized .ini file Go to File Load SettingsTo save all settings at once Go to File Save Settings To create a customized .ini fileCA L I B R a T I O N Automatic CalibrationCalibration Procedure To automatically calibrate a monitorIf you are prompted to perform a Dark Gain Correction L i b r a t i o n L i b r a t i o n Monitor Evaluation To evaluate your monitorManual Calibration To manually calibrate a monitor or HD/SD displayL i b r a t i o n Click Measure Primaries Click Measure Once or Measure ContinuousProceed to Characterization on Page CH a R a C T E R I Z a T I O N Automatic CharacterizationTo automatically characterize your monitor A r a c t e r i z a t i o n If characterization failed, see Characterization Failure on Manual Characterization To manually characterize When you are finished, click File Save Characterization File Editing a Characterization Table Shortcut Keys for the Assistant TaskVI E W I N G a N D CU S T O M I Z I N G LO O K S Opening the ViewerTo open the Viewer Using the Viewer Global OptionsTo Quick Verify Chart with the results is displayed E w i n g a n d C u s t o m i z i n g L o o k s Playback Controls Toolbar Information Pop-up OptionsViewer Shortcut Keys Task KeyCreating a Print Film Look To create a print film lookCreating a Video Look To create a video lookLoading an Image Framing Settings Advanced OptionsGamut Remap Settings Mode DescriptionTransform Bit Depth Surround Compensation Work in a dark environment whenever possibleRecorder Compensation Example file neutral-based compensationExample file neutral- and color-based compensation On the Advanced tab, click Recorder CompensationTransform Rescale Page Verifying the Monitor Setup To verify monitor setupVE R I F Y I N G Verification window opens when the correction is complete Data verify Verifying the Print Film Look To verify the print film lookVerification window opens when the correction is complete Ve r i f y i n g VerifySetupResults or VerifyPrintFilmResults Verification LogsMonitor Setup Verification Log TRO U B L E S H O O T I N G Calibration Failure Characterization Failure Verification FailureDark Gain Correction Failure Sensor Does Not Adhere to Screen Sensor Needs to be ReplacedSensor Fails to Initialize USB Device Is Not RecognizedEnable Cable Does Not Recognize the Monitor License Has ExpiredLicense File Does Not Work Unable to Load an Image Unable to Load a TransformUnable to Build or Export a Transform Calibrate Icon Is Not AvailableProblem with the .ini File Imaging Product Cannot Find LUTMy 1D LUT Does Not Match my 3D LUT My Wide Color Gamut Encoded LUT Does Not Look CorrectClick the Troubleshooting tab Image Does Not Appear in the ViewerTr o u b l e s h o o t i n g Results Are Not as Expected Super Bright Capable Display will not Calibrate Difficulty Navigating the Online User’s GuideHot Links Paging Through the User’s Guide AP P E N D I X a SY S T E M RE Q U I R E M E N T S Windows Operating System Minimum RequirementsMAC OS Minimum Requirements Irix Operating System Minimum Requirements Linux Operating System Minimum RequirementsAdditional Software and Hardware Page AP P E N D I X B SH O R T C U T KEY S Display Manager System Shortcut KeysManual Characterization Assistant Shortcut Keys Viewer Shortcut Keys AP P E N D I X C RE G U L a T O R Y in FO R M a T I O N EU Weee GL O S S a R Y Temperature Options Setup windowDisplay mode Enable cableAssistant SPD See projector SPDVISION2 HD System See Kodak VISION2 HD System D EX D e Macintosh Rite Page Eastman Kodak Company