RCA Hollywood DV-Bridge manual Converting Analog to DV

Page 47

IMPORTANT: Make sure that the camcorder or VCR and monitor are set up properly to receive a video signal. It may be necessary to set a camcorder to VTR mode, while a VCR or monitor might need to be set to “Line In,” “L1,” “L2,” “Aux” or a similar channel. Or, if a monitor is connected to a VCR with a coaxial cable, you might need to set the monitor to channel 3 or 4. Check each device’s documentation for specific details.

Converting Analog to DV

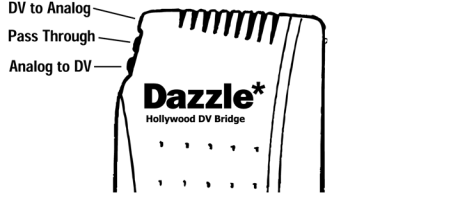
1.Use the Mode Selector button on the back of the Hollywood DV-Bridge to change the mode to Analog to DV.

The LED indicators on the front of the unit show the active mode (see the illustration below).

If you are using an analog camcorder as your input (source) device, put it into Video Tape Recorder mode. Cue the tape to the spot where you want to start playing.

If you are using a DV camcorder as your output (target) device, put it into Video Tape Recorder mode. Cue the tape to the spot where you want to start recording. Make sure you do not record over existing footage on the tape that you want to keep.

2.Press the Play button on the analog camcorder or VCR, and press the Record button on the DV camcorder or VCR.

Hollywood DV-Bridge User’s Guide • Using Hollywood DV-Bridge Without a Computer • Page 47

Image 47
Contents Dazzle Table of Contents Troubleshooting Need for Analog CongratulationsDV Advantage What’s Included Other Items You Might Need About This GuideHardware Overview Mode SelectionHollywood DV-Bridge User’s Guide Introduction Lanc Device Control Minimum System Requirements Getting StartedAdditional Requirements Software OverviewSoftware Installation Page Page Page Hardware Installation Page Capturing Video Connecting Analog Video InputHollywood DV-Bridge Connecting DV InputConnecting an Optional Preview Monitor Analog Camcorder or VCR Hollywood DV-Bridge Capturing Video Creating DVDs, VCDs and S-VCDs Editing VideoOutputting Video Connecting Analog Video OutputHollywood DV-Bridge Analog Camcorder or VCR DV VCR Connecting DV OutputAnalog or DV Output Configurations DV Output Configurations Outputting Video Using the Hollywood DV-Bridge With a Macintosh Installation Power Adapter Page Capturing Video Analog VCR, Camcorder, or TV Hollywood DV-Bridge Optional Preview Monitor Capturing Analog Video Editing Video Outputting Video Connecting an Optional Preview Monitor Hollywood DV-Bridge Outputting Analog Video Converting Analog Video to DV Using the Hollywood DV-Bridge Without a ComputerAnalog Device Input Optional Preview Monitor Analog Camcorder or VCR Optional Preview Monitor Converting Analog to DV Converting DV to Analog Video Hollywood DV-Bridge Analog Camcorder or Analog VCR Connecting an Optional Preview Monitor Converting DV to Analog Analog VCR, Camcorder, or TV Copying Analog to AnalogHollywood DV-Bridge Analog VCR or Camcorder Connecting an Optional Preview Monitor Copying Analog to Analog Hollywood DV-Bridge DV VCR or DV Camcorder Copying DV to DVConnecting an Optional Preview Monitor Analog Camcorder or VCR Optional Preview Monitor Copying DV to DV Frequently Asked Questions TroubleshootingHollywood DV-Bridge User’s Guide Troubleshooting Hollywood DV-Bridge User’s Guide Troubleshooting Dazzle Technical Resource Center Technical Support