Recording
Taking Still Images in Auto Mode
You can record without worrying about the setting details by using the au- to mode.
1Open the LCD monitor and select the still image mode. (Open the lens cover.)
●The still image mode icon appears.
2Check if the recording mode is Auto.
●If the mode is Manual, touch the G/H button.
The mode changes between Auto and Manual with every touch.
3Set the focus on the subject.
●When focused, the focus icon lights up in green.
4Take a still image.
●PHOTO lights up when a still image is being captured.
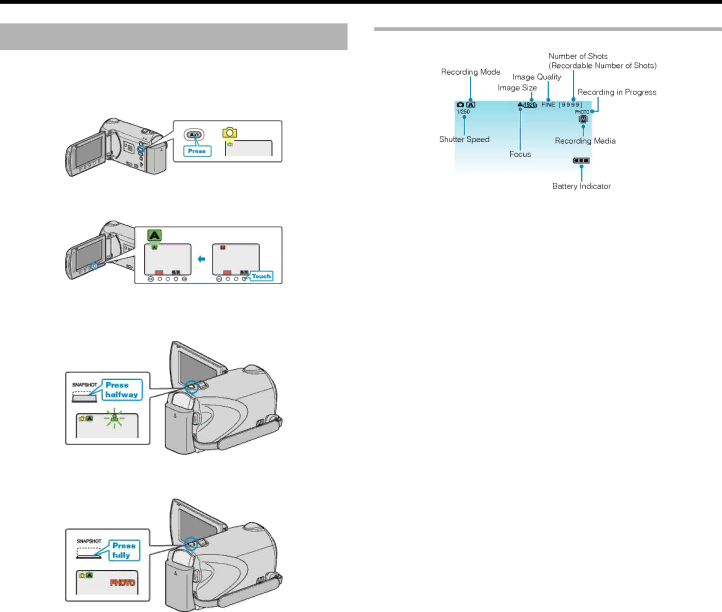
Indications During Still Image Recording
Display Icon | Description |
|
|
Recording | Press the G/H button to switch the recording mode |
Mode | between G (Auto) and H (Manual). |
|
|
Image Size | Displays the icon of the image size. |
| "IMAGE SIZE" (A P.85) |
|
|
Image Quality | Displays the icon of the “IMAGE QUALITY” setting |
| selected in the recording menu. |
| "IMAGE QUALITY" (A P.85) |
|
|
Number of | Displays the remaining number of shots for still im- |
Shots | age recording. |
(Recordable |
|
Number of |
|
Shots) |
|
|
|
Shutter Speed | Displays the shutter speed. |
|
|
Focus | Lights up in green when focused. |
|
|
Recording in | Appears when a still image is being captured. |
Progress |
|
|
|
Recording Me- | Displays the icon of the media where still images |
dia | are recorded to. |
| The recording media can be changed. |
| "REC MEDIA FOR IMAGE |
| HM320)" (A P.107) |
| "IMAGE SLOT SELECTION |
| P.107) |
|
|
Battery Indica- | Displays the approximate remaining battery power. |
tor | Details of the battery power can be displayed by |
| pressing the INFO button M. |
| "Remaining Recording Time/Battery Power" (A |
| P.34) |
|
|
22