JVC GZ-HM340 manual Manual Recording Menu, Name Description

Page 24

Recording

Manual Recording

You can adjust settings, such as brightness, by using the manual mode. Manual recording can be set for both video and still image modes.

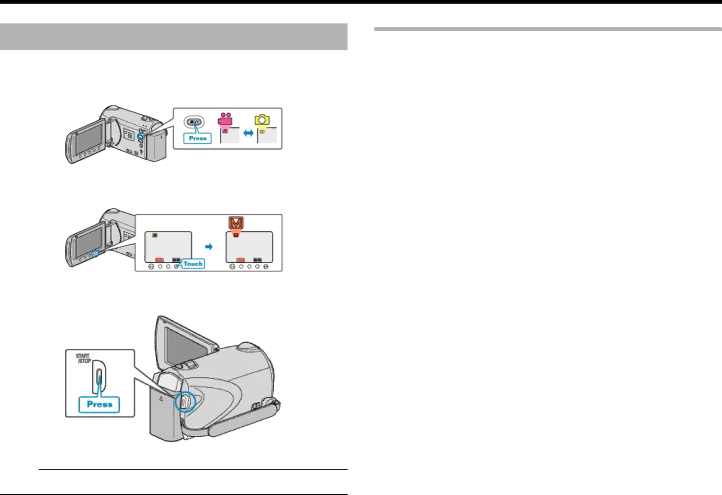
1Select video or still image mode.

The video or still image mode icon appears.

2Select the Manual recording mode.

The mode changes between Auto and Manual with every touch.

3Start recording.

Press again to stop.

Memo:

The manual settings are displayed only in the manual mode.

Manual Recording Menu

The following items can be set.

Name

Description


a SCENE SE-

Recordings that suit the shooting conditions can

LECT

be performed easily.


"Scene Selection" A P.25


h FOCUS

Use manual focus if the subject is not focused


automatically.


"Adjusting Focus Manually" A P.26


o FOCUS AS-

Use this for adjusting the focus more precisely.

SIST

"Using Focus Assist" A P.26


i BRIGHT-

Overall brightness on the screen can be adjus-

NESS ADJUST

ted.


Use this when recording in a dark or bright loca-


tion.


"Adjusting Brightness" A P.27


k WHITE BAL-

Overall color on the screen can be adjusted.

ANCE

Use this when the color on the screen appears


differently from the actual color.


"Setting White Balance" A P.27


l BACKLIGHT

Corrects the image when the subject appears

COMP.

dark due to backlight.


Use this when shooting against the light.


"Setting Backlight Compensation" A P.28


m METERING

Brightness of a specified area can be set as the

AREA/ TYPE

standard.


"Setting Metering Area" A P.28


n EFFECT

Images that look like old photographs or black-


and-white movies can be taken.


"Recording with Effects" A P.29


o TELE MAC-

Use this to take close-up (macro) shots of the

RO

subject.


"Taking Close-up Shots" A P.29


24

Image 24
Contents GZ-HM340 Contents Names of Parts Charging RecordingPlayback Shooting TipsWedding Travel Advanced Operation with Two CamcordersBringing the Necessary Equipment CamcorderBattery Pack Power Plug Adapter a P.17)Battery Charger AC AdapterUsing Pan at the Places of Interest Amusement ParkTaking Videos or Still Images According to the Attraction Scenarios suitable for taking videosInducing Responses by Calling Out Capturing the Best Moment in a Video as a Still ImageAdvanced Operation with Backlight Compensation Without backlight compensation With backlight compensationVerifying the Accessories Charging the Battery PackMemo Illustration DescriptionDetaching the Battery Pack Approximate Battery Charging TimeGrip Adjustment Inserting an SD Card GZ-HM340/GZ-HM320Inserting an SD Card GZ-HM300 Types of Usable SD CardSdhc Card SD CardClock Setting Using the Operation Buttons Using the SliderResetting the Clock Holding this UnitAttaching the Lens Cap Tripod MountingUsing this Unit Overseas Charging the Battery Pack OverseasSetting the Clock to Local Time when Traveling Optional Accessories Setting Daylight Saving TimeApproximate Recording Time Using Battery Battery Pack Actual Recording Continuous RecordingTaking Videos in Auto Mode Indications During Video RecordingUseful Settings for Recording Operation Buttons for Video RecordingZooming Capturing Still Images During Video RecordingReducing Camera Shake Checking the Captured Image ImmediatelyTaking Still Images in Auto Mode Indications During Still Image RecordingOperation Buttons for Still Image Recording Operation But Description Ton ZoomFace Priority AE/AF (A P.83) Manual Recording Manual Recording MenuName Description Setting Effect Scene SelectionEYE LightAdjusting Focus Manually Using Focus AssistFocus Assist Color (A P.96) Adjusting Brightness Setting White BalanceUsing MWB Setting DetailsSetting Backlight Compensation Setting Metering AreaRecording with Effects Taking Close-up ShotsRegistering Files to Events Before Record- ing Taking Videos in YouTube FormatEvent Type Recording at Intervals TIME-LAPSE RE Uploading VideosTrouble with Uploading Videos Indications During Time-Lapse RecordingTime-Lapse Setting Recording Automatically by Sensing Move- ments Auto REC Remaining Recording Time/Battery Power Approximate Video Recording Time Approximate Number of Still Images Unit Number of ShotsPlaying Back Videos During Video PlaybackDisplay Description Checking the Content of Videos Quickly Operation Buttons for Digest PlaybackPlaying a Video with Defective Management Information Playback with Special Effects Playing Back Still Images During Still Image PlaybackSlideshow Playback Image Slot Selection GZ-HM300(A P.107)Searching for a Specific Video/Still Image Group SearchSearch Date Connecting to and Viewing on TV Search EventUnnatural Displays on TV Trouble ActionConnecting via the Hdmi Mini Connector Operating in Conjunction with TV via HdmiPreparations Operation MethodComponent Output (A P.104) Playing Back Playlists Deleting Unwanted FilesDeleting the Currently Displayed File Deleting Selected Files Deleting All Files Protecting Files Protecting the Currently Displayed FileProtecting Selected Files Protecting All Files Releasing Protection of All Files Changing Event Registration of Videos Changing the Event of the Currently Displayed FileChanging the Event of the Selected Files Dividing Files Face Detection Zoom Capturing a Still Image in the Video during Playback Capturing a Required Part in the VideoCapturing Videos for Uploading to You- Tube Creating a Playlist with Title GZ-HM340/GZ- HM320 Uploading Videos to YouTubeCreating Playlists from the Recorded Vid- eos Creating Playlists with Selected FilesPicture Title Creating Playlists by Group Creating Playlists by Date Creating Playlists by Event Editing Playlists Deleting Playlists Adding Title Screens to Playlists GZ-HM340/GZ-HM320 How to Enable Seamless Video Recording Again Combining Videos Recorded by Seamless RecordingCopying Files to Card Copying All FilesCopying Selected Files Moving Files Moving All FilesMoving Selected Files Dubbing Files to a DVD Recorder or VCR Copying to Windows PC Disconnecting this Unit from PC Organizing Files Recording Videos to Discs DVD-R DVD-R DL DVD-RW DVD+R DVD+R DL DVD+RWAvchd JVC Software Licence Agreement Backing Up Files Without Using Provided Software List of Files and FoldersCopying to Mac Computer IMovie and iPhotoOperating the Menu Recording Menu Video Face Priority AE/AF Displaying the ItemRegister Event Video QualityZoom Gain UPAGC TIME-LAPSE Recording Auto RECSeamless Recording ColorWind CUT SELF-TIMER Recording Menu Still ImageShutter Mode Record ONE ShotContinuous ShootingImage Size Image QualitySetting can be adjusted separately for videos Manual Settings Menu Playback Menu Video Delete Picture Title GZ-HM340/GZ-HM320Search Playback PlaylistPROTECT/CANCEL EditCopy WIPE/FADER MoveON-SCREEN Display Display ALLDisplay Date only Copy PROTECT/CANCEL Playback Menu Still ImageDelete Search Date Slide Show Effects Display Settings Menu LanguageDate Display Style Clock Set Style Monitor BrightnessLCD Backlight Focus Assist ColorChanging the Setting Basic Settings Menu Demo Mode Displaying Demo ModeAuto Power OFF 100 Operation SoundRecord Button Update 101Quick Restart Factory Preset 102Connection Settings Menu Setting Details 169103 Display on TV104 Component OutputHdmi Output 105 Hdmi ControlMedia Settings Menu 106REC Media for Video GZ-HM340/GZ-HM320 Video Slot Selection GZ-HM300107 REC Media for Image GZ-HM340/GZ-HM320Image Slot Selection GZ-HM300 Format BUILT-IN MEM. GZ-HM340/GZ-HM320108 Format SD CardErase ALL Data GZ-HM340/GZ-HM320 Front Rear 109Bottom Interior 110LCD Monitor 111Laser Touch Operation Common Recording Indications Video Recording 112Still Image Recording Video Playback113 TIME-LAPSE Recording (A P.81)Still Image Playback 114Battery Pack 115Card 116Editing/Copying 117Other Problems Screen/Image118 Error Message? 119Camcorder Lens/LCD Monitor120 121
Related manuals
Manual 2 pages 14.84 Kb