Recording
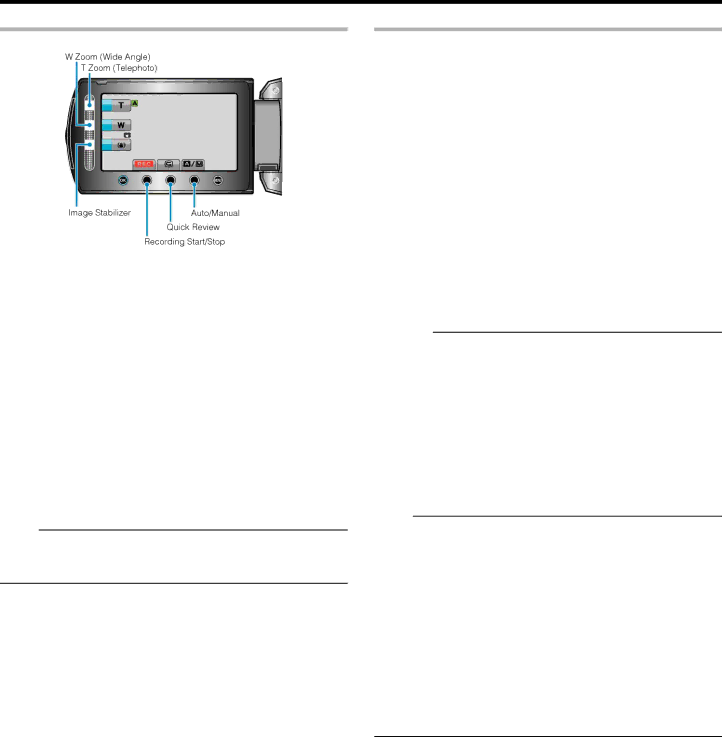
Operation Buttons for Video Recording
Operation But- | Description |
ton |
|
|
|
T/W Zoom | Allows the same functions as the zoom lever to be |
| performed. |
| Camera shake that often occurs when using the |
| zoom lever can be minimized. |
| "Zooming" (A P.21) |
|
|
Image Stabiliz- | Sets whether to reduce camera shake. |
er | "Reducing Camera Shake" (A P.21) |
|
|
Recording | Functions as the START/STOP button. |
Start/Stop |
|
|
|
Quick Review | Enables the most recently captured video to be |
| viewed. |
| "Checking the Captured Image Immediately (Quick |
| Review)" (A P.21) |
|
|
Auto/Manual | Switches the recording mode between Auto and |
| Manual. |
|
|
Memo:
●The slider operation button cannot be used when the LCD monitor is flipped.
●The zoom appears when the slider is touched.
Useful Settings for Recording
●Videos can be found easily during playback by categorizing them when recording.
"Registering Files to Events" (A P.79)
●When “QUICK RESTART” is set to “ON”, this unit turns on immediately if you open the LCD monitor within 5 minutes after the power is turned off by closing the monitor.
"QUICK RESTART" (A P.101)
●When “AUTO POWER OFF” is set to “ON”, this unit turns itself off au- tomatically to conserve power when it is not operated for 5 minutes. (only when using the battery pack)
"AUTO POWER OFF" (A P.99)
●When “FACE PRIORITY AE/AF” is set to “ON” (default setting), this unit detects faces and automatically adjusts its brightness and focus to record the faces more clearly.
"FACE PRIORITY AE/AF" (A P.79)
●If the remaining space on the recording media runs out while “SEAM- LESS RECORDING” is set to “ON”, recording continues after switching to another recording media.
"SEAMLESS RECORDING" (A P.81)
CAUTION:
●Do not expose the lens to direct sunlight.
●Do not use this unit in the rain, snow, or places with high humidity like the bathroom.
●Do not use this unit in places subject to excessive humidity or dust, as well as places exposed to steam or smoke directly.
●The access lamp lights up when video recording is in progress. Do not remove the battery pack, AC adapter, or SD card when the lamp is lighted.
●Make a backup of important recorded data.
It is recommended to copy your important recorded data to a DVD or other recording media for storage. JVC will not be responsible for any lost data.
Memo:
●Before recording an important scene, it is recommended to conduct a trial recording.
●Check the remaining recording time in the media before you start shooting. If there is not enough space, move (copy) the data to a PC or disc.
●Do not forget to make copies after recording!
●Recording stops automatically as it cannot be performed for 12 or more consecutive hours according to specifications. To ensure continuous recording, set “SEAMLESS RECORDING” to “ON” before you start re- cording.
"SEAMLESS RECORDING" (A P.81)
●For long recordings, the file is split into two or more files if the size ex- ceeds 4 GB.
●You can connect this unit to the AC adapter to record for long hours in- doors.
20