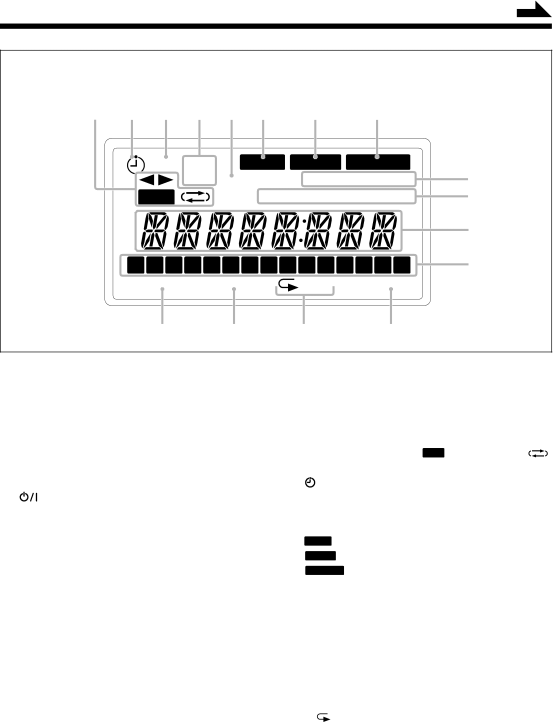
JVC UX-H30, CA-UXH33, SP-UXH33 manual Main unit Display window

Page 7

Continued

Display window

1

2

3

4

5

6

7

8

REC ON

BASS

SLEEP SNOOZE


OFF CLOCK

MONO STEREO

9

REC

RDS TA NEWS INFO

p

q

1

2

3

4

5

6

7

8

9 10 11 12 13 14 15

w

PROGRAM RANDOM

ALL

OVER

e r t y

See the pages in parentheses for details.

Main unit

Display window

1

PHONES jack (11)

1

Tape operation indicators

2

Disc cover


2 3 (tape direction), REC (recording), and

3

TIMER/SNOOZE button (10, 22 – 24)


(reverse mode)

4

ONE TOUCH REC (recording) button (20, 21)

2


(timer) indicator

5

(standby/on) button (11, 23)

3

REC (recording timer) indicator

6

Source buttons

4

ON/OFF (timer on-time/off-time) indicators


• AUX, @ # TAPE, BAND TUNER, and

5

CLOCK indicator


#/8 CD

6

BASS indicator


Pressing one of these buttons also turns on the

7

SLEEP indicator


unit.

8

SNOOZE indicator

7

MULTI CONTROL buttons

9

MONO and STEREO indicators


4 (reverse skip), 7 (stop), and ¢ (forward

p RDS operation indicators


skip)


RDS and TA/NEWS/INFO

8

AHB (Active Hyper Bass) PRO button (11)

q Main display

9

0 OPEN (disc cover open) button (16)


• Shows the source name, frequency, etc.

p VOLUME + / – buttons (11)

w Track calender indicators

q Display window

e PROGRAM indicator

w STANDBY lamp (11)

r RANDOM indicator

e Cassette holder

t Repeat indicators

r Remote sensor


and ALL

t ) (cassette holder open) button (19 – 21)

y OVER indicator

4

Image 7
Contents Micro Component System Important for Laser Products UX-H35/UX-H33/UX-H30 Introduction PrecautionsAbout This Manual Contents Front view Location of the ButtonsMain Unit Top viewMain unit Display window Display windowTape Tuner AUX Remote ControlFM antenna Supplied AccessoriesConnecting Antennas Getting StartedTo connect an outdoor AM MW antenna Connecting SpeakersTurn the AM loop antenna until you have the best reception Release your finger from the clampTo connect an audio equipment Connecting Other EquipmentTo connect the AC power cord To remove the speaker grillesWhen using the unit in your car Putting the Batteries into the Remote ControlCommon Operations Setting the ClockReinforcing the Bass Sound Turning On the PowerAdjusting the Volume Adjusting the Tone Bass/TreblePresetting Stations Tuning in to a StationReceiving FM Stations with RDS Tuning in to a Preset StationPress PTY Search Changing the RDS InformationSearching for Programs by PTY Codes PTY Search Press Display orange-colored. DisplayWait for about 3 seconds after Specifying the data type Switching Temporarily to a Program Type of Your ChoicePress TA/NEWS/INFO until Data type you want Appears on the displayGeneral notes When playing a CD-R or CD-RWPlaying Back Discs Press 0 Open on the unitProgramming the Playing Order of the Tracks-Program Play Basic Disc OperationsPress Random To check the program contentsPlaying at Random-Random Play Repeating Tracks-Repeat PlayPut a cassette in with the exposed part of the tape down Playing Back TapesPlaying Back a Tape Press for cassette deck on the unitTo protect your recording To record on both sides-Reverse ModeRecording Recording on a TapeRepeat steps 2 and 3 to record other tracks you want Disc Direct RecordingOne Track Recording Press ONE TouchSet the off-time when you want the unit To turn off standby Using the TimersUsing Daily Timer and Recording Timer Set the on-time when you want the unit To turn onWith the source to play Adjust the clock if you needSelect the volume level To deactivate the timer temporarilyPress Sleep Using Snooze TimerUsing Sleep Timer How the Sleep Timer actually worksHandling discs MaintenanceCleaning the unit Handling cassette tapesAction TroubleshootingSymptom CauseTest function Alarm functionAdditional Information Description of the PTY codesSpecifications 0103MWMMDWJEM