Settings for the GK Pickup (GK Setup)
GK PHASE Setting
This matches the phase of the GK pickup's sound with the sound from the guitar's pickup.
*If the phases are not matched, the sound from each source will interfere with each other when mixed, altering the tonal qualities and volume levels.
1.Set the GK pickup’s select switch to “MIX.”
2.Rotate [GUITAR TYPE] to select “HOLLOW” (GK PHASE).
3.While playing the sixth string, press MEMORY button [1] or [2] to select the setting which does not diminish the volume level in the low end.
Memory button | Setting |
[1]NORMAL
The phase will remain unchanged.
[2]INVERSE
The phase will be inverted.
GK S1/S2 Setting
This selects the functions for the GK pickup’s S1 and S2 buttons.
1.Rotate [GUITAR TYPE] to select
“12 STRING/ELECTRIC” (GK S1/S2).
2.Press MEMORY button [1] , [2] , [3], or [4] to select the functions for the S1 and S2 buttons.
Memory button | Setting |
[1] | PICKUP |
| Switching the pickup of COSM guitar |
| S1 button: R→C→F |
| S2 button: F→C→R |
[2] | PICKUP (REVERSE) |
| Switching the pickup of COSM guitar |
| S1 button: F→C→R |
| S2 button: R→C→F |
[3] | MANUAL/TUNER |
| S1 button: |
| Switching the Manual/Memory mode. |
| S2 button: |
| Switching the Tuner on/off. |
|
|
[4] | MEMORY ▼/▲ |
| S1 button: memory number down |
| S2 button: memory number up |
GK SENS 6–1 Settings
This sets the GK pickup sensitivity for each string and
adjusts the volume balance between the strings.
1.Set the GK pickup’s select switch to “SYNTH.”
2.Rotate [GUITAR TYPE] to select “STANDARD” (GK SENS 6).
3.While playing the sixth string, press a MEMORY button
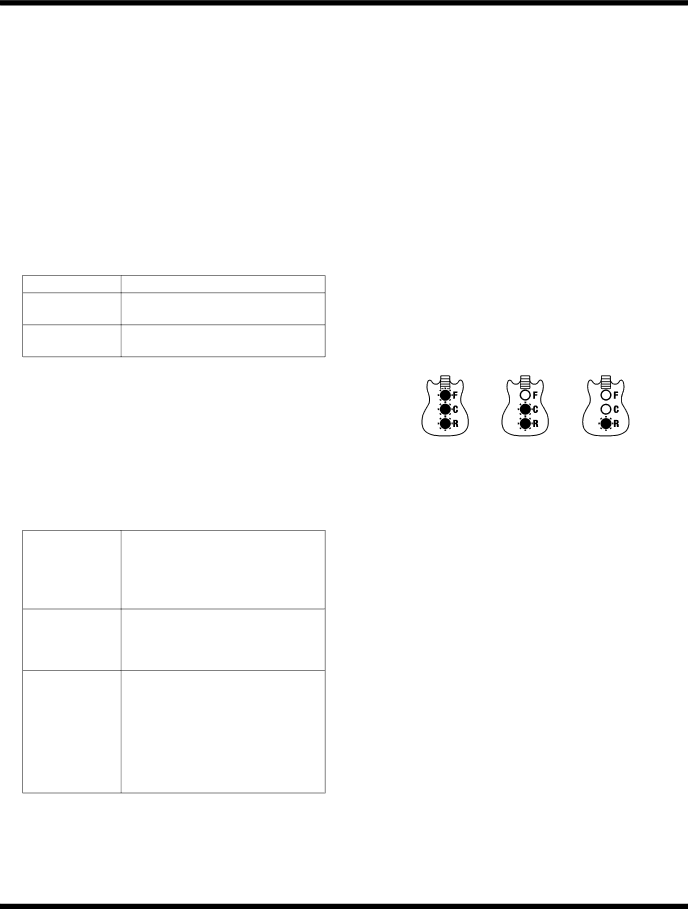
The PICKUP indicators show the level. The indicators light from the bottom up in response to how strongly you play the string.
*Set this to a value such that the center (C) indicator lights, and the upper (F) indicator flashes from time to time during the most dynamic moments of a performance. Also, monitor the actual sound to make sure it is not distorted.
fig.0040
|
|
|
|
|
|
|
|
|
|
|
|
|
|
|
|
|
|
|
|
|
|
| High | Correct | Low |
| ||||||
| (Lower the SENS setting) | (Raise the SENS setting) |
| |||||||
|
|
|
|
|
|
|
|
|
|
|
Memory button |
|
|
| Setting | ||||||
|
|
|
|
|
|
|
|
|
|
|
|
|
|
| |||||||
|
|
|
|
|
|
|
|
|
|
|
4.Set the sensitivity for the fifth through first strings in the same way.
5th String: Rotate [GUITAR TYPE] to select
“12 STRING/ACOUSTIC” (GK SENS 5).
4th String: Rotate [GUITAR TYPE] to select “SYNTH LEAD” (GK SENS 4).
3rd String: Rotate [GUITAR TYPE] to select “SYNTH PAD” (GK SENS 3).
2nd String: Rotate [GUITAR TYPE] to select “SLOW GEAR” (GK SENS 2).
1st String: Rotate [GUITAR TYPE] to select “POLY OCTAVE” (GK SENS 1).
*If you cannot attain a suitable level even when the value is set to its maximum (10), check the installation of the GK pickup (the clearance between the strings and the pickup).
*If any string produces a particularly loud sound, lower the sensitivity for that string in order to minimize volume differences between strings.
13