Panasonic Troubleshooting Guide for 824 Phone System and PABX Solutions

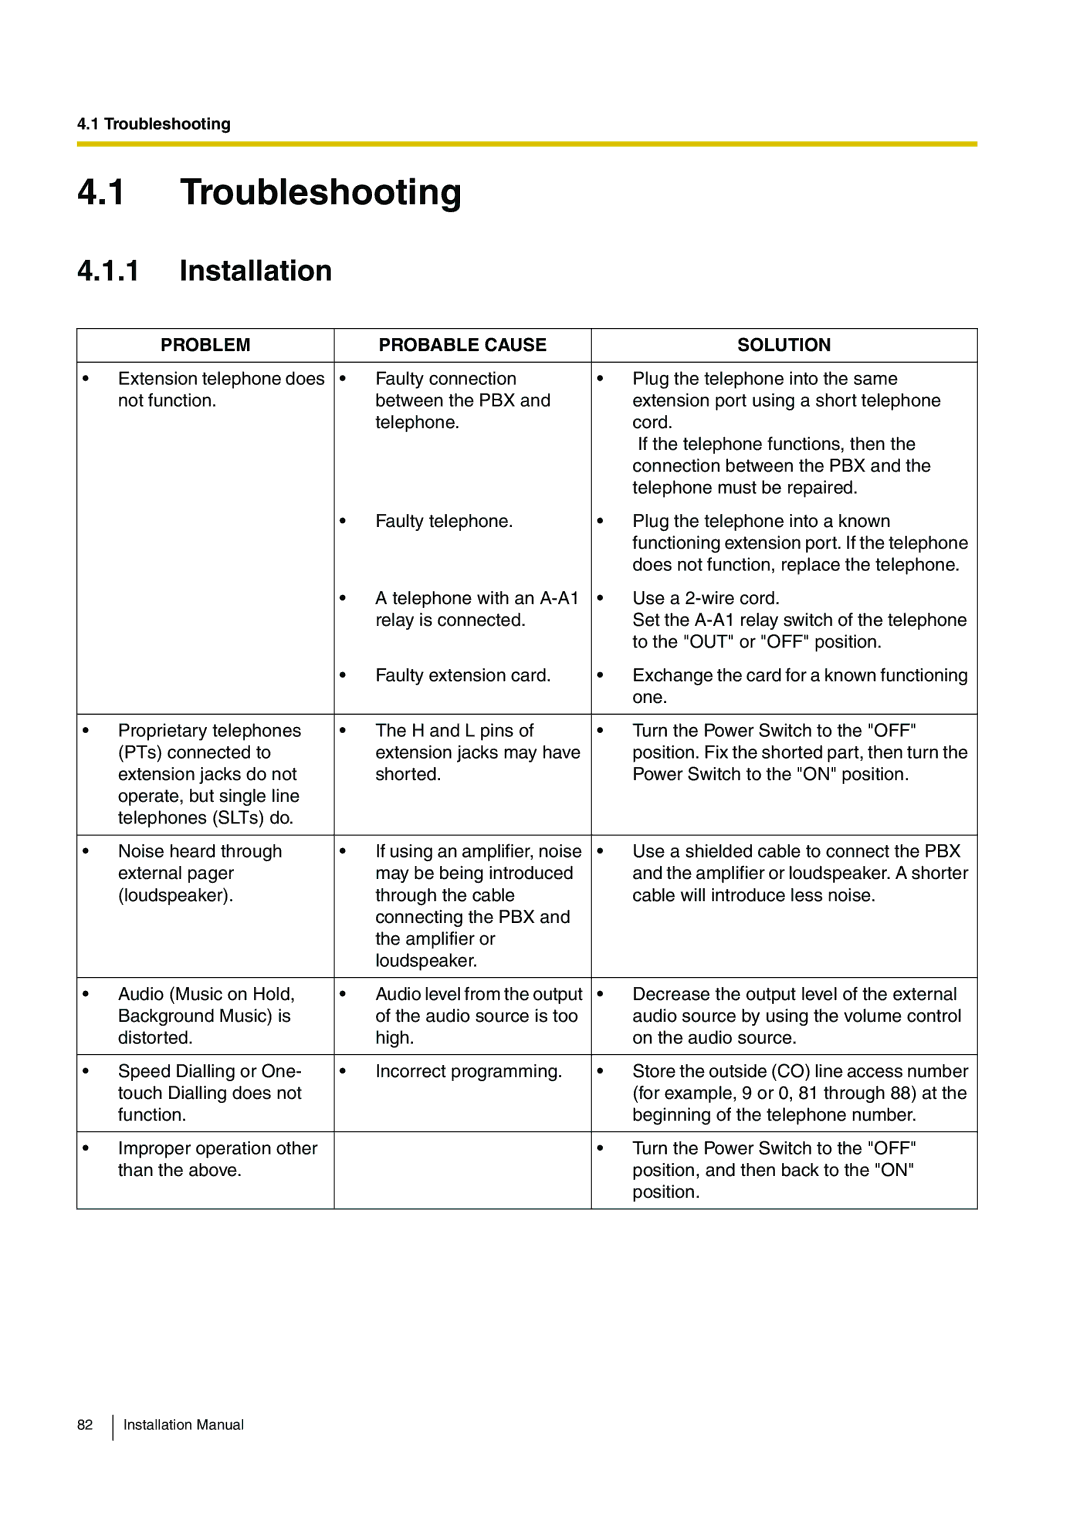
Page 82

4.1 Troubleshooting

4.1Troubleshooting

4.1.1Installation


PROBLEM


PROBABLE CAUSE

SOLUTION


Extension telephone does

Faulty connection

• Plug the telephone into the same


not function.


between the PBX and

extension port using a short telephone


telephone.

cord.


If the telephone functions, then the


connection between the PBX and the


telephone must be repaired.


Faulty telephone.

• Plug the telephone into a known


functioning extension port. If the telephone


does not function, replace the telephone.


• A telephone with an A-A1

• Use a 2-wire cord.


relay is connected.

Set the A-A1 relay switch of the telephone


to the "OUT" or "OFF" position.


Faulty extension card.

• Exchange the card for a known functioning


one.


Proprietary telephones

The H and L pins of

• Turn the Power Switch to the "OFF"


(PTs) connected to


extension jacks may have

position. Fix the shorted part, then turn the


extension jacks do not


shorted.

Power Switch to the "ON" position.


operate, but single line


telephones (SLTs) do.


Noise heard through

If using an amplifier, noise

• Use a shielded cable to connect the PBX


external pager


may be being introduced

and the amplifier or loudspeaker. A shorter


(loudspeaker).


through the cable

cable will introduce less noise.


connecting the PBX and


the amplifier or


loudspeaker.


Audio (Music on Hold,

Audio level from the output

• Decrease the output level of the external


Background Music) is


of the audio source is too

audio source by using the volume control


distorted.


high.

on the audio source.


Speed Dialling or One-

Incorrect programming.

• Store the outside (CO) line access number


touch Dialling does not


(for example, 9 or 0, 81 through 88) at the


function.


beginning of the telephone number.


Improper operation other


• Turn the Power Switch to the "OFF"


than the above.


position, and then back to the "ON"


position.


82

Installation Manual

Image 82
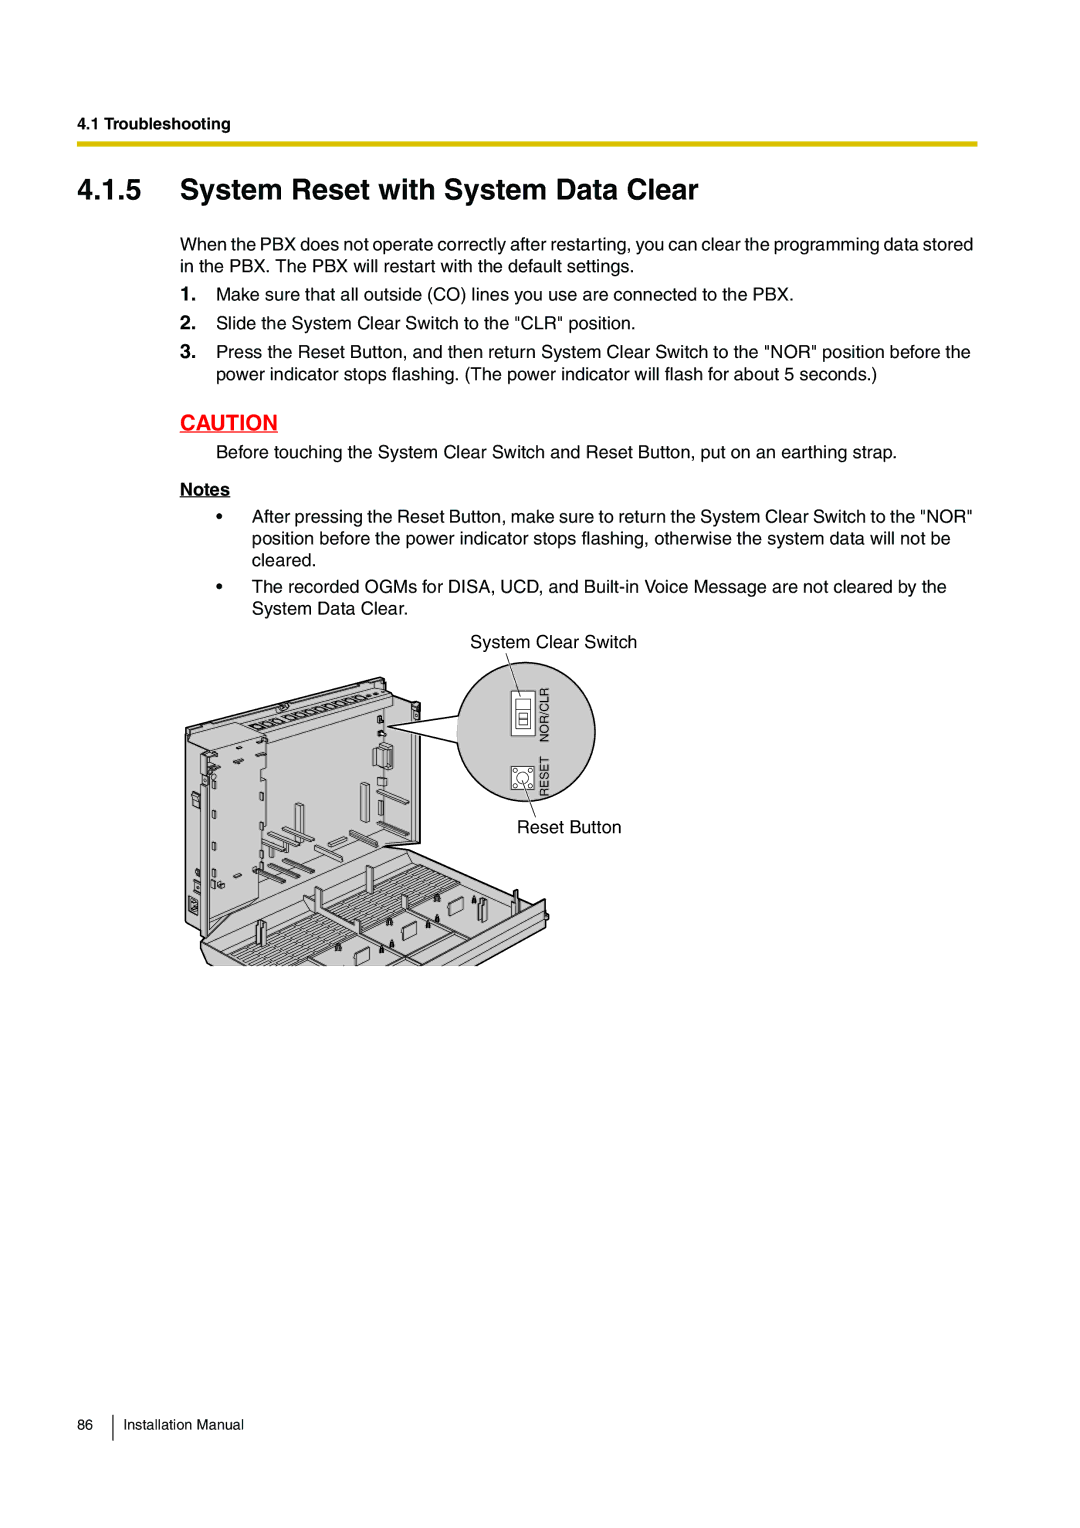
Contents Installation Manual Advanced Hybrid SystemSystem Components Abbreviations in this manual Compatible Proprietary TelephonesImportant Safety Instructions For users in Australia only PrecautionsFor users in New Zealand only For users in Taiwan onlyFor Future Reference For users in Finland, Norway and Sweden onlyHttp//doc.panasonic.de Introduction Precautions for Users in the United Kingdom For Your SAFETY, Please Read the Following Text CarefullyInstallation Manual Table of Contents Guide for KX-TE Maintenance Console Section System Outline System Highlights System HighlightsBasic System Construction Main UnitSystem Connection Diagram Outside CO LineSpecifications General DescriptionCharacteristics Maximum Cards and Terminal Equipment System CapacitySystem Capacity System DataMax. Quantity Section Installation Safety Installation Instructions Before InstallingBefore Installing Installation PrecautionsBefore Installing Installing the Advanced Hybrid System UnpackingNames and Locations Opening/Closing Covers Opening CoversClosing Covers Securing Cords To remove the rivet, use a screwdriver as shown below Connecting Frame Earth Connect the frame of the PBX to earthConnecting Backup Batteries Battery Rating 24 Ah Wall Mounting Mounting on a Wooden WallMounting on a Concrete or Mortar Wall Installing the Advanced Hybrid System Installation Installing Surge ProtectorOverview Outside Installation Installation of an Earth RodInstalling the Advanced Hybrid System Installing Optional Service Cards Location of Optional Service CardsInstalling KX-TE82483 to KX-TES824 FunctionInstalling Optional Service Cards Installing KX-TE82480 to KX-TES824 Installing Optional Service Cards Installing Optional Service Cards Installing KX-TE82480 to KX-TEM824 Installing Optional Service Cards Installing KX-TE82474 to KX-TES824 4 8-Port SLT Extension Card KX-TE82474Installing Optional Service Cards Installing KX-TE82474 to KX-TEM824 5 3-Port Caller ID Card KX-TE82493 6 4-Port Doorphone Card KX-TE82461 Message Expansion Card for DISA/UCD OGMs KX- TE82491 8 2-Channel Voice Message Card KX-TE82492 Connecting Outside CO Lines Connecting Outside CO LinesConnection Connecting Extensions Connecting ExtensionsMaximum Cabling Distance of Extension Wiring Twisted Cable Telephone Wiring Connecting Extensions in Parallel Installing the Doorphone KX-T30865 Connecting Doorphones and Door OpenersConnecting Doorphones and Door Openers Maximum Cabling DistanceConnecting Doorphones and Door Openers Connecting Doorphones KX-T30865 Connecting Door Openers Connecting Doorbell or Door Chime Connecting Doorbell or Door ChimeConnecting Peripherals Connecting PeripheralsPager PC/Printer via RS-232CFor connecting a PC/printer with a 9-pin RS-232C connector Circuit Type Signal Name FunctionFor connecting a PC/printer with a 25-pin RS-232C connector PC via USB 1.1 interface Power Failure Connections Power Failure ConnectionsStarting the Advanced Hybrid System Starting the Advanced Hybrid SystemStarting the Advanced Hybrid System Starting the Advanced Hybrid System Section Guide for KX-TE Maintenance Console Setting the Password and Password Security Installing KX-TE Maintenance ConsoleInstalling KX-TE Maintenance Console on a PC System RequirementsInstalling KX-TE Maintenance Console Click Maintenance ConsoleConnection Installing the USB DriverConnection Serial Interface ConnectionWindows Me Windows 98SEWindows Windows XP Click Continue AnywayStarting KX-TE Maintenance Console for the first time Select Auto Tone or Auto Pulse for Dial Type Accessing PBX via Internal Modem→ KX-TE Maintenance Console Click Initialise Connection Connection Section Troubleshooting Troubleshooting InstallationCause Operation System Restart System Reset with System Data Clear Index Numerics Template for Wall Mounting Copyright
Related manuals
Manual 167 pages 36.9 Kb