RIDGID BS1400 manual On-Off Switch

Page 17

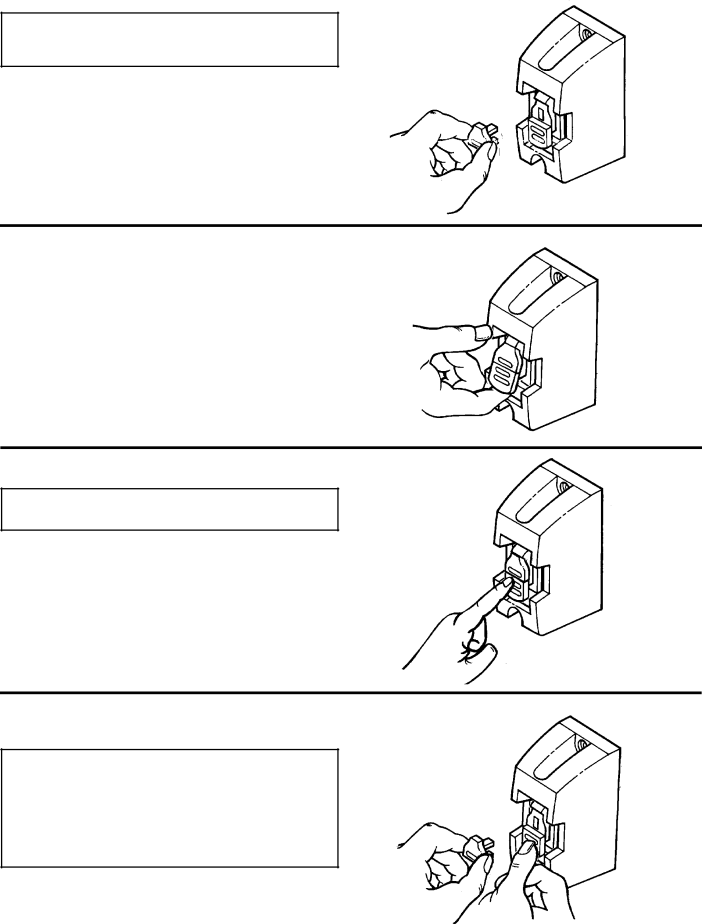
18. On-Off Switch

WARNING: Before turning switch “ON”, make sure the blade guards are correctly installed and operating properly.

The On-Off switch has a locking feature. This feature is intended to help prevent unauthorized and possible hazardous use by children and others.

1. To turn band saw “On” insert key into switch. NOTE: Key is made of yellow plastic, located in the loose parts bag.

2.Insert finger under switch lever and Pull end of switch out.

3. To turn band saw “Off” Push lever in.

WARNING: Never leave the band saw unattended until it has come to a complete stop.

4.To lock switch in “Off” position hold switch in with one hand and remove key with other hand.

WARNING: For your own safety, always lock the switch “Off” when band saw is not in use, remove the key and keep it in a safe place. In the event of a power failure (all of your lights go out) turn switch off, remove the key and store it away from the band saw. This will prevent the machine from starting up again when the power comes back on.

17

Image 17
Contents 235$725·60$18$ +%$16$ Safety Instructions For Band Saw Table of ContentsBefore Each Use When Installing Or Moving The SawPlan Ahead To Protect Your Eyes, Hands, Face and Ears Before Leaving The Saw Glossary Of Terms For WoodworkingWhenever Saw Is Running Power Supply and Motor Specifications Motor Specifications and Electrical RequirementsGeneral Electrical Connections Volt, 60 Hz. Tool InformationWire Sizes Motor Safety ProtectionChanging Motor Voltage Extension Gauge Cord LengthUnpacking and Checking Contents List of Loose Parts in Bag Attaching Leveling Feet AssemblyAssembling Leg Set Hex Nut 3/8-16 Leveling Foot LegAttaching Band Saw to Leg Set Adjusting Leveling FeetMotor Bolt Washer Grommet Lockwasher Nut Mounting The MotorMounting the Pulley Cover Mounting the Switch BoxMounting Blade Hangers Mounting Bevel Scale To Table Mounting the Dust ChuteMounting the Table Trunnion Support To Saw Body Screw Pan Head M5 x Pointer Trunnion Support Bracket Installing Bevel Scale IndicatorMounting the Table To Saw Body Model nameplate Getting to Know Your Band SawMotor Motor pulley cover On-Off Switch Adjusting 90 Table Stop Alignments and AdjustmentsTilting the Table Changing BladesAdjusting Blade Tracking Adjusting Blade TensionAdjusting Upper Blade Guide Assembly Blade Tension Knob Gauge Blade Tracking Knob Lock KnobAdjusting Lower Blade Guides and Blade Support Bearing Adjusting Upper Blade Guides and Blade Support BearingStep Support Bearing Shaft Blade Guides Upper and lowerSafety Instructions for Basic Band Saw Operation Whenever Saw Is Running General Cutting Basic Saw OperationsCircle Cutting OperationRidgid Recommends the Following Accessories MaintenanceTrouble Probable Cause Remedy TroubleshootingGeneral Wiring DiagramParts Parts List For Ridgid 14-inch Band Saw Model NoKey Description Repair Parts2018 Parts List For Ridgid 14 Inch Band Saws Model No. BS14002Base Components Parts List For Ridgid 14 Inch Band Saw Model No. BS14002Page Call