Woodstock W1752 owner manual Adjusting Tool Rest, Installing/Removing Spur Center

Page 19

W1752 Owner's Manual (Mfg. 1/07+)

Adjusting Tool Rest

The tool rest is equipped with a cam-action clamping system to secure it to the lathe bed. When the lever is engaged, a locking plate lifts up and secures the tool rest base to the bed.

To position the tool rest base along the bed, do these steps:

1.Loosen the release lever and slide the tool rest base along the bed (Figure 9).

2.Re-engage the release lever to lock the tool rest base in place.

If the release lever will not lock the tool rest base onto the bed (either too loose or too tight), then loosen or tighten the hex nut (located on the under- side of the tool rest base) in small increments as needed to achieve the proper clamping pressure.

To adjust the tool rest vertically, do these steps:

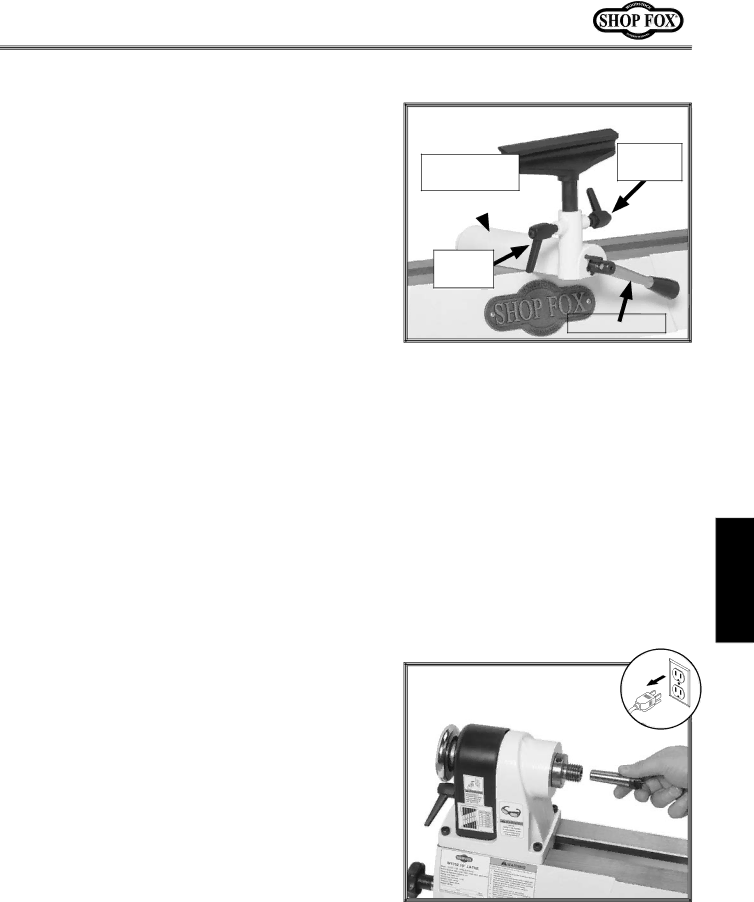
1.Loosen the lock handles (Figure 9) and adjust the tool rest vertically or swivel it as needed.

2.Tighten the lock handles.

Tool Rest

Lock

Handle

Base


Lock


Handle


Release Lever

Figure 9. Tool rest controls.

OPERATIONS

Installing/Removing

Spur Center

The spur center installs into the headstock spindle with a taper fit.

To install the spur center, do these steps:

1.Unplug lathe from power!

2.Insert the tapered end of the center into the spin- dle, and push it in quickly and firmly (see Figure 10).

3.Check that the center is securely installed by giving it a quick tug. (A properly installed center will not

pull out by hand.)  Figure 10. Inserting spur center into

spindle.

-17-

Image 19
Contents OWNERS MANUAL Page Contents Woodstock Technical Support IntroductionMotor Overall DimensionsElectrical Other Specifications Main SpecificationsControls and Features Standard Safety Instructions SafetyAlways Lock Mobile Bases if Used Before Operating Machinery Additional Safety for Wood Lathes Safety Extension Cords Electrical SpecificationsElectrical 110V OperationBox Inventory Figure SET UPUnpacking InventoryMachine Placement Cleaning Machine To install the tool rest, do these steps Assembly To test run the mini wood lathe, do these steps Test RunGeneral OperationsTo position the tailstock along the bed, do these steps Adjusting TailstockChanging Speeds To change speeds, do these stepsTo install the spur center, do these steps Adjusting Tool RestInstalling/Removing Spur Center To adjust the tool rest vertically, do these stepsTo install the live center, do these steps Installing/Removing Live CenterTo remove the live center, do these steps To install the faceplate, do these steps Installing/Removing FaceplateTo mount a workpiece to your faceplate, refer to Gouge Selecting Turning ToolsSpindle Turning To set up a spindle turning operation, do these stepsSpindle Turning Tips To mount your workpiece to the faceplate, do these steps Faceplate TurningTo mount your workpiece to a backing block, do these steps Entanglement Hazard Sanding/FinishingLathe Accessories AccessoriesUnpainted Cast Iron MaintenanceCleaning LubricationTroubleshooting ServiceConstant Paddle Switch Wiring Diagram W1752Parts REF PART
# Description Parts ListPART
# Description Label PlacementPage Page Page Woodstock international inc. p.o. box Bellingham, Wa Warranty High Quality Machines and Tools