1
INSTRUCTIONS FOR USE ‑ Readout Procedure
Instructions for Biological Indicator (BI) Activation and Incubation
![]() CAUTION: To avoid the possibility of the 3M™ Attest™ Rapid Readout Biological Indicator vial absorbing fluorescent residue from a chemical indicator or tape, place the 3M™ Attest™ Rapid Readout Biological Indicator vial so it does not come in direct contact with chemical indicators or tape.
CAUTION: To avoid the possibility of the 3M™ Attest™ Rapid Readout Biological Indicator vial absorbing fluorescent residue from a chemical indicator or tape, place the 3M™ Attest™ Rapid Readout Biological Indicator vial so it does not come in direct contact with chemical indicators or tape.
![]() WARNING: Match the green cap color of the 3M™ Attest™ 1294 Rapid Readout Biological Indicator with the green color‑coded configuration sticker surrounding the 3M™ Attest™ Auto‑reader 390G incubation wells.
WARNING: Match the green cap color of the 3M™ Attest™ 1294 Rapid Readout Biological Indicator with the green color‑coded configuration sticker surrounding the 3M™ Attest™ Auto‑reader 390G incubation wells.
![]() CAUTION: Wear safety glasses when activating 3M™ Attest™ Rapid Readout Biological Indicators.
CAUTION: Wear safety glasses when activating 3M™ Attest™ Rapid Readout Biological Indicators.
Follow this procedure for every 3M™ Attest™ 1294 Rapid Readout Biological Indicator to be read.
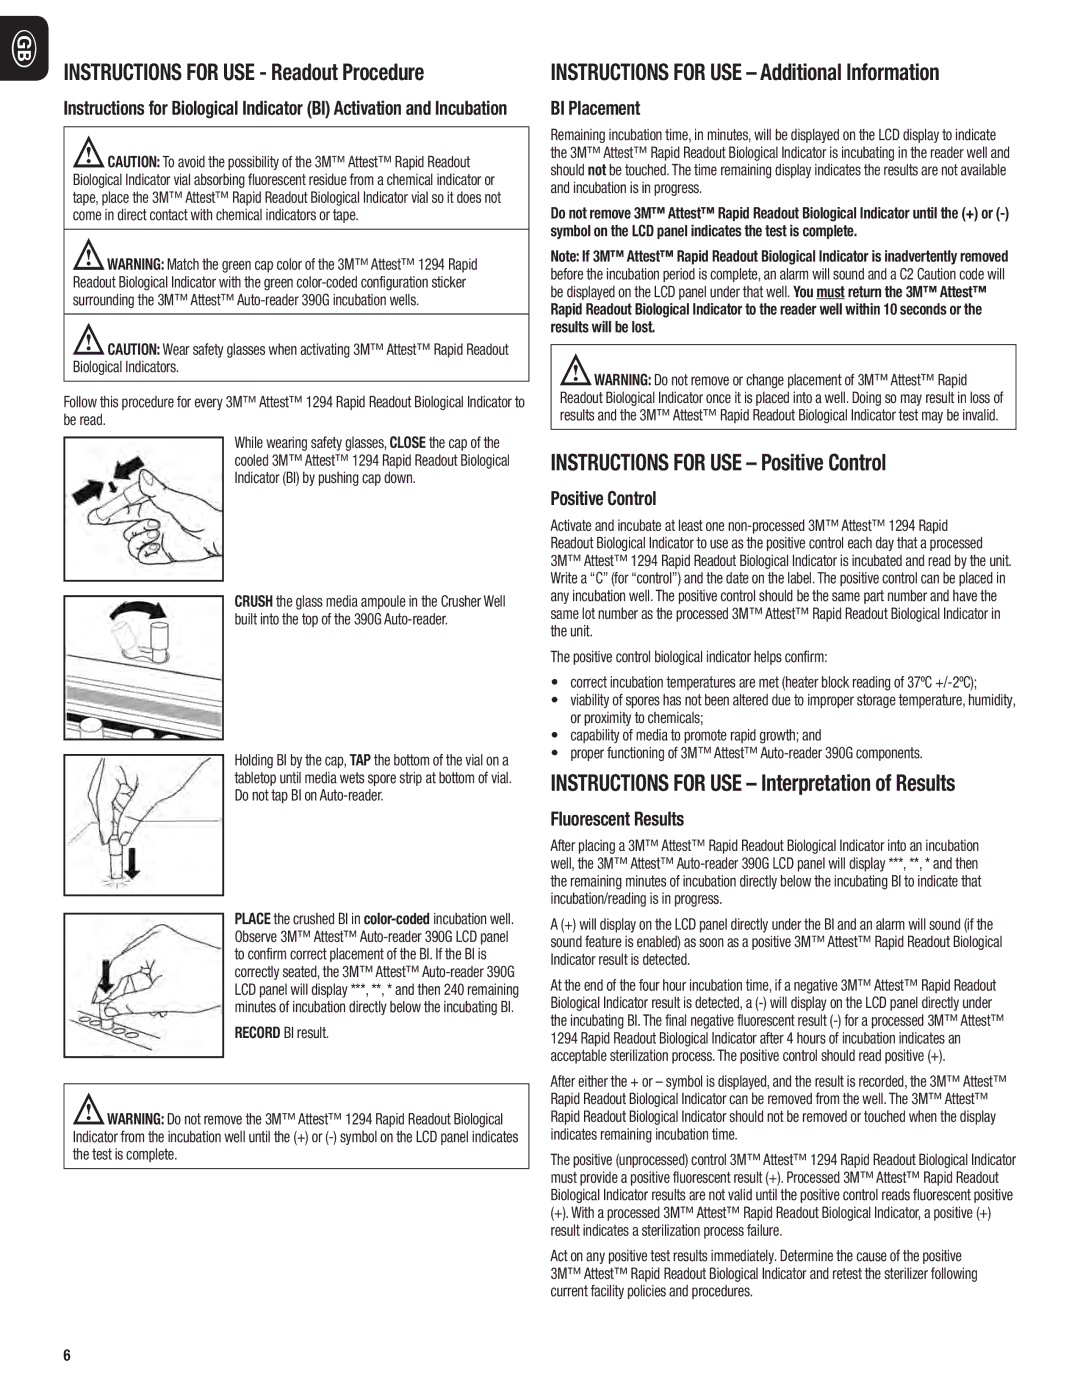
While wearing safety glasses, CLOSE the cap of the cooled 3M™ Attest™ 1294 Rapid Readout Biological Indicator (BI) by pushing cap down.
CRUSH the glass media ampoule in the Crusher Well built into the top of the 390G Auto‑reader.
Holding BI by the cap, TAP the bottom of the vial on a tabletop until media wets spore strip at bottom of vial. Do not tap BI on Auto‑reader.
PLACE the crushed BI in color‑coded incubation well. Observe 3M™ Attest™ Auto‑reader 390G LCD panel to confirm correct placement of the BI. If the BI is correctly seated, the 3M™ Attest™ Auto‑reader 390G LCD panel will display ***, **, * and then 240 remaining minutes of incubation directly below the incubating BI.
RECORD BI result.
![]() WARNING: Do not remove the 3M™ Attest™ 1294 Rapid Readout Biological Indicator from the incubation well until the (+) or (‑) symbol on the LCD panel indicates the test is complete.
WARNING: Do not remove the 3M™ Attest™ 1294 Rapid Readout Biological Indicator from the incubation well until the (+) or (‑) symbol on the LCD panel indicates the test is complete.
6
INSTRUCTIONS FOR USE – Additional Information
BI Placement
Remaining incubation time, in minutes, will be displayed on the LCD display to indicate the 3M™ Attest™ Rapid Readout Biological Indicator is incubating in the reader well and should not be touched. The time remaining display indicates the results are not available and incubation is in progress.
Do not remove 3M™ Attest™ Rapid Readout Biological Indicator until the (+) or (‑) symbol on the LCD panel indicates the test is complete.
Note: If 3M™ Attest™ Rapid Readout Biological Indicator is inadvertently removed before the incubation period is complete, an alarm will sound and a C2 Caution code will be displayed on the LCD panel under that well. You must return the 3M™ Attest™ Rapid Readout Biological Indicator to the reader well within 10 seconds or the results will be lost.
![]() WARNING: Do not remove or change placement of 3M™ Attest™ Rapid Readout Biological Indicator once it is placed into a well. Doing so may result in loss of results and the 3M™ Attest™ Rapid Readout Biological Indicator test may be invalid.
WARNING: Do not remove or change placement of 3M™ Attest™ Rapid Readout Biological Indicator once it is placed into a well. Doing so may result in loss of results and the 3M™ Attest™ Rapid Readout Biological Indicator test may be invalid.
INSTRUCTIONS FOR USE – Positive Control
Positive Control
Activate and incubate at least one non‑processed 3M™ Attest™ 1294 Rapid Readout Biological Indicator to use as the positive control each day that a processed 3M™ Attest™ 1294 Rapid Readout Biological Indicator is incubated and read by the unit. Write a “C” (for “control”) and the date on the label. The positive control can be placed in any incubation well. The positive control should be the same part number and have the same lot number as the processed 3M™ Attest™ Rapid Readout Biological Indicator in the unit.
The positive control biological indicator helps confirm:
•correct incubation temperatures are met (heater block reading of 37ºC +/‑2ºC);
•viability of spores has not been altered due to improper storage temperature, humidity, or proximity to chemicals;
•capability of media to promote rapid growth; and
•proper functioning of 3M™ Attest™ Auto‑reader 390G components.
INSTRUCTIONS FOR USE – Interpretation of Results
Fluorescent Results
After placing a 3M™ Attest™ Rapid Readout Biological Indicator into an incubation well, the 3M™ Attest™ Auto‑reader 390G LCD panel will display ***, **, * and then the remaining minutes of incubation directly below the incubating BI to indicate that incubation/reading is in progress.
A (+) will display on the LCD panel directly under the BI and an alarm will sound (if the sound feature is enabled) as soon as a positive 3M™ Attest™ Rapid Readout Biological Indicator result is detected.
At the end of the four hour incubation time, if a negative 3M™ Attest™ Rapid Readout Biological Indicator result is detected, a (‑) will display on the LCD panel directly under the incubating BI. The final negative fluorescent result (‑) for a processed 3M™ Attest™ 1294 Rapid Readout Biological Indicator after 4 hours of incubation indicates an acceptable sterilization process. The positive control should read positive (+).
After either the + or – symbol is displayed, and the result is recorded, the 3M™ Attest™ Rapid Readout Biological Indicator can be removed from the well. The 3M™ Attest™ Rapid Readout Biological Indicator should not be removed or touched when the display indicates remaining incubation time.
The positive (unprocessed) control 3M™ Attest™ 1294 Rapid Readout Biological Indicator must provide a positive fluorescent result (+). Processed 3M™ Attest™ Rapid Readout Biological Indicator results are not valid until the positive control reads fluorescent positive
(+). With a processed 3M™ Attest™ Rapid Readout Biological Indicator, a positive (+) result indicates a sterilization process failure.
Act on any positive test results immediately. Determine the cause of the positive 3M™ Attest™ Rapid Readout Biological Indicator and retest the sterilizer following current facility policies and procedures.