■Mounting
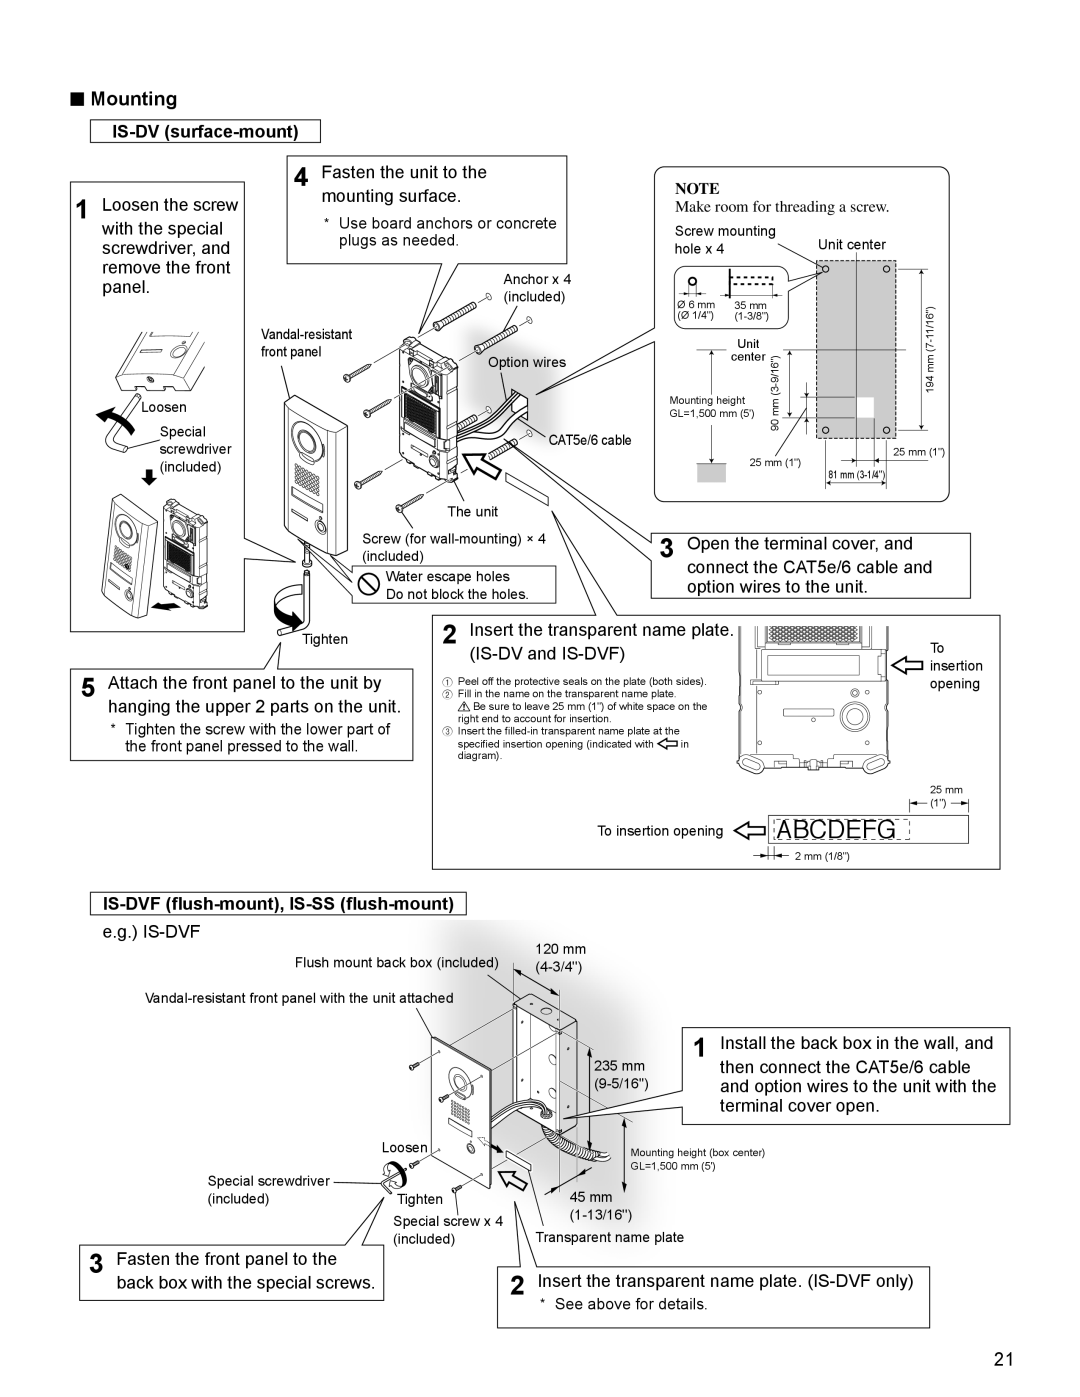
1 Loosen the screw with the special screwdriver, and remove the front panel.
Loosen
Special ![]()
![]() screwdriver (included)
screwdriver (included)
4 Fasten the unit to the | NOTE |
mounting surface. | Make room for threading a screw. |
|
* | Use board anchors or concrete | Screw mounting |
| ||
| plugs as needed. | Unit center | |||
| hole x 4 |
|
| ||
|
|
|
| ||
| Anchor x 4 |
|
|
|
|
| (included) | Ø 6 mm | 35 mm |
| 11/16'')- |
(Ø 1/4") | |||||
|
|
| |||
front panel |
|
| Unit |
| (7 |
Option wires |
| center | 194 mm | ||
|
|
| |||
|
| Mounting height | |||
|
| mm |
| ||
|
| GL=1,500 mm (5') |
| ||
|
| 90 |
| ||
| CAT5e/6 cable |
|
|
| |
|
|
|
| 25 mm (1") | |
|
|
| 25 mm (1") | ||
|
|
| 81 mm | ||
|
|
|
|
| |
The unit
Screw (for
Water escape holes Do not block the holes.
3 Open the terminal cover, and connect the CAT5e/6 cable and option wires to the unit.
Tighten
5 Attach the front panel to the unit by hanging the upper 2 parts on the unit.
*Tighten the screw with the lower part of the front panel pressed to the wall.
2 Insert the transparent name plate. (IS-DV and IS-DVF)
1Peel off the protective seals on the plate (both sides).
2Fill in the name on the transparent name plate.
![]() Be sure to leave 25 mm (1") of white space on the right end to account for insertion.
Be sure to leave 25 mm (1") of white space on the right end to account for insertion.
3Insert the
specified insertion opening (indicated with | in |
diagram). |
|
To
![]() insertion opening
insertion opening
25 mm (1") ![]()
To insertion opening ![]() ABCDEFG
ABCDEFG
2 mm (1/8")
e.g.) IS-DVF
Flush mount back box (included) | 120 mm |
Loosen
Special screwdriver ![]()
![]()
(included)Tighten
Special screw x 4 (included)
| 1 Install the back box in the wall, and |
235 mm | then connect the CAT5e/6 cable |
and option wires to the unit with the | |
| terminal cover open. |
Mounting height (box center)
GL=1,500 mm (5')
45 mm
Transparent name plate
3 Fasten the front panel to the back box with the special screws.
2 Insert the transparent name plate. (IS-DVF only)
*See above for details.
21