English

MOUNTING THE TERMINAL COVER

The product’s appearance can be improved by mount- ing the terminal cover on the main unit after installa- tion.

Mount the terminal cover after the connections have been made and you have checked that operation is normal.

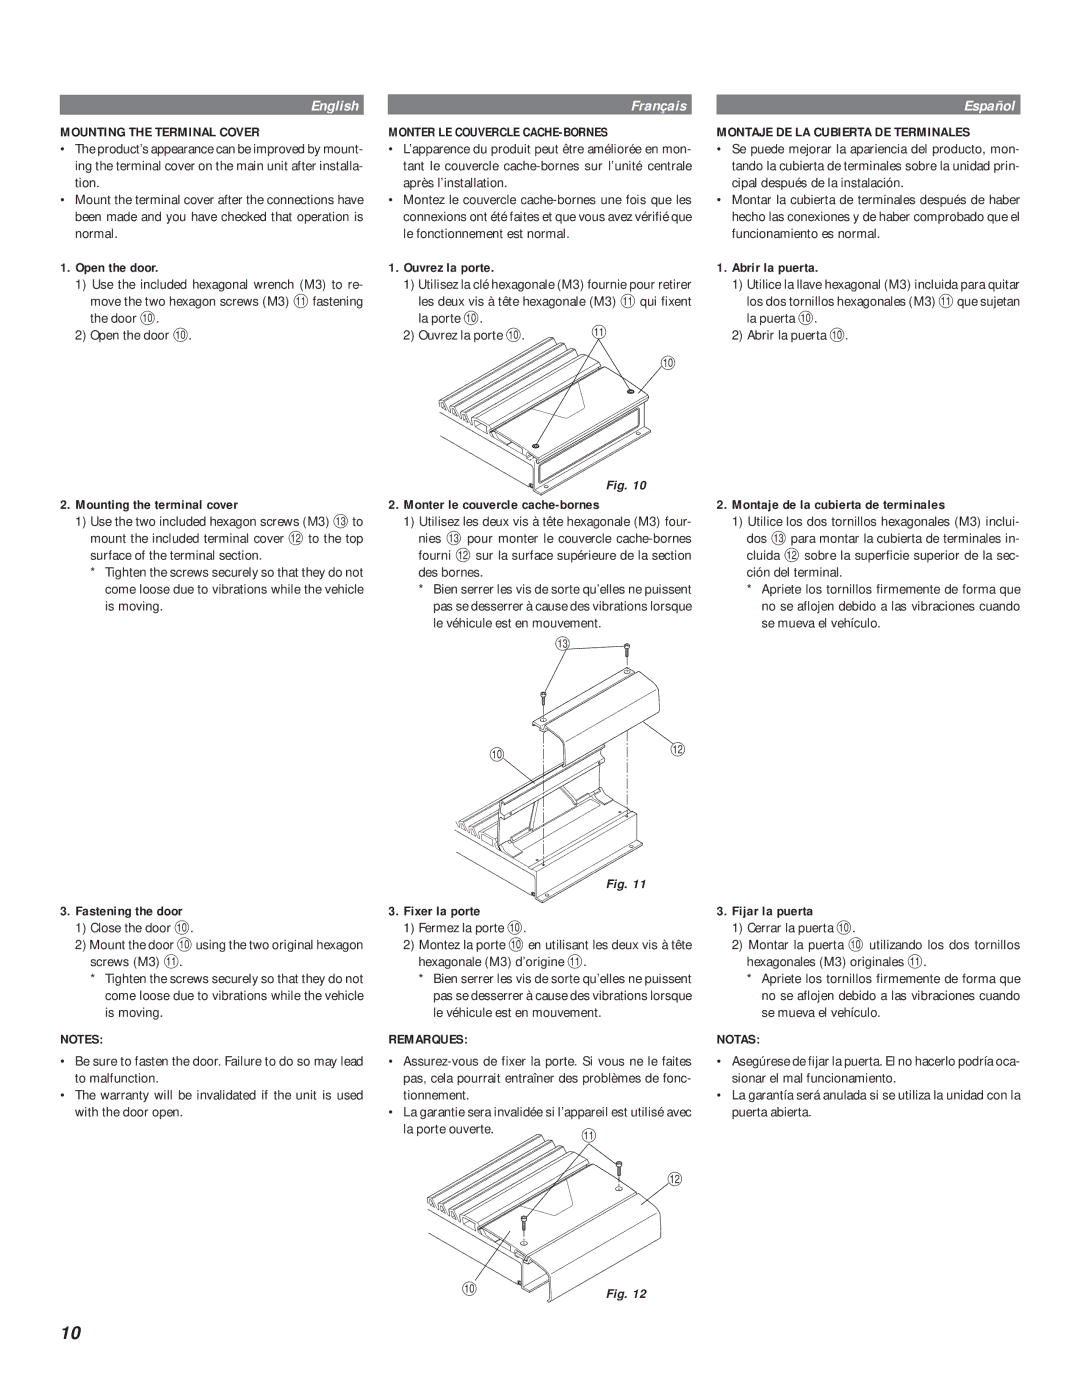
1.Open the door.

1)Use the included hexagonal wrench (M3) to re-

move the two hexagon screws (M3) q fastening the door p.

2)Open the door p.

2.Mounting the terminal cover

1)Use the two included hexagon screws (M3) e to mount the included terminal cover w to the top surface of the terminal section.

*Tighten the screws securely so that they do not come loose due to vibrations while the vehicle is moving.

Français

MONTER LE COUVERCLE CACHE-BORNES

L’apparence du produit peut être améliorée en mon- tant le couvercle cache-bornes sur l’unité centrale après l’installation.

Montez le couvercle cache-bornes une fois que les connexions ont été faites et que vous avez vérifié que le fonctionnement est normal.

1.Ouvrez la porte.

1) Utilisez la clé hexagonale (M3) fournie pour retirer

les deux vis à tête hexagonale (M3) q qui fixent la porte p.

2) Ouvrez la porte p.

q


p

Fig. 10

2.Monter le couvercle cache-bornes

1)Utilisez les deux vis à tête hexagonale (M3) four-

nies e pour monter le couvercle cache-bornes fourni w sur la surface supérieure de la section des bornes.

*Bien serrer les vis de sorte qu’elles ne puissent pas se desserrer à cause des vibrations lorsque le véhicule est en mouvement.

e

Español

MONTAJE DE LA CUBIERTA DE TERMINALES

Se puede mejorar la apariencia del producto, mon- tando la cubierta de terminales sobre la unidad prin- cipal después de la instalación.

Montar la cubierta de terminales después de haber hecho las conexiones y de haber comprobado que el funcionamiento es normal.

1.Abrir la puerta.

1)Utilice la llave hexagonal (M3) incluida para quitar

los dos tornillos hexagonales (M3) qque sujetan la puerta p.

2)Abrir la puerta p.

2.Montaje de la cubierta de terminales

1)Utilice los dos tornillos hexagonales (M3) inclui-

dos e para montar la cubierta de terminales in- cluida w sobre la superficie superior de la sec- ción del terminal.

*Apriete los tornillos firmemente de forma que no se aflojen debido a las vibraciones cuando se mueva el vehículo.

pw

3.Fastening the door

1)Close the door p.

2)Mount the door pusing the two original hexagon screws (M3) q.

*Tighten the screws securely so that they do not come loose due to vibrations while the vehicle is moving.

NOTES:

Be sure to fasten the door. Failure to do so may lead to malfunction.

The warranty will be invalidated if the unit is used with the door open.

Fig. 11

3.Fixer la porte

1)Fermez la porte p.

2)Montez la porte p en utilisant les deux vis à tête hexagonale (M3) d’origine q.

*Bien serrer les vis de sorte qu’elles ne puissent pas se desserrer à cause des vibrations lorsque le véhicule est en mouvement.

REMARQUES:

Assurez-vous de fixer la porte. Si vous ne le faites pas, cela pourrait entraîner des problèmes de fonc- tionnement.

La garantie sera invalidée si l’appareil est utilisé avec

la porte ouverte.

q


w

3.Fijar la puerta

1)Cerrar la puerta p.

2)Montar la puerta p utilizando los dos tornillos hexagonales (M3) originales q.

*Apriete los tornillos firmemente de forma que no se aflojen debido a las vibraciones cuando se mueva el vehículo.

NOTAS:

Asegúrese de fijar la puerta. El no hacerlo podría oca- sionar el mal funcionamiento.

La garantía será anulada si se utiliza la unidad con la puerta abierta.

p

Fig. 12

10

Page 10
Image 10
Alpine MRV-T320 Mounting the Terminal Cover, Monter LE Couvercle CACHE-BORNES, Montaje DE LA Cubierta DE Terminales, Notas

MRV-T420, MRV-T320 specifications

The Alpine MRV-T420 and MRV-T320 are renowned amplifiers in the world of car audio, embodying the synergy of powerful sound performance with advanced technology. Designed for audiophiles and casual listeners alike, these amplifiers elevate the in-car audio experience to new heights.

The MRV-T420 is a 4-channel amplifier, delivering an impressive 75 watts RMS per channel at 4 ohms, making it ideal for powering multiple speakers while ensuring clarity and volume. It’s engineered with advanced circuitry and innovative design, which allows it to push boundaries without overheating. The compact form factor of this amplifier means it can fit snugly in various vehicle setups without compromising on performance. The built-in high-pass and low-pass filters empower users to fine-tune their audio experience, allowing for a more customizable sound profile.

On the other hand, the MRV-T320 offers a refined 2-channel output, providing 100 watts RMS per channel at 4 ohms. It suits those seeking to power additional speaker systems or subwoofers while maintaining an outstanding level of fidelity. With its Class D technology, the MRV-T320 achieves a high level of efficiency, minimizing power consumption while delivering maximum output. This amplifier is perfect for users looking to integrate powerful sound solutions into their existing audio system without the bulk of traditional amplifiers.

Both amplifiers feature an intuitive design with front-mount controls, making adjustments straightforward and hassle-free. An essential characteristic of the MRV series is Alpine’s proprietary variable crossover settings, enabling users to tailor audio frequencies based on their personal preferences. Furthermore, the MRV-T420 and MRV-T320 boast a robust construction that reinforces longevity, protecting the components within from wear and tear.

Other notable technologies include thermal protection circuitry that prevents overheating during peak usage and short-circuit protection, ensuring reliability during operation. Whether installed in a compact vehicle or a larger car, the MRV-T420 and MRV-T320 promise high fidelity and crisp sound reproduction, allowing users to enjoy music like never before. With their advanced features, these amplifiers are a worthy investment for enthusiasts seeking to enrich their auditory journey on the road.