Installation

IN OUT

BALANCED IN

A

B

C

7

RS BACK

IN OUT

BALANCED IN

A

B

C

6

R SURR

IN OUT

BALANCED IN

A

B

C

5 RIGHT

IN OUT

BALANCED IN

A

B

C

4 CENTRE

IN OUT

BALANCED IN

A

B

C

3 LEFT

IN OUT

BALANCED IN

A

B

C

2

L SURR

IN OUT

POWER ON/OFF

BALANCED IN

SLOBLO FUSE

A

B

C

1

LS BACK

12V

TRIGGER

IN

POWER INLET

230V

Positioning the unit

<Place the amplifier on a level, firm surface.

<Avoid placing the unit in direct sunlight or near sources of heat or damp.

<Do not place the unit on top of another power amplifier or other sources of heat.

<Ensure adequate ventilation.

If the unit is placed in an enclosed space, such as a bookcase, equipment rack or cabinet, make sure that there is adequate space and ventilation in the enclosure for air to flow through the ventilation slots and cool the amplifier. Inadequate cabinet ventilation may cause the P1000 to shut down due to thermal overload.

The amplifier will run warm, even during normal operation.

<Ensure that the equipment rack or stand can support the weight of the P1000.

Connecting to a pre-amplifier

Two different connection types are provided for receiving signals from your pre-amplifier. The connection type to use depends on the set-up that you have.

1.If the cables to be used to connect your pre-amp. to the P1000 are less than 3m long, we recommend connecting your pre-amp. to the phono sockets of your P1000.

2.If the cables to be used to connect your pre-amp. to the P1000 are 3m or longer and your pre-amp. has balanced outputs, we recommend using these instead of the phono connections. Performance will also be improved in electrically-noisy environments by using these connections.

While it is acceptable to mix balanced and phono connections between your pre-amp. and P1000 (should you wish), do not connect both balanced and phono inputs to any single channel.

General connection advice

The outputs from your pre-amp. should be connected to the AUDIO IN inputs on the P1000. It is helpful to connect the pre-amp. output for a given channel to the input for that particular channel on the P1000. For example: connect the left-surround output from your pre-amp. to the left-surround channel input of the P1000. There is no technical improvement in following this strategy, but it makes life easier.

If you wish to use two modules to bi-amplify a pair of speakers, or would like to bi-amplify using another power amp., then you can take the signal for that channel (using the AUDIO OUT phono socket for that channel) and feed it on to the additional module(s). The signal is then fed in to the first module, but also fed on to the second module so that both modules can bi-amplify the loudspeaker. See ‘Bi-amping’ on page 8 for more information. Note that bi-amping in this way requires the use of phono connections between your pre-amp. and the P1000.

12V Trigger input

If your pre-amp. provides a 12V Trigger output, it can be connected to the 12V TRIGGER IN socket using a 3.5mm jack. This enables the P1000 to be turned on remotely from the pre-amp.

Note that the trigger input is active only when the power button on the rear panel is in the ‘on’ position.

The 12V-trigger uses a 3.5mm mono jack plug, wired as follows:

<Sleeve: Ground

<Tip: Active

P1000

E-6

Page 6
Image 6
Arcam P1000 manual Installation, Positioning the unit, Connecting to a pre-amplifier, General connection advice

P1000 specifications

The Arcam P1000 is a high-performance Stereo Power Amplifier designed to deliver exceptional sound quality and reliability for audiophiles and home theatre enthusiasts. With its sleek design and robust build, the P1000 exemplifies Arcam's commitment to excellence in audio engineering.

One of the standout features of the P1000 is its advanced Class G amplifier technology. This innovative design allows the amplifier to efficiently switch between multiple power supplies, which ensures optimal sound quality while maintaining high output power. As a result, users can enjoy undistorted audio even at elevated volume levels. The P1000 delivers an impressive output of 100 watts per channel at 8 ohms and a substantial 200 watts per channel at 4 ohms, making it capable of driving a wide range of speakers with varying sensitivities.

The P1000 is equipped with intricate circuitry and high-quality components that minimize interference and noise, further enhancing the listening experience. It features a fully balanced input configuration, which significantly reduces common-mode noise and increases the overall signal integrity. The use of high-grade capacitors and resistors ensures longevity and reliability while delivering a dynamic and detailed sound.

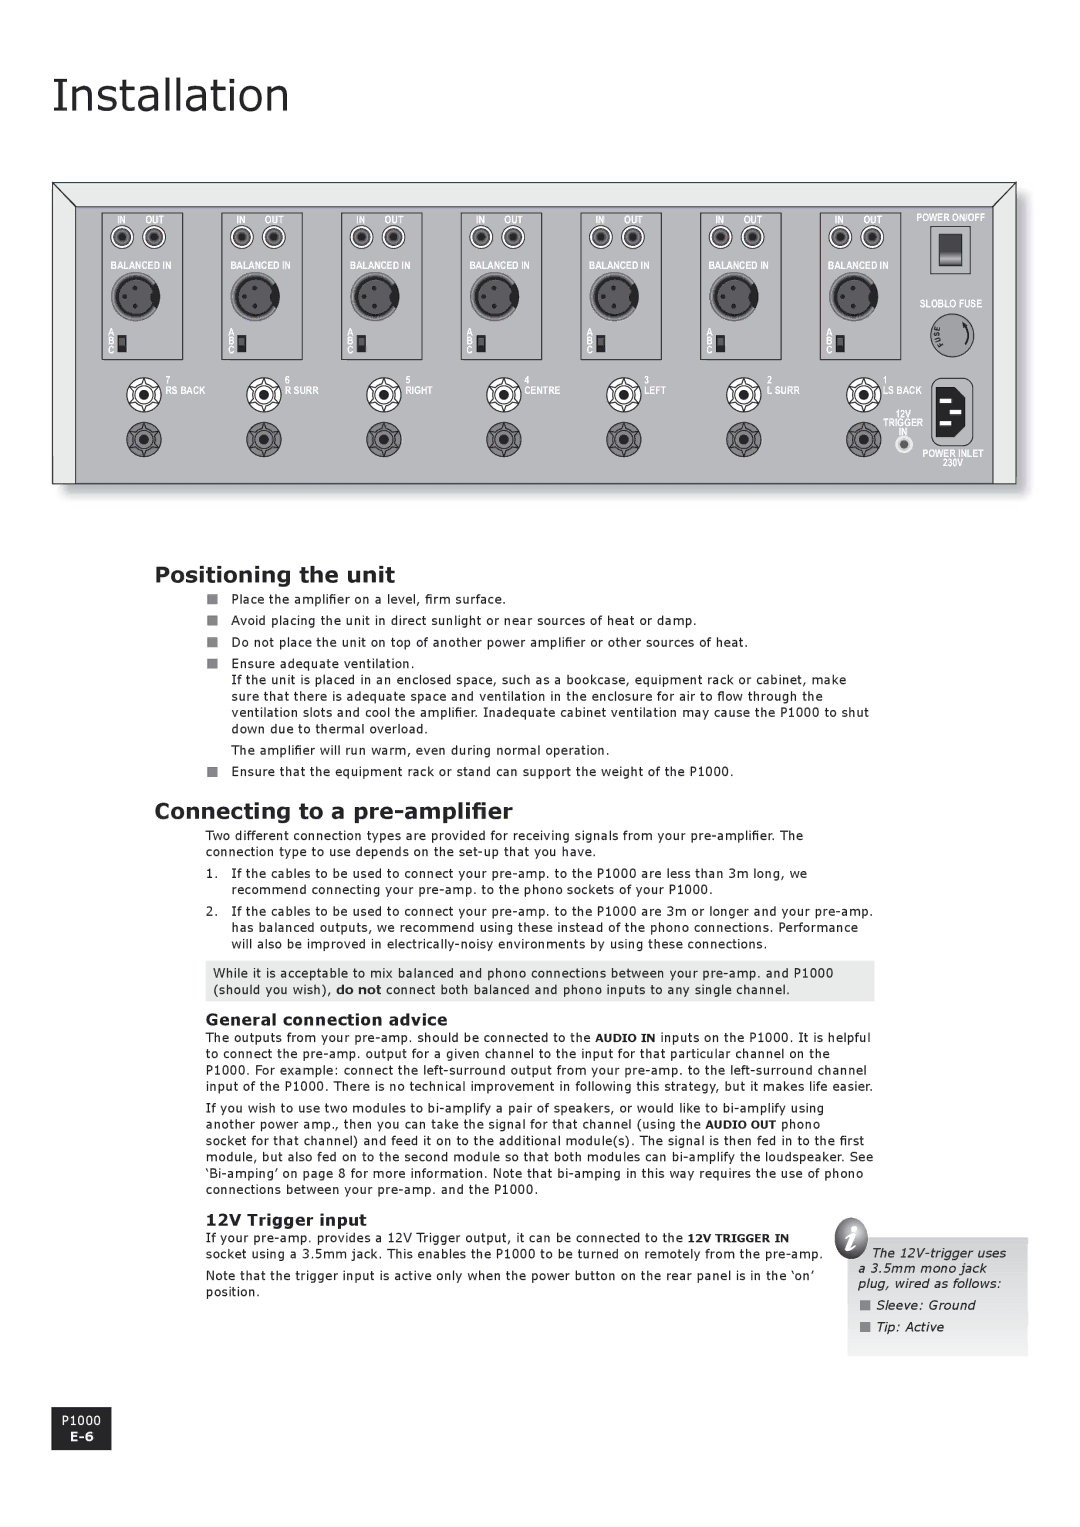
Another noteworthy characteristic of the P1000 is its versatility. It includes a variety of input options to accommodate various audio sources. These include RCA and XLR inputs, allowing for seamless connections to different preamplifiers or home theatre receivers. Additionally, the amplifier has a trigger input that enables automated power-on when paired with compatible devices, enhancing convenience for users.

The design of the P1000 is both aesthetically pleasing and functional. Its sturdy chassis minimizes vibrations and contributes to the overall durability of the unit. The amplifier also features an easy-to-read front panel that includes LED indicators for operational status, providing users with quick visual feedback.

In summary, the Arcam P1000 stands out as a premier choice for those seeking an exceptional power amplifier. Its advanced Class G technology, robust output capabilities, high-quality components, and user-friendly design make it an excellent addition to any high-end audio setup. Whether you're an audiophile or a casual listener, the P1000 promises to deliver an immersive and faithful sound experience that will elevate your audio enjoyment to new heights.