To adjust the reverse clutch (Figure 13) :
1.Loosen the two nuts on the end of the
2.Turn the adjusting nut so that the direction control lever stops 15 degrees past vertical to the rear.
3.Hold the adjusting nut and tighten the jam nut against it.
To adjust the forward clutch (Figure 13) :
1.Put the direction control in the forward position.
2.Loosen the two rear nuts on the
3.Turn the adjusting nut until the
4.Hold the adjusting nut and tighten the jam nut against it.
HI/LOW GEAR CLUTCH
WARNING: Stop the engine before adjusting the gear clutch.
To adjust the “HIGH” clutch:
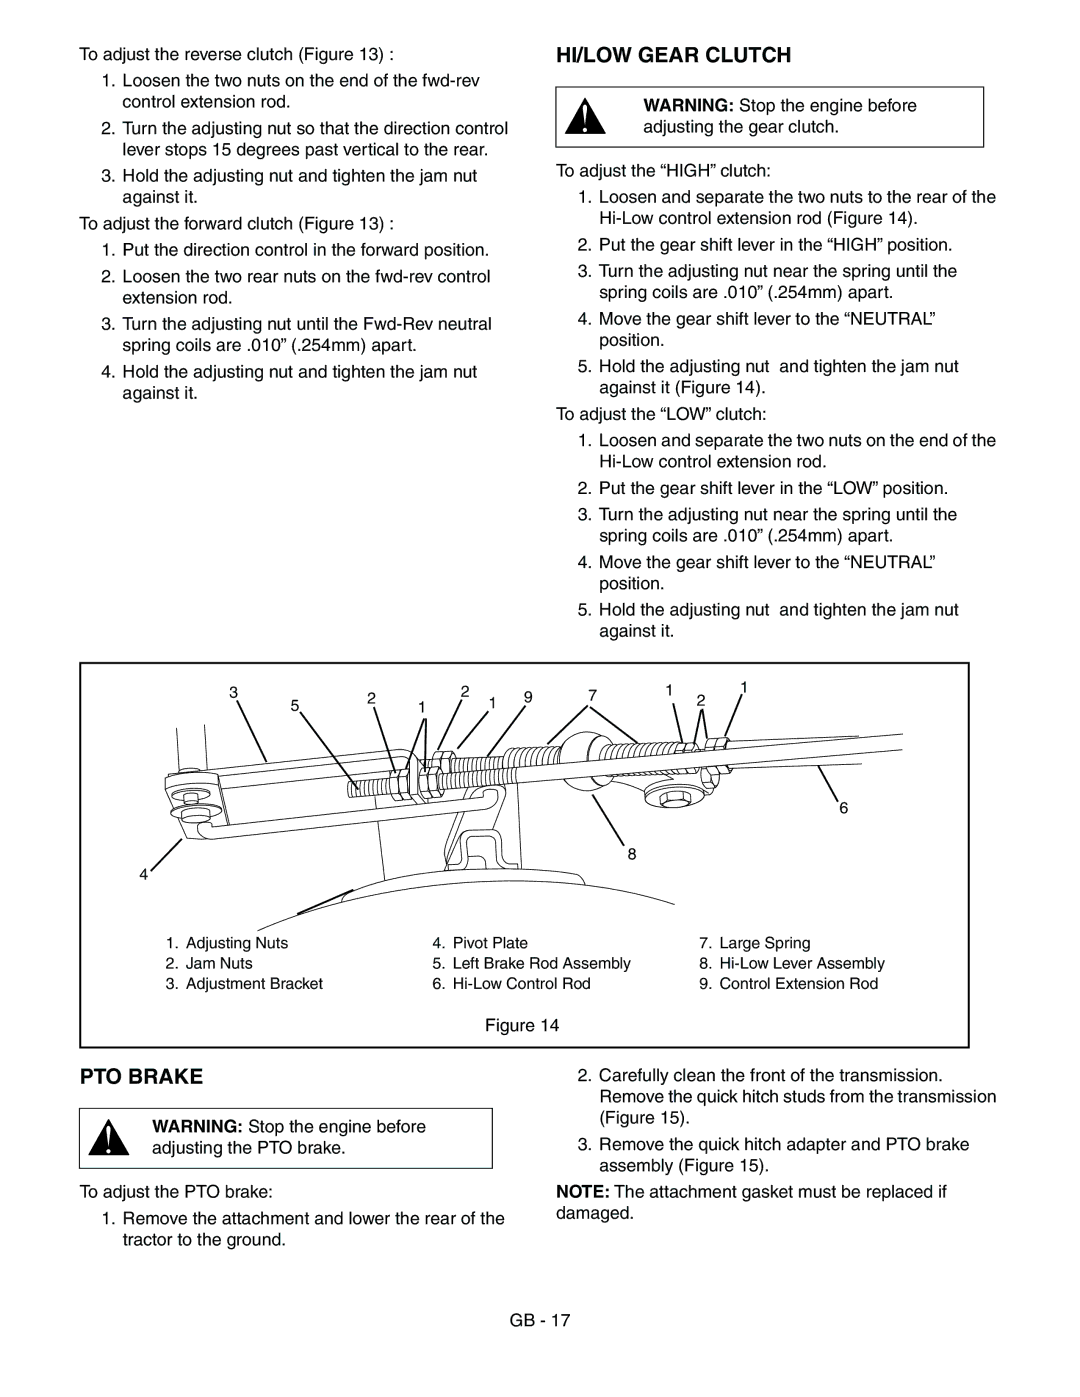
1.Loosen and separate the two nuts to the rear of the
2.Put the gear shift lever in the “HIGH” position.
3.Turn the adjusting nut near the spring until the spring coils are .010” (.254mm) apart.
4.Move the gear shift lever to the “NEUTRAL” position.
5.Hold the adjusting nut and tighten the jam nut against it (Figure 14).
To adjust the “LOW” clutch:
1.Loosen and separate the two nuts on the end of the
2.Put the gear shift lever in the “LOW” position.
3.Turn the adjusting nut near the spring until the spring coils are .010” (.254mm) apart.
4.Move the gear shift lever to the “NEUTRAL” position.
5.Hold the adjusting nut and tighten the jam nut against it.
| 3 | 2 | 1 | 2 | 9 | 7 | 1 | 2 | 1 |
| 5 | 1 |
|
|
| ||||
|
|
|
|
|
|
|
|
| 6 |
|
|
|
|
|
| 8 |
|
|
|
4 |
|
|
|
|
|
|
|
|
|
1. | Adjusting Nuts |
| 4. | Pivot Plate |
|
| 7. | Large Spring | |
2. | Jam Nuts |
| 5. | Left Brake Rod Assembly |
| 8. | |||
3. | Adjustment Bracket |
| 6. |
| 9. | Control Extension Rod | |||
|
|
|
| Figure 14 |
|
|
|
| |
PTO BRAKE
WARNING: Stop the engine before adjusting the PTO brake.
To adjust the PTO brake:
1.Remove the attachment and lower the rear of the tractor to the ground.
2.Carefully clean the front of the transmission. Remove the quick hitch studs from the transmission (Figure 15).
3.Remove the quick hitch adapter and PTO brake assembly (Figure 15).
NOTE: The attachment gasket must be replaced if damaged.
GB - 17
