Manuals
/
ATEN Technology
/
Computer Equipment
/
Network Card
ATEN Technology
ACS-1208AL, ACS-1216AL Slide the unit into the rack, Rack Mounting, 2003-01-27
Models:
ACS-1208AL, ACS-1216AL
1
69
72
72
Download
72 pages
63.85 Kb
65
66
67
68
69
70
71
72
<
>
Troubleshooting
Specification
Install
LCD OSD Configuration
Reset Switch
OSD Factory Default Settings
Setting the Scan Interval
Firmware Upgrade Recovery Switch
Power Jack
The Firmware Upgrade Utility
Page 69
Image 69
Rack Mounting
3.
Slide the unit into the rack.
4.
Screw the metal tabs to the rear flanges.
5. Secure the unit to the rack with the front flanges and rear tabs.
C-3
2003-01-27
Page 68
Page 70
Page 69
Image 69
Page 68
Page 70
Contents
ACS-1208AL ACS-1216AL
This is a class A product. In a domestic environment this product may cause radio interference in which case the user may be required to take adequate measures
Packing List
Installation
Table of Contents
1. Introduction
Hotkey Operation
Appendix A, Technical Information
5. The Firmware Upgrade Utility
Appendix B, Module Removal
Appendix C, Rack Mounting
Overview
About This Manual
Install Enter
Key information in
2003-01-27
2003-01-27
viii
Introduction
Overview
Chapter
2003-01-27
Features
Hardware Requirements
Introduction
2003-01-27
2L-1700 / 2L-1701 2L-5201P /5202P / 5203P
1.Handle
ACS-1208AL /ACS1216AL Front View
2.Cover
3.Port LEDs
10.Reset Switch
4.Keyboard 5.Power LED
6.Slide Release
7.Rack Mounting Brackets
ACS-1208AL / ACS-1216ALRear View
4.Power Jack
1.Daisy Chain Port
2.CPU Port Section
6.Firmware Upgrade Recovery Switch
5.Firmware Upgrade Port
Introduction
2003-01-27
LCD OSD Configuration
Single Stage Installation
Installation
Before you Begin
Chapter
Daisy Chaining
aPlug in the power adapter for the First Station
ACS-1216AL ACS-1216A ACS-1216A
2003-01-27
Switching Station Positions
Hot Plugging
Hot Plugging CPU Ports
Port ID Numbering
Port Selection
Powering Off and Restarting
2003-01-27
Hotkey Operation
Hotkey Port Access
Invoking Hotkey Mode
Chapter
3.Press Enter
Selecting the Active Port
3.Press Enter
Setting the Scan Interval
Auto Scan Paused
Invoking Auto Scan
1.Invoke Hotkey Mode see p. 2.Key in Arrow
Control
Hotkey
Summary
OSD Operation
OSD Operation
Chapter
2003-01-27
OSD Main Screen Headings
OSD Navigation
Heading
Explanation
F1 GOTO
OSD Functions
F2 LIST
Choice
Meaning
F3 SET
ACCESSIBLE PORTS, p
Setting
QUICK VIEW + POWERED ON - Only those Ports which
Function
F4 ADM
F4 ADM continued
Setting
Table continues on next page
Function
Function
Setting
Setting
OSD Operation
Function
F5 SKP
OSD Operation
F6 BRC
4-13
2003-01-27
F7 SCAN
OSD Operation
F8 LOUT
4-15
2003-01-27
2003-01-27
4-16
The Firmware Upgrade Utility
Introduction
Chapter
2003-01-27
Begin
Upgrade
Performing the Upgrade
2003-01-27
2003-01-27
The Firmware Upgrade Utility
Upgrade Failed
Succeeded
Upgrade
Firmware Upgrade Recovery
2003-01-27
ACS-1208AL / ACS-1216AL- Connection Tables
Technical Information
Appendix A
ACS-1208AL
ACS-1216AL
OSD Factory Default Settings
Setting
Default
Function
Specifications
ACS-1208AL
ACS-1216AL
Clear Login Information
Limited Warranty
Troubleshooting
Symptom
Possible Cause
2003-01-27
Module Removal
Removing the KVM Module
Appendix B
1. Remove the two attaching screws
Removing the Keyboard and Touchpad
4.Lift the module clear and unplug the cables
2003-01-27
Rack Mounting
Standard Rack Mounting
Appendix C
2003-01-27
Optional Rack Mounting
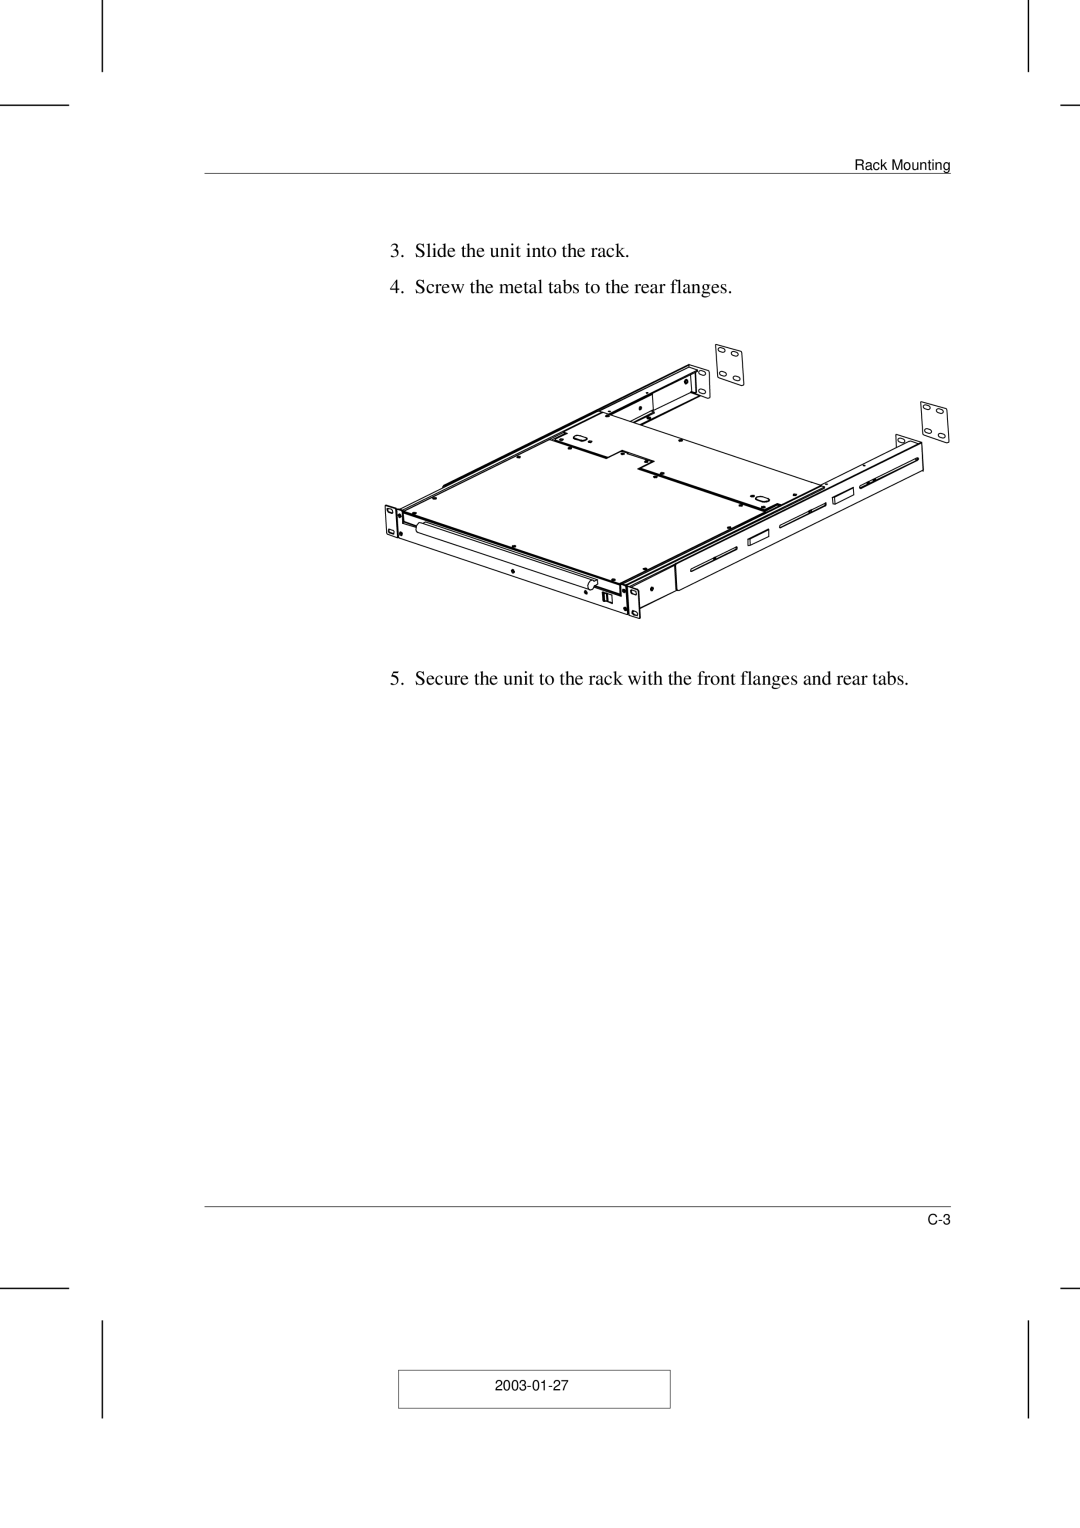
4.Screw the metal tabs to the rear flanges
3.Slide the unit into the rack
Rack Mounting
2003-01-27
2003-01-27
Index
E - F
G - H
Q - R