English
Controls and functions |
|
|
|
|
|
|
| |
Projector |
|
|
|
|
|
|
| |
|
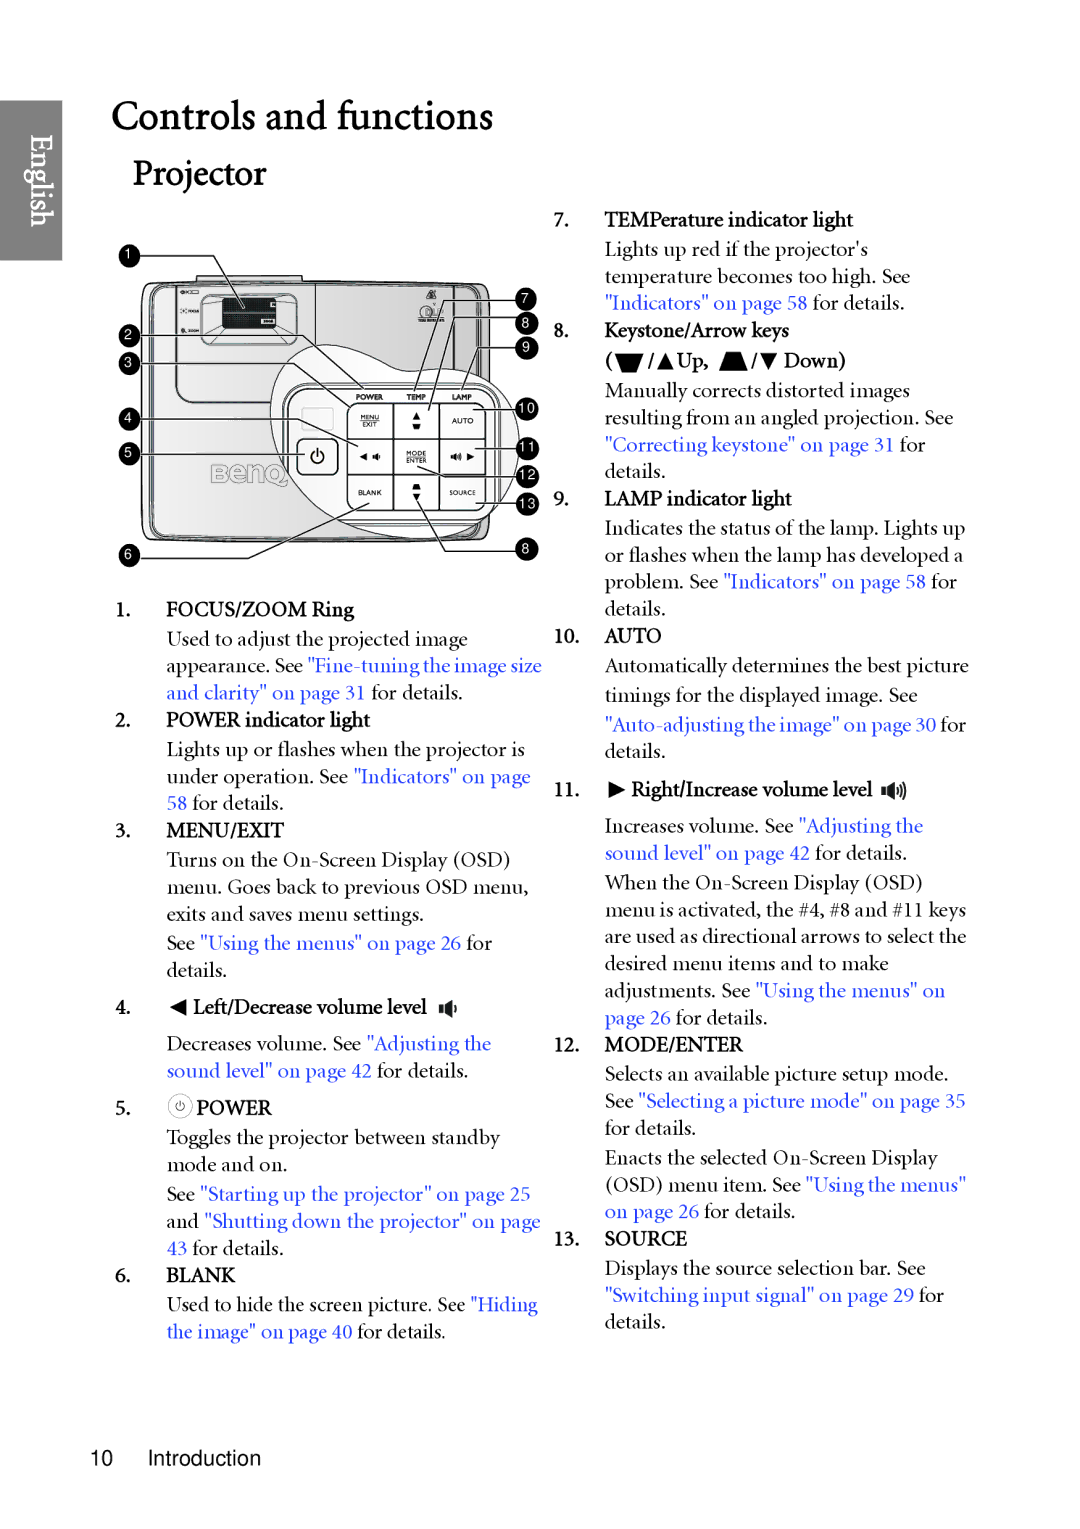
| 7. | TEMPerature indicator light | |||||
1 |
|
| Lights up red if the projector's | |||||
| 7 |
| temperature becomes too high. See | |||||
|
| "Indicators" on page 58 for details. | ||||||
| 8 |
| ||||||
2 | 8. | Keystone/Arrow keys | ||||||
9 | ||||||||
3 |
| ( | / | Up, | / | Down) | ||
|
| |||||||
| 10 |
| Manually corrects distorted images | |||||
4 |
| resulting from an angled projection. See | ||||||
|
| |||||||
5 | 11 |
| "Correcting keystone" on page 31 for | |||||
| 12 |
| details. |
|
|
| ||
| 13 | 9. | LAMP indicator light | |||||
|
|
|
|
|
|
|
|
|
| 8 |
| Indicates the status of the lamp. Lights up | ||
6 |
|
|
|
|
|
|
|
|
| or flashes when the lamp has developed a | ||||
|
|
|
|
|
| |||||||||
|
|
|
|
|
|
|
|
|
|
| ||||
|
|
|
|
|
|
|
|
|
|
|
| problem. See "Indicators" on page 58 for | ||
1. | FOCUS/ZOOM Ring |
| details. | |||||||||||
| Used to adjust the projected image | 10. | AUTO | |||||||||||
| appearance. See |
| Automatically determines the best picture | |||||||||||
| and clarity" on page 31 for details. |
| timings for the displayed image. See | |||||||||||
2. | POWER indicator light |
| ||||||||||||
| Lights up or flashes when the projector is |
| details. | |||||||||||
| under operation. See "Indicators" on page | 11. | Right/Increase volume level |
|
| |||||||||
| 58 for details. |
|
| |||||||||||
|
| Increases volume. See "Adjusting the | ||||||||||||
3. | MENU/EXIT |
| ||||||||||||
| Turns on the |
| sound level" on page 42 for details. | |||||||||||
|
| When the | ||||||||||||
| menu. Goes back to previous OSD menu, |
| ||||||||||||
| exits and saves menu settings. |
| menu is activated, the #4, #8 and #11 keys | |||||||||||
| See "Using the menus" on page 26 for |
| are used as directional arrows to select the | |||||||||||
|
| desired menu items and to make | ||||||||||||
| details. |
| ||||||||||||
|
| adjustments. See "Using the menus" on | ||||||||||||
4. | Left/Decrease volume level |
|
|
|
|
|
| |||||||
|
|
| page 26 for details. | |||||||||||
|
| |||||||||||||
|
|
|
|
|
|
|
|
|
|
|
| |||
| Decreases volume. See "Adjusting the | 12. | MODE/ENTER | |||||||||||
| sound level" on page 42 for details. |
| Selects an available picture setup mode. | |||||||||||
5. | POWER |
| See "Selecting a picture mode" on page 35 | |||||||||||
| for details. | |||||||||||||
| Toggles the projector between standby |
| ||||||||||||
|
| Enacts the selected | ||||||||||||
| mode and on. |
| ||||||||||||
|
| (OSD) menu item. See "Using the menus" | ||||||||||||
| See "Starting up the projector" on page 25 |
| ||||||||||||
|
| on page 26 for details. | ||||||||||||
| and "Shutting down the projector" on page |
| ||||||||||||
| 13. | SOURCE | ||||||||||||
| 43 for details. |
| Displays the source selection bar. See | |||||||||||
6. | BLANK |
| ||||||||||||
|
|
|
| |||||||||||
Used to hide the screen picture. See "Hiding | "Switching input signal" on page 29 for | |
details. | ||
the image" on page 40 for details. | ||
|
10 Introduction
