Brother XL5100 Twin-Needle Sewing, Costura con aguja doble, Couture avvec l’aiguille jumelée

Models: XL5100 XL5300 XL5200

1 88
Download 88 pages 46.47 Kb
Page 41
Image 41

A

1

B

3 2

Twin-Needle Sewing

Your sewing machine is designed for twin-needle sewing, which al- lows you to sew using two upper threads. You can use the same color or two different colors of thread for decorative stitches.

Inserting The Twin Needle

Insert the twin needle in the same way that a single needle is inserted. (Refer to page 7.) The flat side of the needle should be toward the back and the rounded side should be toward you.

Setting The Extra Spool Pin

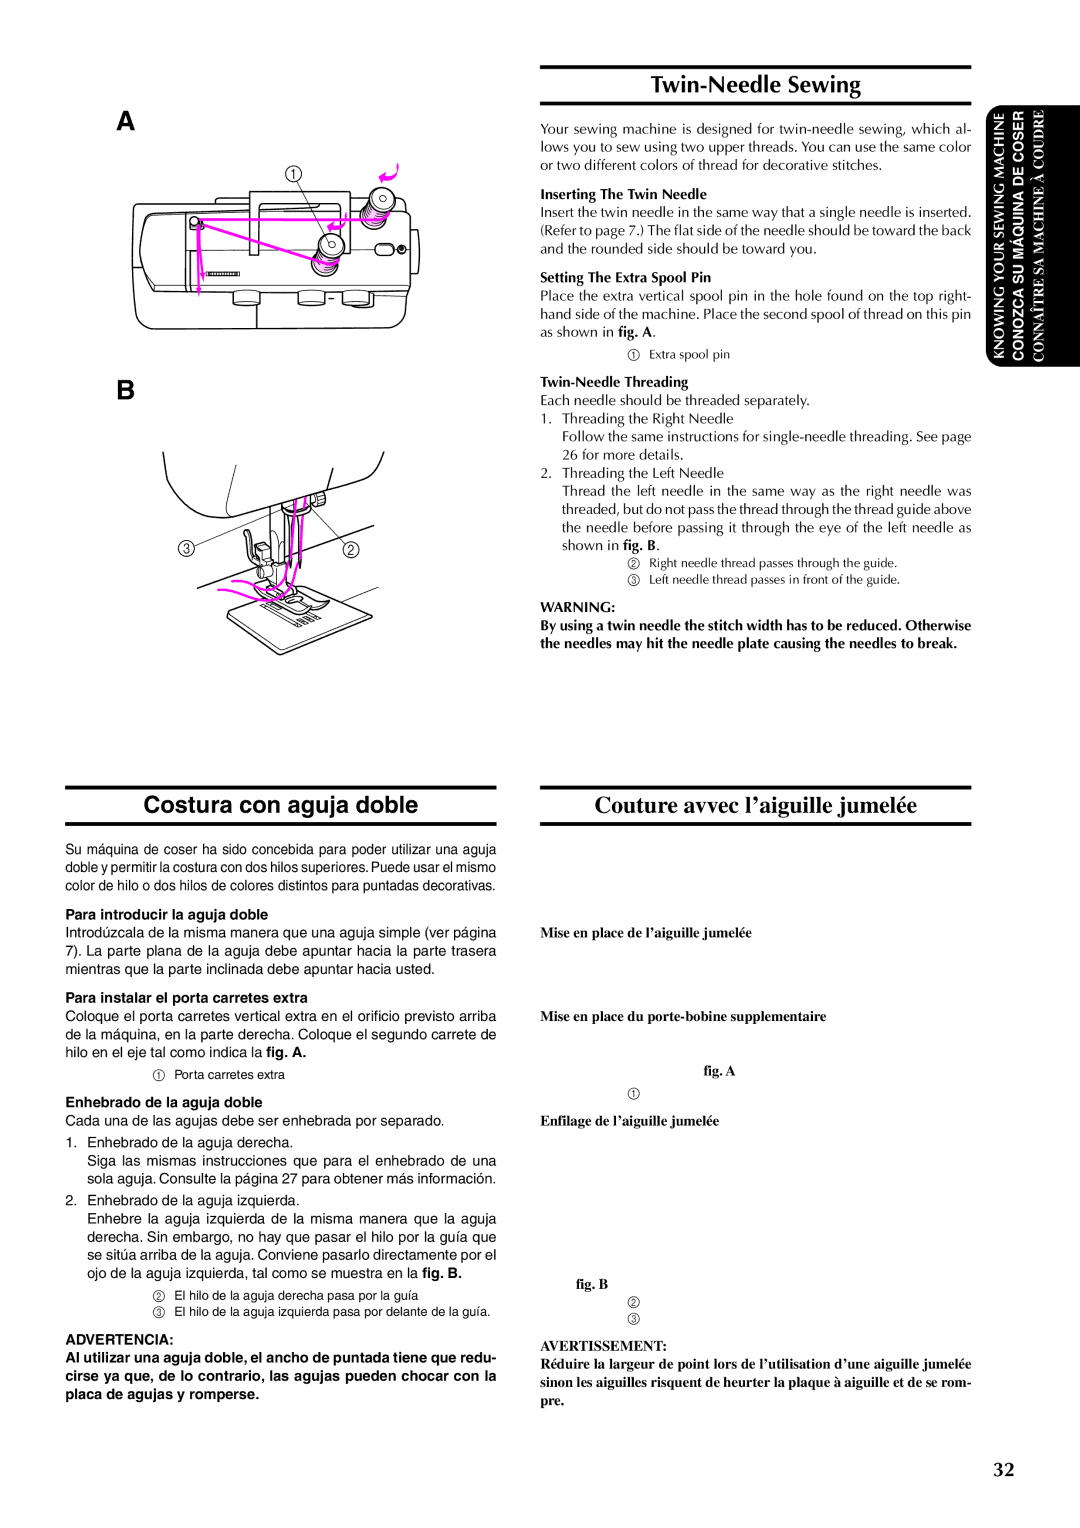
Place the extra vertical spool pin in the hole found on the top right- hand side of the machine. Place the second spool of thread on this pin as shown in fig. A.

1Extra spool pin

Twin-Needle Threading

Each needle should be threaded separately.

1.Threading the Right Needle

Follow the same instructions for single-needle threading. See page 26 for more details.

2.Threading the Left Needle

Thread the left needle in the same way as the right needle was threaded, but do not pass the thread through the thread guide above the needle before passing it through the eye of the left needle as shown in fig. B.

2 Right needle thread passes through the guide. 3 Left needle thread passes in front of the guide.

WARNING:

By using a twin needle the stitch width has to be reduced. Otherwise the needles may hit the needle plate causing the needles to break.

YOURSEWINGMACHINE

SUMÁQUINADECOSER

KNOWING

CONOZCA

CONNAÎTRE SA MACHINE À COUDRE

Costura con aguja doble

Su máquina de coser ha sido concebida para poder utilizar una aguja doble y permitir la costura con dos hilos superiores. Puede usar el mismo color de hilo o dos hilos de colores distintos para puntadas decorativas.

Para introducir la aguja doble

Introdúzcala de la misma manera que una aguja simple (ver página 7). La parte plana de la aguja debe apuntar hacia la parte trasera mientras que la parte inclinada debe apuntar hacia usted.

Para instalar el porta carretes extra

Coloque el porta carretes vertical extra en el orificio previsto arriba de la máquina, en la parte derecha. Coloque el segundo carrete de hilo en el eje tal como indica la fig. A.

1Porta carretes extra

Enhebrado de la aguja doble

Cada una de las agujas debe ser enhebrada por separado.

1.Enhebrado de la aguja derecha.

Siga las mismas instrucciones que para el enhebrado de una sola aguja. Consulte la página 27 para obtener más información.

2.Enhebrado de la aguja izquierda.

Enhebre la aguja izquierda de la misma manera que la aguja derecha. Sin embargo, no hay que pasar el hilo por la guía que se sitúa arriba de la aguja. Conviene pasarlo directamente por el ojo de la aguja izquierda, tal como se muestra en la fig. B.

2El hilo de la aguja derecha pasa por la guía

3El hilo de la aguja izquierda pasa por delante de la guía.

ADVERTENCIA:

Al utilizar una aguja doble, el ancho de puntada tiene que redu- cirse ya que, de lo contrario, las agujas pueden chocar con la placa de agujas y romperse.

Couture avvec l’aiguille jumelée

Cette machine à coudre a été conçue pour pauvoir être utilisée avec une aiguille jumelée, permettant ainsi de coudre avec deux fils supérieurs. Il est possible d’utiliser la même couleur de fil ou deux fils de couleurs différen- tes pour obtenir des points fantaisie décoratifs.

Mise en place de l’aiguille jumelée

Introduire l’aiguille comme pour une aiguille normale (veuillez vous référer

àla page 7). Le côté plat de l’aiguille doit être tourné vers l’arrière et l’arrondi doit se situer face à l’utilisateur.

Mise en place du porte-bobine supplementaire

Placer le porte-bobine vertical supplémentaire dans l’orifice qui se trouve au-dessus de la machine, du côté droit. Placer la seconde bobine de fil sur cet axe comme le montre la fig. A.

1Porte-bobine supplémentaire

Enfilage de l’aiguille jumelée

Chaque aiguille doit être enfilée séparément.

1.Enfilage de l’aiguille de droite

Suivre les mêmes instructions que pour l’enfilage d’une aiguille normale. Voir page 27 pour de plus amples détails.

2.Enfilage de l’aiguille de gauche

Enfiler l’aiguille de gauche de la même manière que l’aiguille de droite mais sans passer le fil par le guide-fils situé au-dessus de l’aiguille. Passer directement le fil par le chas de l’aiguille gauche, comme le montre la fig. B.

2 Le fil de l’aiguille droite passe par le guide-fils.

3 Le fil de l’aiguille gauche passe devant le guide-fils.

AVERTISSEMENT:

Réduire la largeur de point lors de l’utilisation d’une aiguille jumelée sinon les aiguilles risquent de heurter la plaque à aiguille et de se rom- pre.

32

Page 41
Image 41
Brother XL5100, XL5200, XL5300 Twin-Needle Sewing, Costura con aguja doble, Couture avvec l’aiguille jumelée

XL5100, XL5300, XL5200 specifications

The Brother XL series sewing machines, including the XL5200, XL5300, and XL5100, are versatile and user-friendly models designed for both beginners and experienced sewers. These machines combine functionality with advanced features to cater to a wide range of sewing projects.

The Brother XL5200 is designed to simplify the sewing experience while offering versatility. It features 35 built-in stitches, including decorative, utility, and stretch stitches, providing plenty of options for various projects. The easy-to-read LCD screen allows users to select stitches effortlessly. One of its standout features is the automatic needle threader, eliminating the frustration of threading the needle manually. The machine also comes equipped with a drop-in top bobbin system that ensures smooth and consistent sewing.

The XL5300 builds upon the capabilities of the XL5200, providing additional features that enhance creativity. With 60 built-in stitches, including an impressive selection of decorative stitches and seven one-step auto-size buttonhole options, this model encourages experimentation. The XL5300 also includes a hard case for protection and portability, making it an excellent choice for sewers who attend classes or workshops. Its adjustable stitch width and length allow for customization of stitches, ensuring the outcome perfectly aligns with the user’s vision.

The Brother XL5100 is a great entry-level machine known for its ease of use. This model contains 50 built-in stitches, including essential utility stitches that are perfect for garment construction, quilting, and crafting. Like its counterparts, it features an automatic needle threader and a jam-resistant drop-in bobbin. The XL5100 also offers a convenient free arm that is ideal for sewing sleeves and cuffs. This model is particularly user-friendly, making it an excellent option for beginners looking to develop their sewing skills.

All three models come with various presser feet and accessories that expand their functionality, such as a zipper foot, buttonhole foot, and walking foot for quilting. They are designed with sturdy construction, ensuring durability and longevity for all sewing enthusiasts.

In summary, the Brother XL5200, XL5300, and XL5100 are excellent choices for those looking for reliable sewing machines that offer a blend of user-friendly features, versatility, and performance. Whether for simple alterations or complex projects, these models provide the tools necessary to help bring user creativity to life.