ENTRETIEN

MANTENIMIENTO

MAINTENANCE

A

1


Cleaning


Removing the Shuttle Hook


2

1.

Raise the needle to its highest position and remove the power sup-


ply plug from the outlet.


2.

Remove the extension table and open the shuttle cover on the front


of the free arm.


3.

Take out the bobbin case by opening its latch and pulling it out


3


from the shuttle race.

B

4.

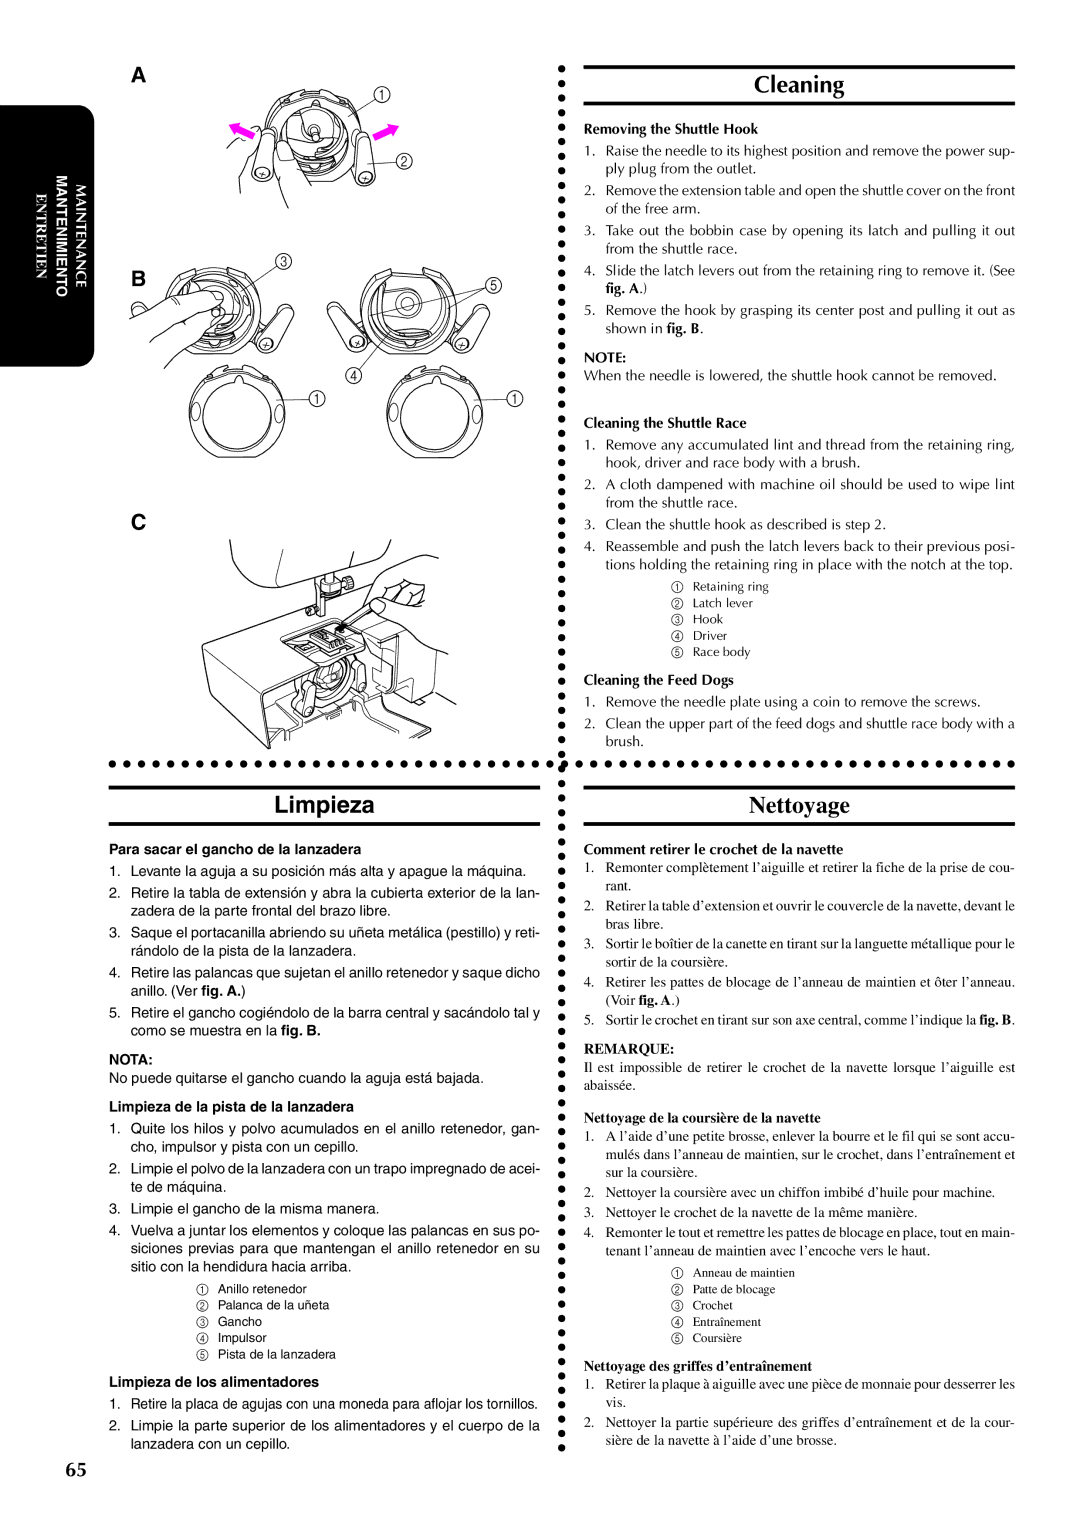
Slide the latch levers out from the retaining ring to remove it. (See

5


fig. A.)


5.

Remove the hook by grasping its center post and pulling it out as


shown in fig. B.


NOTE:


4

When the needle is lowered, the shuttle hook cannot be removed.

1 1

Cleaning the Shuttle Race


1.

Remove any accumulated lint and thread from the retaining ring,


hook, driver and race body with a brush.


2.

A cloth dampened with machine oil should be used to wipe lint

C


from the shuttle race.

3.

Clean the shuttle hook as described is step 2.


4.

Reassemble and push the latch levers back to their previous posi-


tions holding the retaining ring in place with the notch at the top.


1

Retaining ring


2

Latch lever


3

Hook


4

Driver


5

Race body

Cleaning the Feed Dogs

1. Remove the needle plate using a coin to remove the screws.

2. Clean the upper part of the feed dogs and shuttle race body with a brush.

Limpieza


Nettoyage

Para sacar el gancho de la lanzadera

1.Levante la aguja a su posición más alta y apague la máquina.

2.Retire la tabla de extensión y abra la cubierta exterior de la lan- zadera de la parte frontal del brazo libre.

3.Saque el portacanilla abriendo su uñeta metálica (pestillo) y reti- rándolo de la pista de la lanzadera.

4.Retire las palancas que sujetan el anillo retenedor y saque dicho anillo. (Ver fig. A.)

5.Retire el gancho cogiéndolo de la barra central y sacándolo tal y como se muestra en la fig. B.

NOTA:

No puede quitarse el gancho cuando la aguja está bajada.

Limpieza de la pista de la lanzadera

1.Quite los hilos y polvo acumulados en el anillo retenedor, gan- cho, impulsor y pista con un cepillo.

2.Limpie el polvo de la lanzadera con un trapo impregnado de acei- te de máquina.

3.Limpie el gancho de la misma manera.

4.Vuelva a juntar los elementos y coloque las palancas en sus po- siciones previas para que mantengan el anillo retenedor en su sitio con la hendidura hacia arriba.

1Anillo retenedor

2 Palanca de la uñeta

3 Gancho

4 Impulsor

5 Pista de la lanzadera

Limpieza de los alimentadores

1.Retire la placa de agujas con una moneda para aflojar los tornillos.

2.Limpie la parte superior de los alimentadores y el cuerpo de la lanzadera con un cepillo.

Comment retirer le crochet de la navette

1.Remonter complètement l’aiguille et retirer la fiche de la prise de cou- rant.

2.Retirer la table d’extension et ouvrir le couvercle de la navette, devant le bras libre.

3.Sortir le boîtier de la canette en tirant sur la languette métallique pour le sortir de la coursière.

4.Retirer les pattes de blocage de l’anneau de maintien et ôter l’anneau. (Voir fig. A.)

5.Sortir le crochet en tirant sur son axe central, comme l’indique la fig. B.

REMARQUE:

Il est impossible de retirer le crochet de la navette lorsque l’aiguille est abaissée.

Nettoyage de la coursière de la navette

1.A l’aide d’une petite brosse, enlever la bourre et le fil qui se sont accu- mulés dans l’anneau de maintien, sur le crochet, dans l’entraînement et sur la coursière.

2.Nettoyer la coursière avec un chiffon imbibé d’huile pour machine.

3.Nettoyer le crochet de la navette de la même manière.

4.Remonter le tout et remettre les pattes de blocage en place, tout en main- tenant l’anneau de maintien avec l’encoche vers le haut.

1Anneau de maintien

2 Patte de blocage

3 Crochet

4 Entraînement

5 Coursière

Nettoyage des griffes d’entraînement

1.Retirer la plaque à aiguille avec une pièce de monnaie pour desserrer les vis.

2.Nettoyer la partie supérieure des griffes d’entraînement et de la cour- sière de la navette à l’aide d’une brosse.

65

Page 74
Image 74
Brother XL5100, XL5200, XL5300 instruction manual Cleaning, Limpieza, Nettoyage

XL5100, XL5300, XL5200 specifications

The Brother XL series sewing machines, including the XL5200, XL5300, and XL5100, are versatile and user-friendly models designed for both beginners and experienced sewers. These machines combine functionality with advanced features to cater to a wide range of sewing projects.

The Brother XL5200 is designed to simplify the sewing experience while offering versatility. It features 35 built-in stitches, including decorative, utility, and stretch stitches, providing plenty of options for various projects. The easy-to-read LCD screen allows users to select stitches effortlessly. One of its standout features is the automatic needle threader, eliminating the frustration of threading the needle manually. The machine also comes equipped with a drop-in top bobbin system that ensures smooth and consistent sewing.

The XL5300 builds upon the capabilities of the XL5200, providing additional features that enhance creativity. With 60 built-in stitches, including an impressive selection of decorative stitches and seven one-step auto-size buttonhole options, this model encourages experimentation. The XL5300 also includes a hard case for protection and portability, making it an excellent choice for sewers who attend classes or workshops. Its adjustable stitch width and length allow for customization of stitches, ensuring the outcome perfectly aligns with the user’s vision.

The Brother XL5100 is a great entry-level machine known for its ease of use. This model contains 50 built-in stitches, including essential utility stitches that are perfect for garment construction, quilting, and crafting. Like its counterparts, it features an automatic needle threader and a jam-resistant drop-in bobbin. The XL5100 also offers a convenient free arm that is ideal for sewing sleeves and cuffs. This model is particularly user-friendly, making it an excellent option for beginners looking to develop their sewing skills.

All three models come with various presser feet and accessories that expand their functionality, such as a zipper foot, buttonhole foot, and walking foot for quilting. They are designed with sturdy construction, ensuring durability and longevity for all sewing enthusiasts.

In summary, the Brother XL5200, XL5300, and XL5100 are excellent choices for those looking for reliable sewing machines that offer a blend of user-friendly features, versatility, and performance. Whether for simple alterations or complex projects, these models provide the tools necessary to help bring user creativity to life.