UTILISATION DES ACCESSOIRES ET

LEURS APPLICATIONS

USO DE ACCESORIOS Y

APLICACIONES

USING ATTACHMENTS

AND APPLICA TIONS

A


Zipper Inserting


1


2


XL5100


XL5300 XL5200

Pattern

Stitch Length

Stitch Width

Foot


PX300

PX200

PX100


Straight


2.5


2

2

3

2-3

(Center needle

Zipper Foot


Stitch


position)


3

NOTE:


After selecting the pattern, set the stitch width dial to 2.5 to select the

B


center needle position.


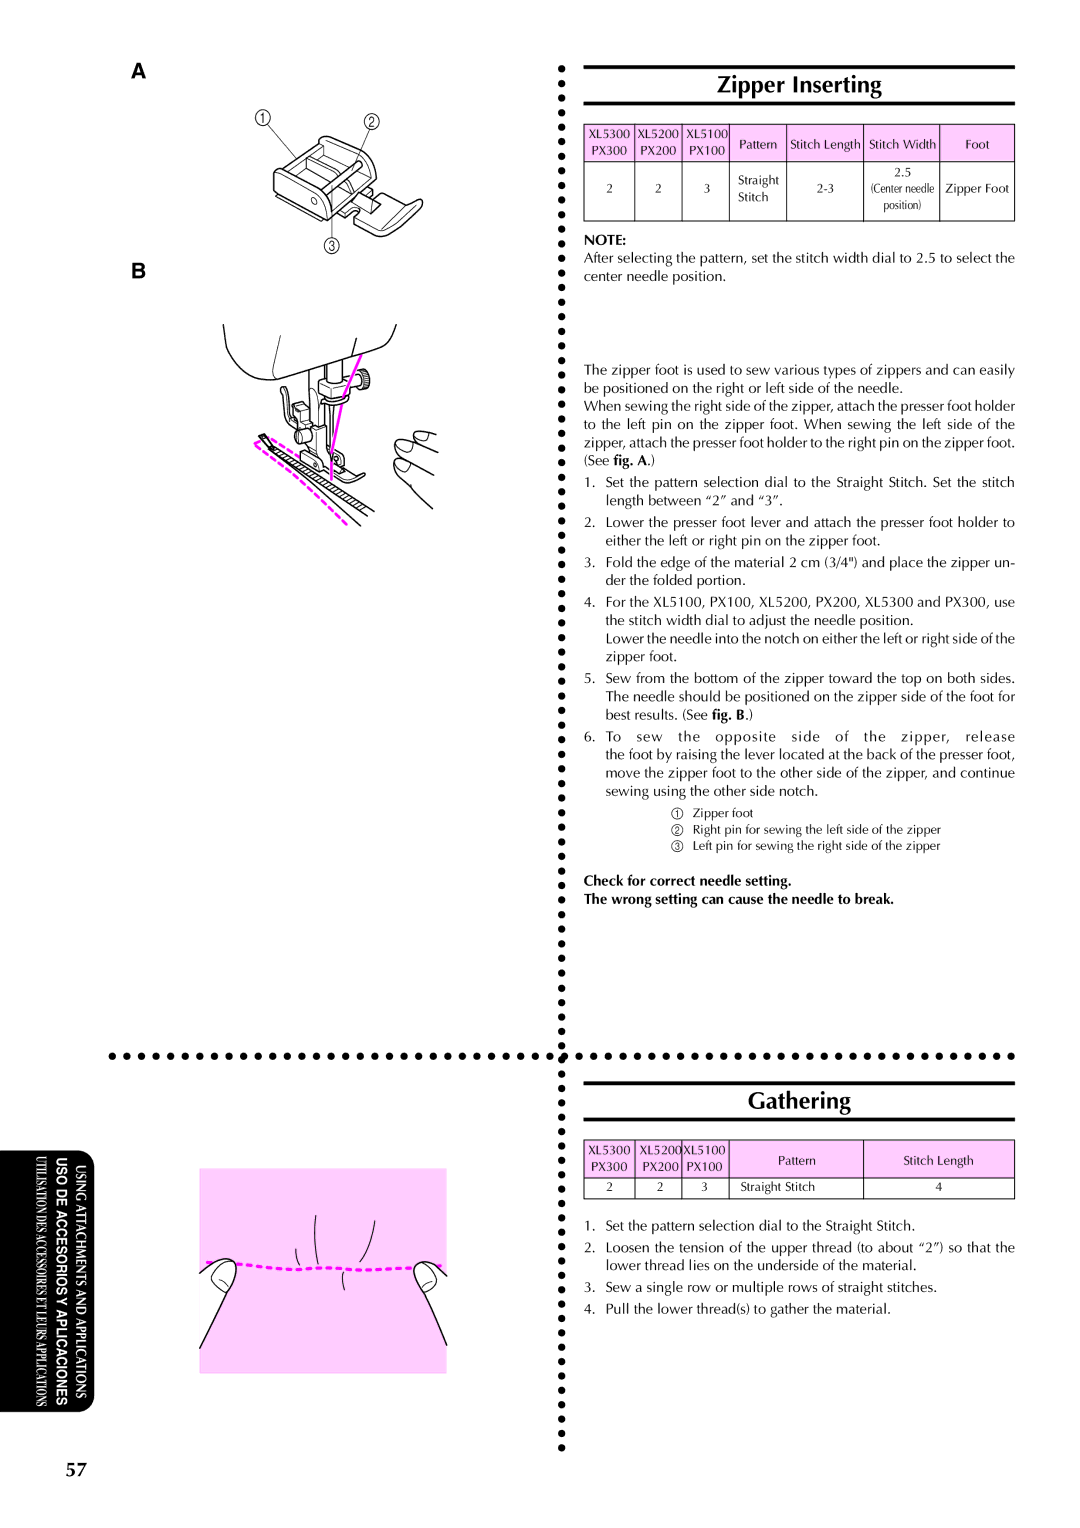
The zipper foot is used to sew various types of zippers and can easily be positioned on the right or left side of the needle.

When sewing the right side of the zipper, attach the presser foot holder to the left pin on the zipper foot. When sewing the left side of the zipper, attach the presser foot holder to the right pin on the zipper foot. (See fig. A.)

1. Set the pattern selection dial to the Straight Stitch. Set the stitch length between “2” and “3”.

2. Lower the presser foot lever and attach the presser foot holder to either the left or right pin on the zipper foot.

3. Fold the edge of the material 2 cm (3/4") and place the zipper un- der the folded portion.

4. For the XL5100, PX100, XL5200, PX200, XL5300 and PX300, use the stitch width dial to adjust the needle position.

Lower the needle into the notch on either the left or right side of the zipper foot.

5. Sew from the bottom of the zipper toward the top on both sides. The needle should be positioned on the zipper side of the foot for best results. (See fig. B.)

6. To sew the opposite side of the zipper, release the foot by raising the lever located at the back of the presser foot, move the zipper foot to the other side of the zipper, and continue sewing using the other side notch.

1 Zipper foot

2 Right pin for sewing the left side of the zipper 3 Left pin for sewing the right side of the zipper

Check for correct needle setting.

The wrong setting can cause the needle to break.

Gathering

XL5300

XL5200XL5100

Pattern

Stitch Length

PX300

PX200

PX100


2

2

3

Straight Stitch

4


1. Set the pattern selection dial to the Straight Stitch.

2. Loosen the tension of the upper thread (to about “2”) so that the lower thread lies on the underside of the material.

3. Sew a single row or multiple rows of straight stitches.

4. Pull the lower thread(s) to gather the material.

57

Page 66
Image 66
Brother XL5200, XL5300, XL5100 instruction manual Zipper Inserting, Gathering

XL5100, XL5300, XL5200 specifications

The Brother XL series sewing machines, including the XL5200, XL5300, and XL5100, are versatile and user-friendly models designed for both beginners and experienced sewers. These machines combine functionality with advanced features to cater to a wide range of sewing projects.

The Brother XL5200 is designed to simplify the sewing experience while offering versatility. It features 35 built-in stitches, including decorative, utility, and stretch stitches, providing plenty of options for various projects. The easy-to-read LCD screen allows users to select stitches effortlessly. One of its standout features is the automatic needle threader, eliminating the frustration of threading the needle manually. The machine also comes equipped with a drop-in top bobbin system that ensures smooth and consistent sewing.

The XL5300 builds upon the capabilities of the XL5200, providing additional features that enhance creativity. With 60 built-in stitches, including an impressive selection of decorative stitches and seven one-step auto-size buttonhole options, this model encourages experimentation. The XL5300 also includes a hard case for protection and portability, making it an excellent choice for sewers who attend classes or workshops. Its adjustable stitch width and length allow for customization of stitches, ensuring the outcome perfectly aligns with the user’s vision.

The Brother XL5100 is a great entry-level machine known for its ease of use. This model contains 50 built-in stitches, including essential utility stitches that are perfect for garment construction, quilting, and crafting. Like its counterparts, it features an automatic needle threader and a jam-resistant drop-in bobbin. The XL5100 also offers a convenient free arm that is ideal for sewing sleeves and cuffs. This model is particularly user-friendly, making it an excellent option for beginners looking to develop their sewing skills.

All three models come with various presser feet and accessories that expand their functionality, such as a zipper foot, buttonhole foot, and walking foot for quilting. They are designed with sturdy construction, ensuring durability and longevity for all sewing enthusiasts.

In summary, the Brother XL5200, XL5300, and XL5100 are excellent choices for those looking for reliable sewing machines that offer a blend of user-friendly features, versatility, and performance. Whether for simple alterations or complex projects, these models provide the tools necessary to help bring user creativity to life.