Brother XL5300 Monogramming and Embroidering, Monogramas y bordados, Monogrammes et broderies

Models: XL5100 XL5300 XL5200

1 88
Download 88 pages 46.47 Kb
Page 70
Image 70

Monogramming and Embroidering

XL5300

XL5200

XL5100

Pattern

Stitch Length

Stitch Width

Foot

PX300

PX200

PX100


3

3

2

Zigzag Stitch

Any

Any

None


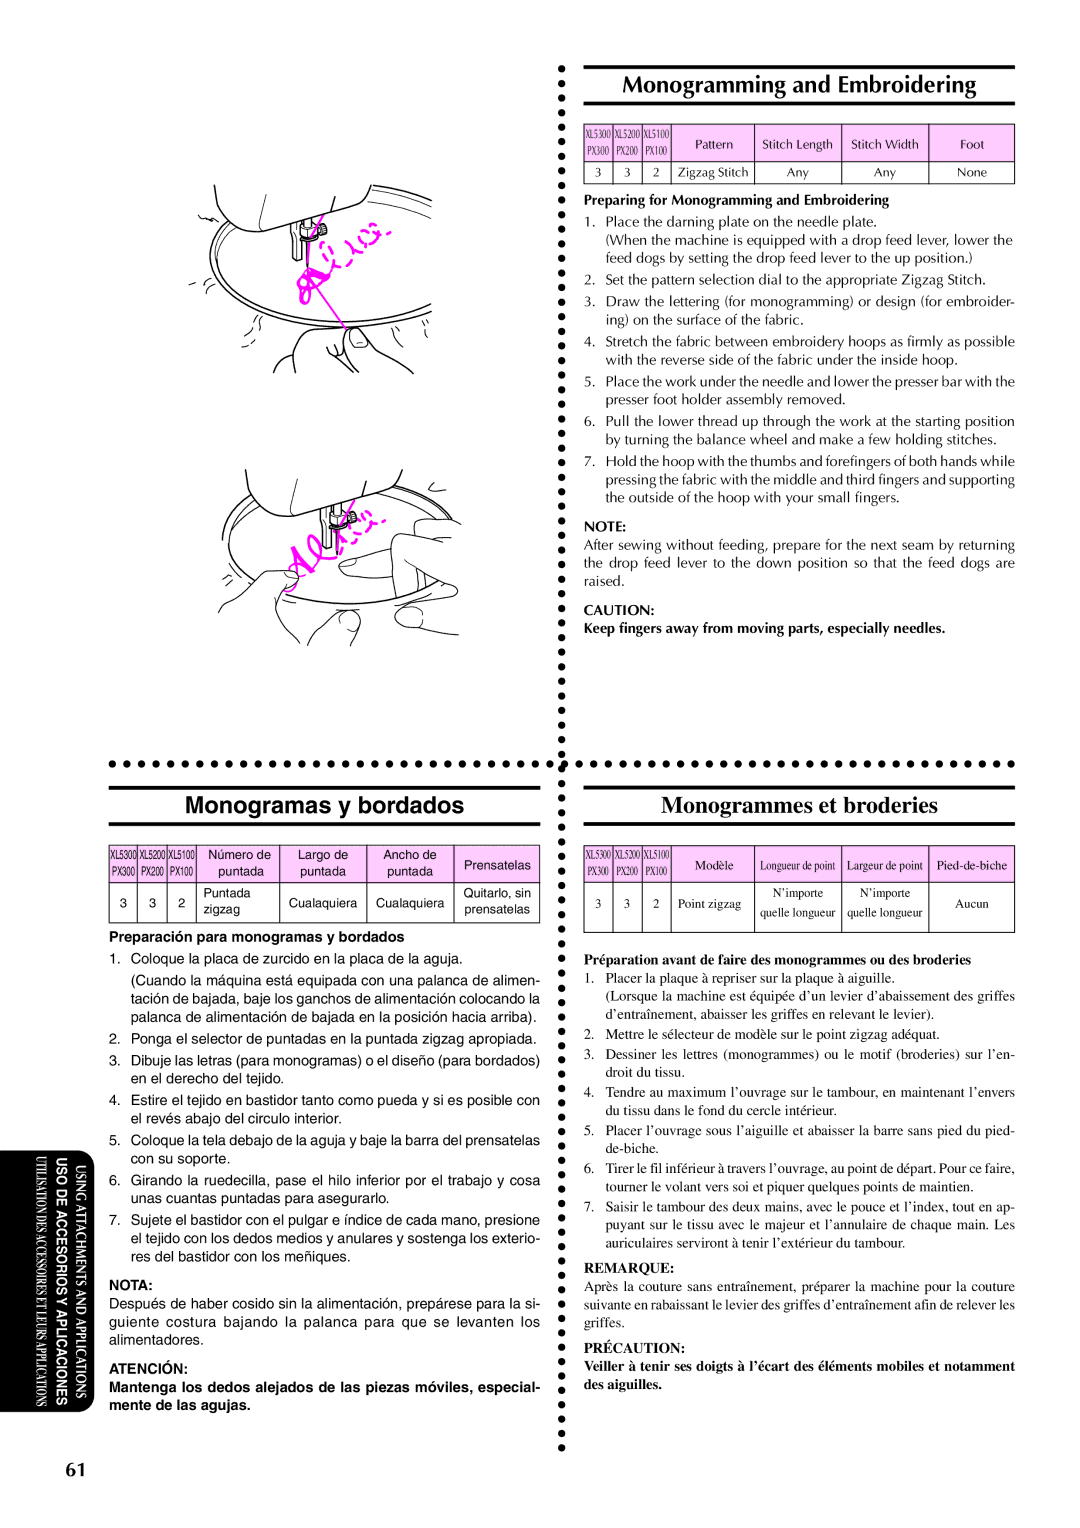
Preparing for Monogramming and Embroidering

1.Place the darning plate on the needle plate.

(When the machine is equipped with a drop feed lever, lower the feed dogs by setting the drop feed lever to the up position.)

2.Set the pattern selection dial to the appropriate Zigzag Stitch.

3.Draw the lettering (for monogramming) or design (for embroider- ing) on the surface of the fabric.

4.Stretch the fabric between embroidery hoops as firmly as possible with the reverse side of the fabric under the inside hoop.

5.Place the work under the needle and lower the presser bar with the presser foot holder assembly removed.

6.Pull the lower thread up through the work at the starting position by turning the balance wheel and make a few holding stitches.

7.Hold the hoop with the thumbs and forefingers of both hands while pressing the fabric with the middle and third fingers and supporting the outside of the hoop with your small fingers.

NOTE:

After sewing without feeding, prepare for the next seam by returning the drop feed lever to the down position so that the feed dogs are raised.

CAUTION:

Keep fingers away from moving parts, especially needles.

UTILISATION DES ACCESSOIRES ET

LEURS APPLICATIONS

USO DE ACCESORIOS Y

APLICACIONES

USING ATTACHMENTS

AND APPLICA TIONS

Monogramas y bordados

XL5300

XL5200

XL5100

Número de

Largo de

Ancho de

Prensatelas

PX300

PX200

PX100

puntada

puntada

puntada


3

3

2

Puntada

Cualaquiera

Cualaquiera

Quitarlo, sin

zigzag

prensatelas


Preparación para monogramas y bordados

1.Coloque la placa de zurcido en la placa de la aguja.

(Cuando la máquina está equipada con una palanca de alimen- tación de bajada, baje los ganchos de alimentación colocando la palanca de alimentación de bajada en la posición hacia arriba).

2.Ponga el selector de puntadas en la puntada zigzag apropiada.

3.Dibuje las letras (para monogramas) o el diseño (para bordados) en el derecho del tejido.

4.Estire el tejido en bastidor tanto como pueda y si es posible con el revés abajo del circulo interior.

5.Coloque la tela debajo de la aguja y baje la barra del prensatelas con su soporte.

6.Girando la ruedecilla, pase el hilo inferior por el trabajo y cosa unas cuantas puntadas para asegurarlo.

7.Sujete el bastidor con el pulgar e índice de cada mano, presione el tejido con los dedos medios y anulares y sostenga los exterio- res del bastidor con los meñiques.

NOTA:

Después de haber cosido sin la alimentación, prepárese para la si- guiente costura bajando la palanca para que se levanten los alimentadores.

ATENCIÓN:

Mantenga los dedos alejados de las piezas móviles, especial- mente de las agujas.

Monogrammes et broderies

XL5300

XL5200

XL5100

Modèle

Longueur de point

Largeur de point

Pied-de-biche

PX300

PX200

PX100


3

3

2

Point zigzag

N’importe

N’importe

Aucun

quelle longueur

quelle longueur


Préparation avant de faire des monogrammes ou des broderies

1.Placer la plaque à repriser sur la plaque à aiguille.

(Lorsque la machine est équipée d’un levier d’abaissement des griffes d’entraînement, abaisser les griffes en relevant le levier).

2.Mettre le sélecteur de modèle sur le point zigzag adéquat.

3.Dessiner les lettres (monogrammes) ou le motif (broderies) sur l’en- droit du tissu.

4.Tendre au maximum l’ouvrage sur le tambour, en maintenant l’envers du tissu dans le fond du cercle intérieur.

5.Placer l’ouvrage sous l’aiguille et abaisser la barre sans pied du pied- de-biche.

6.Tirer le fil inférieur à travers l’ouvrage, au point de départ. Pour ce faire, tourner le volant vers soi et piquer quelques points de maintien.

7.Saisir le tambour des deux mains, avec le pouce et l’index, tout en ap- puyant sur le tissu avec le majeur et l’annulaire de chaque main. Les auriculaires serviront à tenir l’extérieur du tambour.

REMARQUE:

Après la couture sans entraînement, préparer la machine pour la couture suivante en rabaissant le levier des griffes d’entraînement afin de relever les griffes.

PRÉCAUTION:

Veiller à tenir ses doigts à l’écart des éléments mobiles et notamment des aiguilles.

61

Page 70
Image 70
Brother XL5300, XL5200, XL5100 Monogramming and Embroidering, Monogramas y bordados, Monogrammes et broderies

XL5100, XL5300, XL5200 specifications

The Brother XL series sewing machines, including the XL5200, XL5300, and XL5100, are versatile and user-friendly models designed for both beginners and experienced sewers. These machines combine functionality with advanced features to cater to a wide range of sewing projects.

The Brother XL5200 is designed to simplify the sewing experience while offering versatility. It features 35 built-in stitches, including decorative, utility, and stretch stitches, providing plenty of options for various projects. The easy-to-read LCD screen allows users to select stitches effortlessly. One of its standout features is the automatic needle threader, eliminating the frustration of threading the needle manually. The machine also comes equipped with a drop-in top bobbin system that ensures smooth and consistent sewing.

The XL5300 builds upon the capabilities of the XL5200, providing additional features that enhance creativity. With 60 built-in stitches, including an impressive selection of decorative stitches and seven one-step auto-size buttonhole options, this model encourages experimentation. The XL5300 also includes a hard case for protection and portability, making it an excellent choice for sewers who attend classes or workshops. Its adjustable stitch width and length allow for customization of stitches, ensuring the outcome perfectly aligns with the user’s vision.

The Brother XL5100 is a great entry-level machine known for its ease of use. This model contains 50 built-in stitches, including essential utility stitches that are perfect for garment construction, quilting, and crafting. Like its counterparts, it features an automatic needle threader and a jam-resistant drop-in bobbin. The XL5100 also offers a convenient free arm that is ideal for sewing sleeves and cuffs. This model is particularly user-friendly, making it an excellent option for beginners looking to develop their sewing skills.

All three models come with various presser feet and accessories that expand their functionality, such as a zipper foot, buttonhole foot, and walking foot for quilting. They are designed with sturdy construction, ensuring durability and longevity for all sewing enthusiasts.

In summary, the Brother XL5200, XL5300, and XL5100 are excellent choices for those looking for reliable sewing machines that offer a blend of user-friendly features, versatility, and performance. Whether for simple alterations or complex projects, these models provide the tools necessary to help bring user creativity to life.