Oil-Lubricated Compressors
Troubleshooting Chart
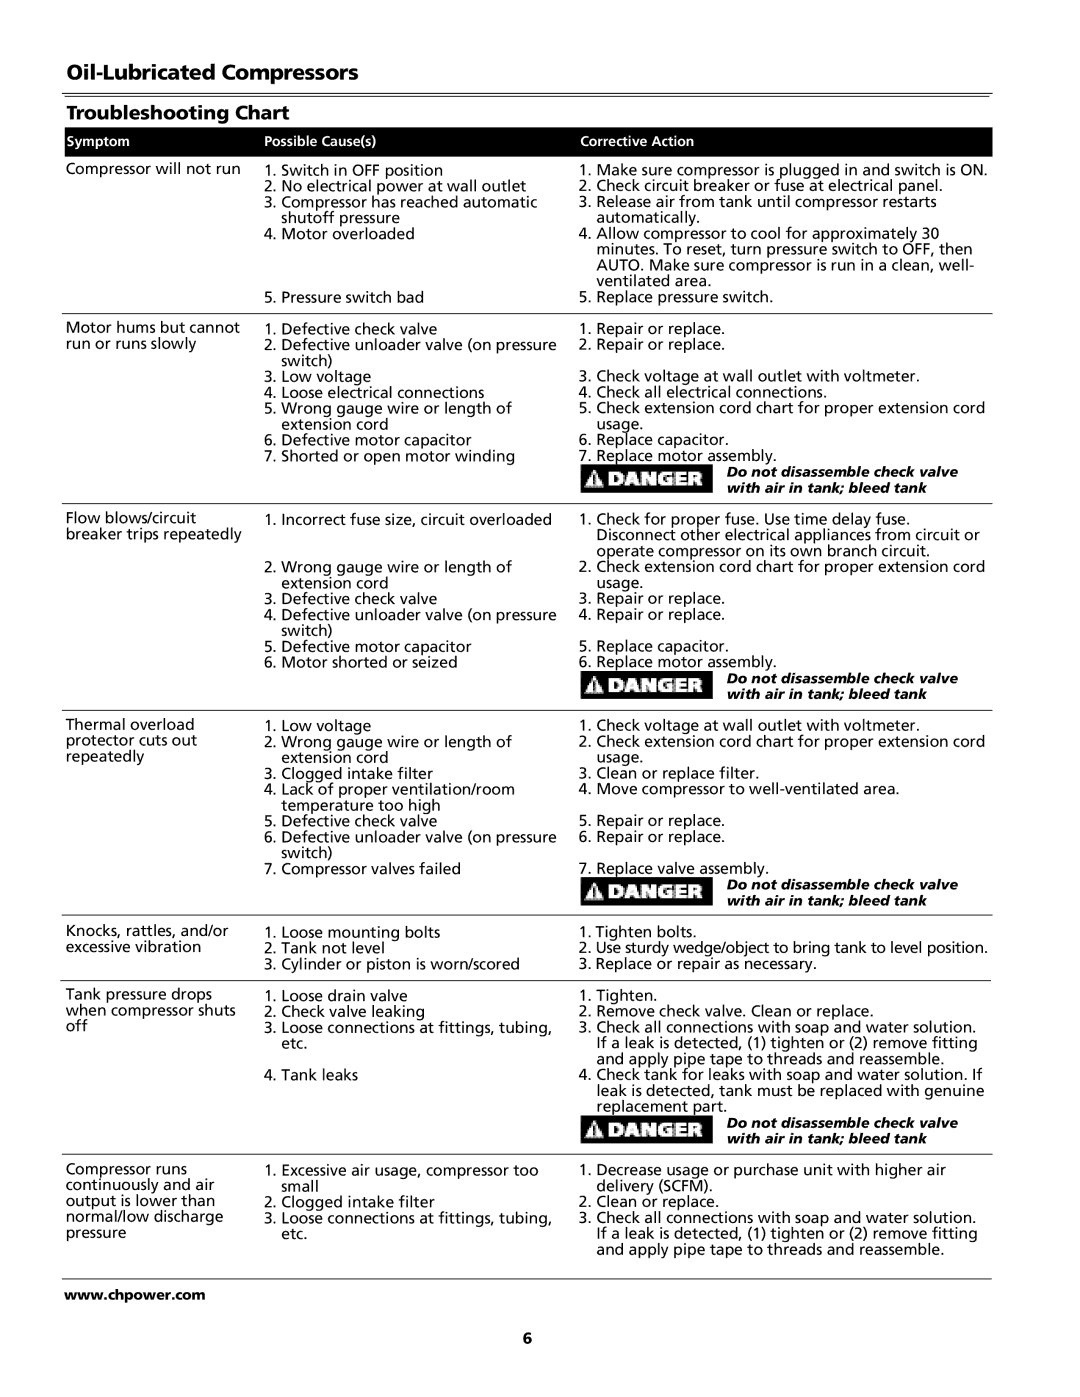
| Symptom | Possible Cause(s) | Corrective Action | ||
|
|
|
|
| |
| Compressor will not run | 1 . Switch in OFF position | 1 | . Make sure compressor is plugged in and switch is ON. | |
|
| 2 | . No electrical power at wall outlet | 2 | . Check circuit breaker or fuse at electrical panel. |
|
| 3 | . Compressor has reached automatic | 3 | . Release air from tank until compressor restarts |
|
|
| shutoff pressure |
| a u t o m a t i c a l l y . |
|
| 4 | . Motor overloaded | 4 | . Allow compressor to cool for approximately 30 |
|
|
|
|
| minutes. To reset, turn pressure switch to OFF, then |
|
|
|
|
| AUTO. Make sure compressor is run in a clean, well- |
|
|
|
|
| ventilated area. |
|
| 5 | . Pressure switch bad | 5 | . Replace pressure switch. |
|
|
|
|
| |
| Motor hums but cannot | 1 . Defective check valve | 1 | . Repair or replace. | |
| run or runs slowly | 2 . Defective unloader valve (on pressure | 2 | . Repair or replace. | |
|
|
| s w i t c h ) | 3 | . Check voltage at wall outlet with voltmeter. |
|
| 3 | . Low voltage | ||
|
| 4 | . Loose electrical connections | 4 | . Check all electrical connections. |
|
| 5 | . Wrong gauge wire or length of | 5 | . Check extension cord chart for proper extension cord |
|
|
| extension cord |
| u s a g e . |
|
| 6 | . Defective motor capacitor | 6 | . Replace capacitor. |
|
| 7 | . Shorted or open motor winding | 7 | . Replace motor assembly. |
Do not disassemble check valve with air in tank; bleed tank
Flow blows/circuit breaker trips repeatedly
1 | . Incorrect fuse size, circuit overloaded | 1 | . Check for proper fuse. Use time delay fuse. |
|
|
| Disconnect other electrical appliances from circuit or |
|
|
| operate compressor on its own branch circuit. |
2 | . Wrong gauge wire or length of | 2 | . Check extension cord chart for proper extension cord |
| extension cord |
| u s a g e . |
3 | . Defective check valve | 3 | . Repair or replace. |
4 | . Defective unloader valve (on pressure | 4 | . Repair or replace. |
| s w i t c h ) | 5 | . Replace capacitor. |
5 | . Defective motor capacitor | ||
6 | . Motor shorted or seized | 6 | . Replace motor assembly. |
Do not disassemble check valve with air in tank; bleed tank
Thermal overload protector cuts out r e p e a t e d l y
1 | . Low voltage | 1 | . Check voltage at wall outlet with voltmeter. |
2 | . Wrong gauge wire or length of | 2 | . Check extension cord chart for proper extension cord |
| extension cord |
| u s a g e . |
3 | . Clogged intake filter | 3 | . Clean or replace filter. |
4 | . Lack of proper ventilation/room | 4 | . Move compressor to |
| temperature too high | 5 | . Repair or replace. |
5 | . Defective check valve | ||
6 | . Defective unloader valve (on pressure | 6 | . Repair or replace. |
| s w i t c h ) | 7 | . Replace valve assembly. |
7 | . Compressor valves failed |
Do not disassemble check valve with air in tank; bleed tank
Knocks, rattles, and/or | 1 | . Loose mounting bolts | 1 | . Tighten bolts. |
excessive vibration | 2 | . Tank not level | 2. Use sturdy wedge/object to bring tank to level position. | |
| 3 | . Cylinder or piston is worn/scored | 3 | . Replace or repair as necessary. |
|
|
|
|
|
Tank pressure drops | 1 | . Loose drain valve | 1 | . T i g h t e n . |
when compressor shuts | 2 | . Check valve leaking | 2 | . Remove check valve. Clean or replace. |
o f f | 3 | . Loose connections at fittings, tubing, | 3 | . Check all connections with soap and water solution. |
|
| e t c . |
| If a leak is detected, (1) tighten or (2) remove fitting |
|
|
|
| and apply pipe tape to threads and reassemble. |
| 4 | . Tank leaks | 4 | . Check tank for leaks with soap and water solution. If |
|
|
|
| leak is detected, tank must be replaced with genuine |
|
|
|
| replacement part. |
Do not disassemble check valve with air in tank; bleed tank
Compressor runs continuously and air output is lower than normal/low discharge p r e s s u r e
1 . Excessive air usage, compressor too s m a l l
2. Clogged intake filter
3 . Loose connections at fittings, tubing, e t c .
1 . Decrease usage or purchase unit with higher air delivery (SCFM).
2 . Clean or replace.
3 . Check all connections with soap and water solution. If a leak is detected, (1) tighten or (2) remove fitting and apply pipe tape to threads and reassemble.
w w w . c h p o w e r . c o m
6