PUB. DIE-310B
Important Usage Instructions
Trademark Acknowledgements
Enjoying High-Definition Video with your Camcorder
What are the advantages of a hard disk?
Important Notes About the Hard Disk Drive
Use the camcorder within its operating temperature range
Table of contents
Playlist and Scene Operations
Basic Recording
Basic Playback
Advanced Functions
Saving and Backing Up Your Recordings
Additional Functions
Printing Photos
Terminals on the Camcorder
General Information
Appendix Menu Options Lists
Trouble?
113 Do’s and Don’ts
Conventions Used in this Manual
About this Manual
Special Scene Recording Programs
Supplied Accessories
Left side view Right side view Front view
Components Guide
Back view LCD panel Top view
Bottom view
Wireless Controller WL-D88
Recording Movies
Screen Displays
Recording Photos Viewing Photos
25F progressive frame rate
Remaining battery time
Hard disk/memory card operation
Remaining recording time
Charging will start when the camcorder is turned off
Charging the Battery Pack
Attach the battery pack to the camcorder
Indicator is off
Place the lithium button battery with the + side facing up
Preparing the Wireless Controller and Accessories
Insert the battery holder
Fasten the grip belt
Accessories
Hold DISP. pressed down for more than 2 seconds
Adjusting the Position and Brightness of the LCD Screen
Rotating the LCD Panel Open the LCD panel 90 degrees
LCD Backlight
Press the button to enter
Button Mode or Flexible Recording
Basic Operation Camcorder
Selecting a FUNC. Menu Option
Using the Menus
Press FUNC. to save the settings and close the menu
Joystick and Joystick Guide
Select the tab of the desired menu
Press Func Select , the icon Press to open the setup menus
Select the setting you want To change and press
Selecting an Option from the Setup Menus
Menu Language Desired language
First Time Settings
Setting the Date and Time
Changing the Language
Menu Time Zone/DST Your local time zone
Using a Memory Card
Changing the Time Zone
Memory Cards Compatible for Use with the Camcorder
Inserting and Removing a Memory Card
Make sure the indicator is off
Turn off the camcorder
Open the memory card slot cover
Complete Initialization
Selecting the Recording Media
Initializing the Hard Disk or Memory Card
Quick Initialization
Press Start/Stop to begin recording
Set the mode dial to Turn on the camcorder
Basic Recording
Shooting Video
Mode
Using the Viewfinder
Standard Play 7 Mbps Desired recording mode
Selecting the Video Quality Recording Mode
12x Optical Zoom
Zooming
Approximate recording times
Reviewing and Deleting the Last Scene Recorded
When you wish to resume recording, open the LCD panel
Quick Start Function
Press / or to begin the playback
Basic Playback
Playing Back the Video
Press to display the joystick guide
During playback, press to display the joystick guide
Adjust the volume
Special playback modes
Return to the index screen to select the scene or photo
Changing the Index Screen Selection
Selecting the Media for Playback
Changing the Number of Items in the Index Screen
Move , the cursor to the desired date
Selecting Scenes by Recording Date
Open the list of recordings
Open the calendar screen
Change the scene
Press to return to the index screen
Press / to begin the playback
Screen and press to select an individual scene/photo
Selecting Recordings from the Index Screen
Select the original movies or the photo index screen
Open the selection screen
Back up important scenes before Deleting them
Deleting Scenes
Delete the scenes
Delete Desired option Yes
Special Scene Recording Programs
Advanced Functions
Programmed AE
Changing the Shutter Speed and Aperture
Programmed AE Desired recording program
Shutter speed guidelines
Menu Frame Rate PF25
Cinema Mode Giving a Cinematic Look to your Recordings
Programmed AE Cine Mode
Push the joystick toward Exposure
Self Timer
Mode
Press BLC
Manual Focus Adjustment
Adjust the focus as Necessary and press
Automatic Backlight Correction
Changes to MF and the camcorder returns to manual focus
White Balance
Infinity Focus
Automatic Desired option
Image Effect Off
Image Effects
Options
Image Effect Off Desired option
Digital Effect Off Desired fader/effect
Digital Effects
Applying
Push the joystick toward
Audio Recording Level
Mode All displays on Most displays off
Data Code setting
On-Screen Displays and Data Code
Menu Audio Level Indicator On
Using Headphones
Adjust the audio level as necessary
Press to save the setting and hide the joystick guide
Menu AV/Headphones Headphones
Using the Mini Advanced Shoe
When an external microphone is
Using an External Microphone
Using other microphones
Using the DM-100 Directional Stereo Microphone
FUNC. Divide Scene selected will start playing back
Using a Video Light
Playlist and Scene Operations
Dividing Scenes
Hard disk playlist or memory card playlist tab
Adding Scenes to the Playlist
Add the scenes to the playlist
Delete the scene
Deleting Scenes from the Playlist
Select the playlist index screen
Select , the scene you want to delete
Copy the playlist
Copying Scenes
Copying Original Movies
Copy the scenes
Once the focus is automatically
Access indicator will flash as the photo is being recorded
Taking Photos
Press Photo halfway
Approximate number of photos available on a memory card
Selecting Photo Size and Quality
2048x1536 Desired photo size* Desired photo quality
Slideshow
Deleting a Photo Right After Recording It
Viewing Photos
Push the joystick toward Select Yes and press
Photo Jump Function
Index Screen Move the zoom lever toward W
Select , a photo
Index screen closes and the selected photo is displayed
Delete the photos
Deleting Photos
Select the photo index screen
Select , the photo you want to delete
Move the zoom lever toward T
Additional Functions
Flash
Magnifying Photos during Playback
Histogram Display
Select a recording mode other than Fireworks Options
Range of the flash decreases in continuous shooting mode
Drive Mode Continuous Shooting and Exposure Bracketing
Taking Photos while Recording Movies Simultaneous Recording
Single Desired option
Evaluative Desired option
Light Metering Mode
Set TV Type to Wide TV before using this function
Capturing a Photo from the Playback Scene
Copying a Single Photo
Protecting Photos
Copying Photos
Protecting Single Photos Open the photo selection screen
You can also use the following Functions
Copying Photos from the Index Screen
Move the zoom lever toward W Then select the hard disk tab
FUNC. Copy
Select the media that contains the photos you want to print
Connecting the Camcorder to the Printer
Printing Photos
Printing Photos Direct Print
Select the photo you wish to print Press
Selecting the Print Settings
Printing after Changing the Print Settings
Printing with the Print/Share Button
Inkjet printers
Push the joystick toward . The print settings menu appears
Press while printing Select OK and press
Photos/sheet Printing multiple photos on the same sheet
Trimming frame appears
Trimming Settings
Open the print settings menu
Select , Trimming Press
Print Orders Desired option Yes OK
To cancel the print order, set the number of copies to
Connection . Refer to Connection Diagrams
Print Orders
Open the print menu
To cancel the printing, refer to
AV OUT/ Terminal
Terminals on the Camcorder
Hdmi OUT Terminal
Component OUT Terminal
Type Analog Quality Depends on the settings Output only
Connection Diagrams
Type Digital data connection
External Connections
Select the most appropriate connection for your TV
Playback on a TV Screen
Saving your Recordings without a Computer
Saving and Backing Up Your Recordings
Backing Up Your Recordings on a Computer
Pixela ImageMixer 3 SE
Insert a brand new disc into the DVD Burner
Mode to create Photo DVDs of your photos
Select the scenes or photos you want to add to the disc
Press the start button on the DVD Burner
Insert the disc you want to play back into the DVD Burner
Playing Back Avchd Discs Using the DW-100 DVD Burner
Turn on the DVD Burner and set it to Disc Playback mode
Connect the camcorder to the TV
Video Recorder Direct Transfer
CameraWindow
Press FUNC. to return to the transfer menu
To cancel the transfer, select Cancel and press , or press
Transferring Photos
Select a transfer option Press
Select the photo you want to mark with a transfer order
Setting Transfer Orders from the Index Screen
Transfer Orders
FUNC. Transfer Orders appears on the screen
Programmed AE
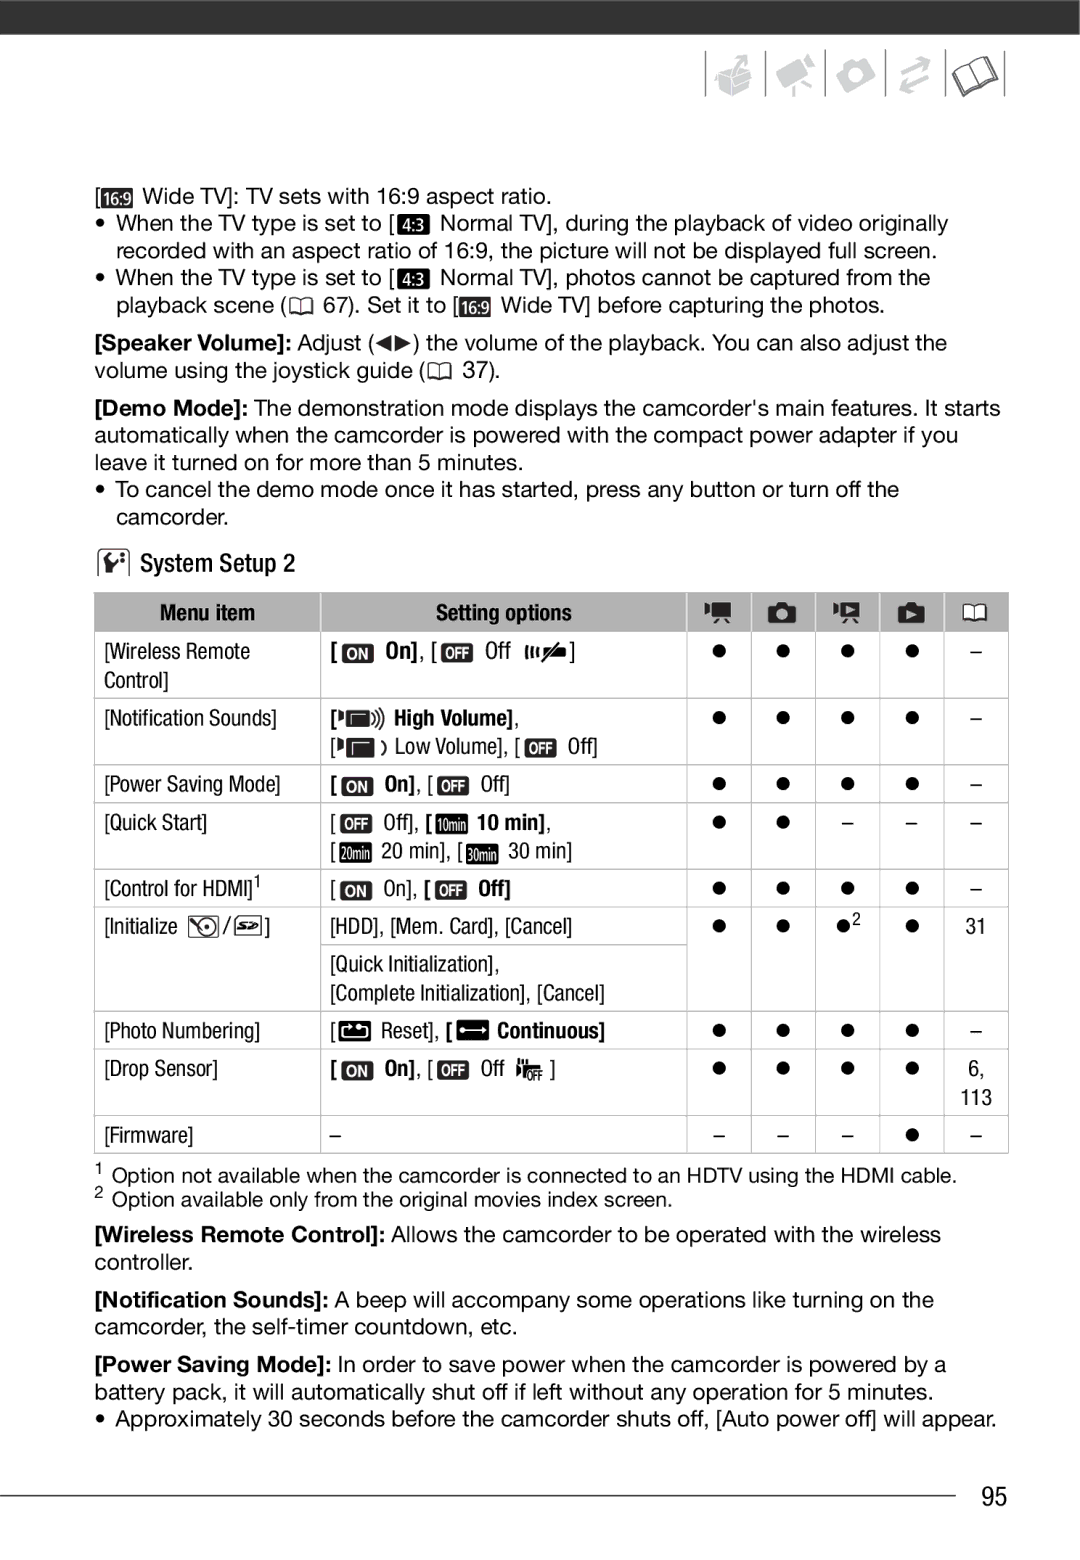
Menu item Setting options
Appendix Menu Options Lists
FUNC. Menu Recording Modes
Fine
FUNC. Menu Playback Modes
Standard Play 7 Mbps
Off
Camera Setup
Menu item
Automatic
Variable
Instant AF
Activated, appears on the screen
Operating mode
Mode With
Computer/Printer
Fine, Normal Data Code Date
Date and Time
Wide TV
System Setup
Small
1080i
Off Control
Initialize HDD, Mem. Card, Cancel
Reset
Wide TV TV sets with 169 aspect ratio
Additional Information
Y 1.Jan.2008 1200 AM
Date/Time Setup
Information Screens
Recording
Troubleshooting
Power supply
Power source
Recording
Playback
Indicators and Onscreen Displays
100
Picture and Sound
101
Connections with External Devices
Memory Card and Accessories
102
103
List of Messages in alphabetical order
104
105
Cannot record movies in MXP/FXP mode on this memory card
Could not add the scenes to the playlist
106
107
Function not available in mode
108
Messages Related to the Optional DW-100 DVD Burner
109
Direct Print Related Messages
110
111
112
113
Handling Precautions
Camcorder
Long-term storage
When recording movies, try to get a calm, stable picture
114
Memory Card
Battery Pack
Remaining battery time
Regarding the use of non-Canon battery packs
116
Built-in Rechargeable Lithium Battery
Lithium Button Battery
117
Maintenance/Others
Cleaning
Disposal
118
Condensation
119
System Diagram Availability differs from area to area
120
Optional Accessories
Use the battery charger to charge the battery packs
Recording and Playback Times
Using the hard disk
Using a memory card
121
122
SC-2000 Soft Carrying Case
123
DM-100 Directional Stereo Microphone
Shoulder Strap
System
Specifications
HG21/HG20
124
125
CA-570 Compact Power Adapter
BP-807 Battery Pack
Power/Others
Copying Movies Photos
Index
126
AF frame
Reviewing
127
Histogram
Quick Start function Recording
USB terminal
128
Special Scene
Canon Europa N.V

 Wide TV]: TV sets with 16:9 aspect ratio.
 System Setup 2