PAL
Important Usage Instructions
Class 1 Laser Product
How to Select a DVD Disc
Disc specification on DVD-RWs
No need to worry about recording over a tape
Just select a scene from the index screen
Easily play back your recordings on a DVD player
Available features depend on the DVD disc used
Disc type Disc specifications
DVD-R, DVD-R DL DVD-RW Video
Mode
Table of contents
Basic Playback
Additional Functions
Managing Scenes and the Disc
Disc Playback on an External Device
Connecting to a TV or VCR
Printing Photos
Appendix Menu Options Lists
Trouble?
About this Manual
Conventions Used in this Manual
Introduction
Supplied Accessories
Components Guide
Left side view Right side view Front view
Back view Top view Bottom view
Screen Displays
Recording movies
Playing movies during playback
Recording still images Viewing still images
Record
Playback
END will be displayed and the recording will stop
Charging the Battery Pack
Getting Started
Preparing the Accessories
Disconnect the compact power adapter from the camcorder
To Remove the Battery Pack
When YOU Mount the Camcorder on a Tripod
Power Switch
Basic Operation of the Camcorder
Operating Modes
Joystick and Joystick Guide
Using the Menus
Press FUNC. to save the settings and close the menu
Menu items not available will appear grayed out
Next
Select the icon and press To open the setup menus
Display Setup
Press Func
Abbreviation of Menu Selections in this Manual
First Time Settings
Setting the Date and Time
Changing the Language
Options
Opening the Lens Cover and Adjusting the LCD screen
Getting Ready to Start Recording
Changing the Time Zone
Turn the switch to on to set the camcorder in mode
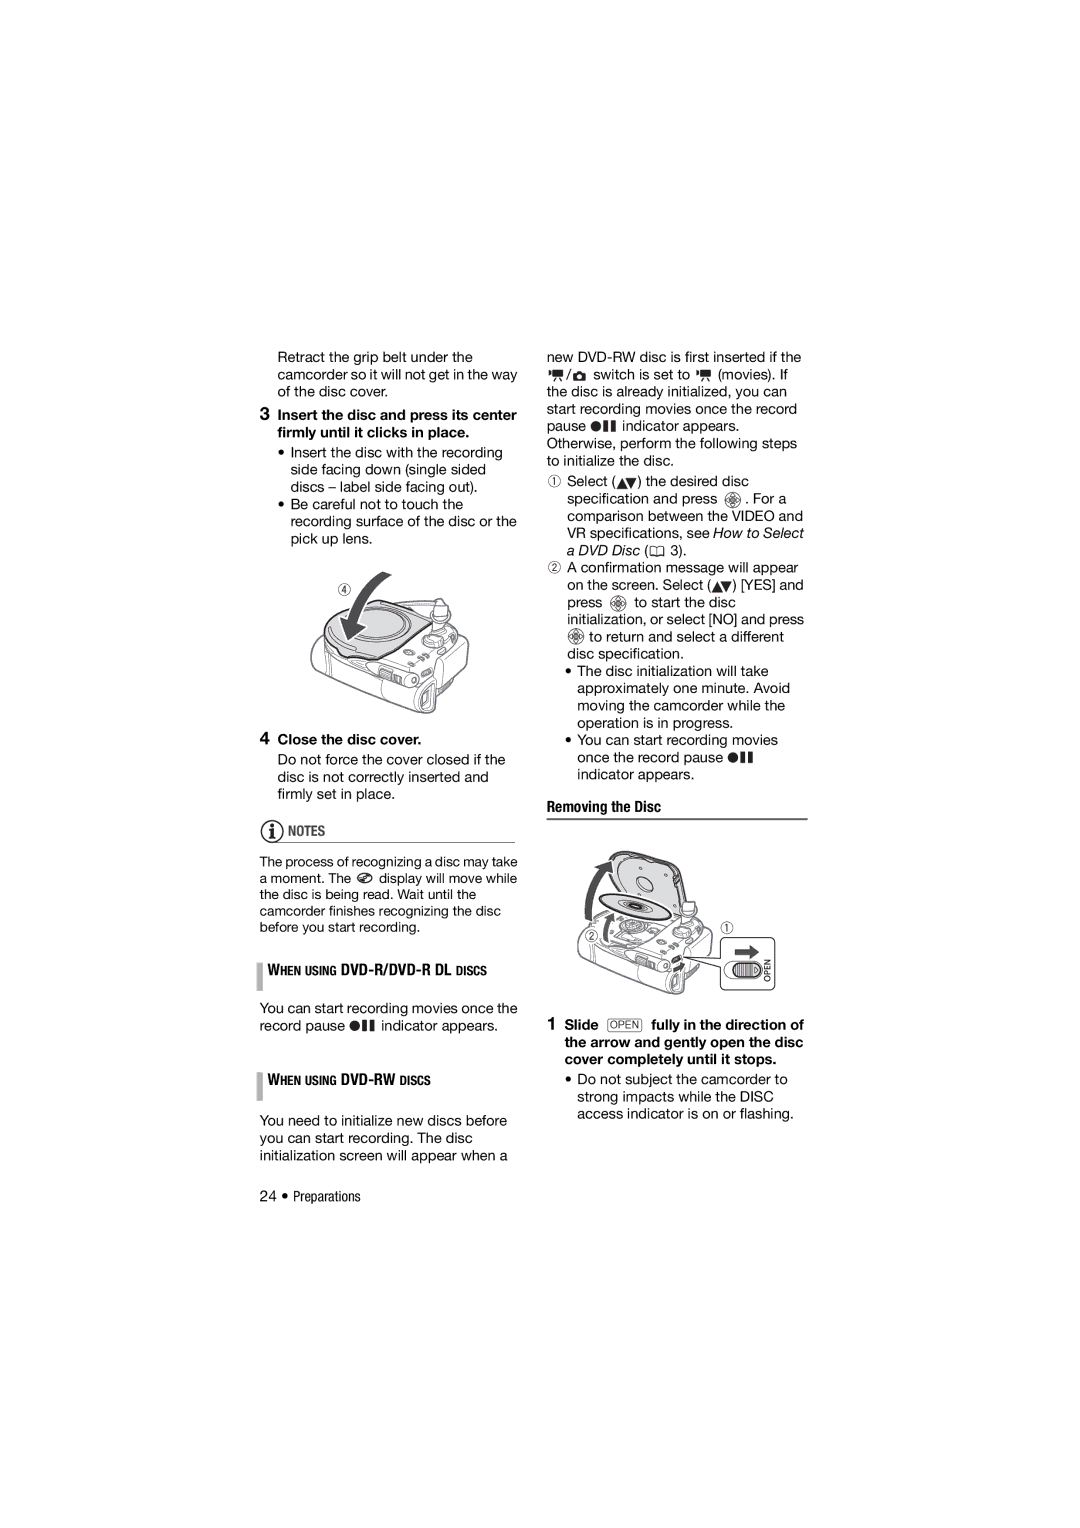
Inserting and Removing a Disc
LCD Backlight
Hold DISP. pressed down for more than 2 seconds
When Using DVD-RWDISCS
Close the disc cover
Removing the Disc
Grab the edge of the disc and gently pull it out
Turn off the camcorder Open the memory card slot cover
Close the cover
Inserting and Removing a Memory Card
Red Camera indicator will turn on
Move the / switch to movies
Basic Recording
Shooting Video
Using the viewfinder
Operations for 5 minutes 65. To
Selecting the Recording Mode
Camera Setup
Zooming Optical, Advanced and Digital Zoom
Selecting the Zoom Type
Menu Camera Setup Zoom Speed Desired option
Using the Zoom
Quick Start Function
Selecting the Zoom Speed
Reviewing and Deleting the Last Scene Recorded
Press Quick Start firmly
Within approx second, the camcorder is ready to record
Push the joystick toward
Basic Playback
Playing Back the Video
Deleting a Scene After Recording It
Disc type DVD-RW After recording a scene
Speaker VOL Adjust the volume
To Adjust the Volume
During the playback of a scene
Camcorder operation
Deleting Scenes
On-Screen Displays Data Code
Deleting a Single Scene
Deleting All Scenes
Mode switch
Additional Functions
Special Scene Recording Programs
All displays on All displays off1 Data code2 only
Use this mode to record in dimly lit places
Use this mode to record sunsets in vibrant colors
Use this mode to record spotlit scenes
Use this mode to record fireworks
Mode switch Options
Flexible Recording Changing the Shutter Speed
Program AE Desired option
To SET the Shutter Speed
Self Timer
Activate the self timer
LCD Video Light
LCD Light OFF
Manual Focus Adjustment
Adjust the focus as necessary
Push the joystick toward Next to save the focus adjustment
Push the joystick toward Focus
Manual Exposure Adjustment
Mode switch except for Fireworks recording program
Adjust the brightness of the image as required
White Balance
Press FUNC. to save the setting and close the menu
Image Effects
Options
Setting
Digital Effects
Applying
Managing Scenes and the Disc
Creating a Playlist
Adding Scenes to the Playlist
ADD to Playlist
Switching Between Original and Playlist Scenes
Moving Scenes in the Playlist
Dividing Scenes
To Playlist
Disc Playback on an External Device
Initializing the Disc
Changing the Disc Title
Disc Operations Disc Title
Finalizing the Disc
Menu Disc Operations Finalize
YES
Press
Disc Playback on External Devices
Insert the finalized disc in the DVD drive
On a DVD Player
Recordings on a Finalized Disc
Press when the confirmation screen appears
VR mode
Disc Operations Unfinalize YES
Discs that can be unfinalized
Move the / switch to still images
Move the lens cover switch down To to open the lens cover
Taking Photos
Photos
Selecting Photo Size and Quality
Approximate number of still images on a memory card
Green Play indicator will turn on
Viewing Photos
Erasing the Last Photo Just Recorded
OFF While reviewing the image immediately after recording
You can press again to hide the joystick guide
Slideshow
Slideshow Start
To RUN Through the Still Images
Magnifying Photos during Playback
Erasing Photos
Move the zoom lever toward T
Still IMG Oper Erase ALL Images YES
Single Desired option
SINGLE
Mode switch at The focus priority cannot be turned off
Menu Camera Setup Focus PRI. Desired option
Automatic Focus Priority
Press Start/Stop and hold it pressed down
Protecting Photos
Histogram and Other Screen Displays
Protect Press Protect The image selection screen appears
To Select the ON-SCREEN Displays
Initializing the Memory Card
Still IMG Oper
Initialize Card Select the card initialization method YES
Initialize
Printing Photos
Print Orders
Selecting Still Images for Printing Print Order
Still IMG Oper Erase ALL ORD YES
Connecting to a TV or VCR
Connection Diagrams
External Connections
AV Terminal
Playback on a TV Screen
Copying your Recordings to an External Video Recorder
Menu item Setting options
Appendix Menu Options Lists
Additional Information
Camera Play
Size LW 1152x648, L 640x480 1024x768, S Quality
Super FINE, Fine Normal To Playlist To Original
Move Divide Delete
Speaker VOL Slideshow Protect Print Order Copies
OFF
Sec
Camera
Auto
Disc Info Initialize DISC1 VIDEO, VR, Cancel Finalize
UNFINALIZE2
DEL.ALL MOVIES3
DEL.PLAYLIST4
Initialize Card INITIALIZE, COMPL.INIT., Cancel
Demo Mode OFF
Erase ALL ORD
Brightness TV Screen
System Setup
10 min
Continuous
Wide TV
DATE/TIME Setup
ZONE/DST
DATE/TIME Date Format
Y 1.JAN.2008 1200 AM
Troubleshooting
Power Source
Recording/Playback
Recording
Cannot open the disc cover to remove the disc
Playback/Editing
Playing Back the Disc in an External DVD Device
Memory Card Operation
List of Messages in alphabetical order
Cannot USE Disc USE of a Recommended Disc is Advised
Unable to Recognize the Data
Handling Precautions
Battery Pack
Treat the battery pack with care
Camcorder
About the battery terminal cover
Mini DVD Disc
For 24 hours with the switch set to Additional Information
Memory Card
Maintenance/Others
Cleaning
Storage
Condensation
Using the Camcorder Abroad
Trademark Acknowledgements
Resuming USE
System Diagram Availability differs from area to area
Scart
Optional Accessories
Use of genuine Canon accessories is recommended
Battery pack → Charging conditions ↓
NB-2LH
NB-2LH
Page
Specifications
DC320/DC311/DC310/DC301
System
Recording Media
CA-570 Compact Power Adapter
NB-2LH Battery Pack
Power/Others
Terminals
Index
Only Additional Information
XP mode Zoom
Recording program Playback
Quick Start function Recording
Reviewing
Canon Europa N.V