Canon iP4700 series On-screen Manual 1 of 437 pages
Contents
IP4700 series Basic Guide 2 of 437 pages
Overview of the Printer
Overview of the Printer 3 of 437 pages
Main Components 4 of 437 pages
Front View
Top Cover
Auto power on/off feature
Main Components 5 of 437 pages
Inside View
Rear View
Main Components 6 of 437 pages
Main Components 7 of 437 pages
Print Head Holder
Printing
Printing 8 of 437 pages
Start Easy-PhotoPrint EX, and select Photo Print
Printing Photos Easy-PhotoPrint EX 9 of 437 pages
Load paper
Click Photo Print
Printing Photos Easy-PhotoPrint EX
10 of 437 pages
Select the folder in which images are saved
Make sure that your printers name is selected in Printer
11 of 437 pages
Select the loaded paper
12 of 437 pages
Click Print
Creating Your Own Prints
Using Various Functions of Easy-PhotoPrint EX
Using Various Functions of Easy-PhotoPrint EX
Correcting Images
Make sure that your printers name is selected
Printing Documents Windows
14 of 437 pages
Click Preferences or Properties
Make sure of the displayed settings
Select Business Document in Commonly Used Settings
Specify the required print settings
15 of 437 pages
16 of 437 pages
Start printing
Printing Documents Macintosh
For Mac OS X
17 of 437 pages
Select the page size of the loaded paper in Paper Size
18 of 437 pages
Select the print quality in Print Quality
Specify the page size
For Mac OS X v.10.4.x or Mac OS X
19 of 437 pages
Make sure that your printers name is selected in Format for
20 of 437 pages
21 of 437 pages
Other Usages
22 of 437 pages
Printing Photos from a PictBridge Compliant Device
23 of 437 pages
Useful Software Applications
24 of 437 pages
Easy-WebPrint EX
25 of 437 pages
Installing Easy-WebPrint EX
26 of 437 pages
Loading Paper
27 of 437 pages
Loading Photo Paper in the Rear Tray
Paper Source to Load Paper
Loading Plain Paper in the Cassette
28 of 437 pages
29 of 437 pages
30 of 437 pages
Loading Paper in the Cassette
Loading Paper in the Cassette
Prepare paper
31 of 437 pages
Set the Cover on the Cassette
32 of 437 pages
Insert the Cassette into the printer
33 of 437 pages
Loading Paper in the Rear Tray
Loading Paper in the Rear Tray
Loading Photo Paper
34 of 437 pages
35 of 437 pages
Loading Envelopes
Prepare envelopes
36 of 437 pages
Load envelopes Open the Paper Support, and pull it out
Specify the settings in the printer driver
37 of 437 pages
Media Types You Can Use
Media Types You Can Use
Media Types
38 of 437 pages
Sizes
39 of 437 pages
Paper Weight
40 of 437 pages
Media Types You Cannot Use
Media Types You Cannot Use
41 of 437 pages
Routine Maintenance
42 of 437 pages
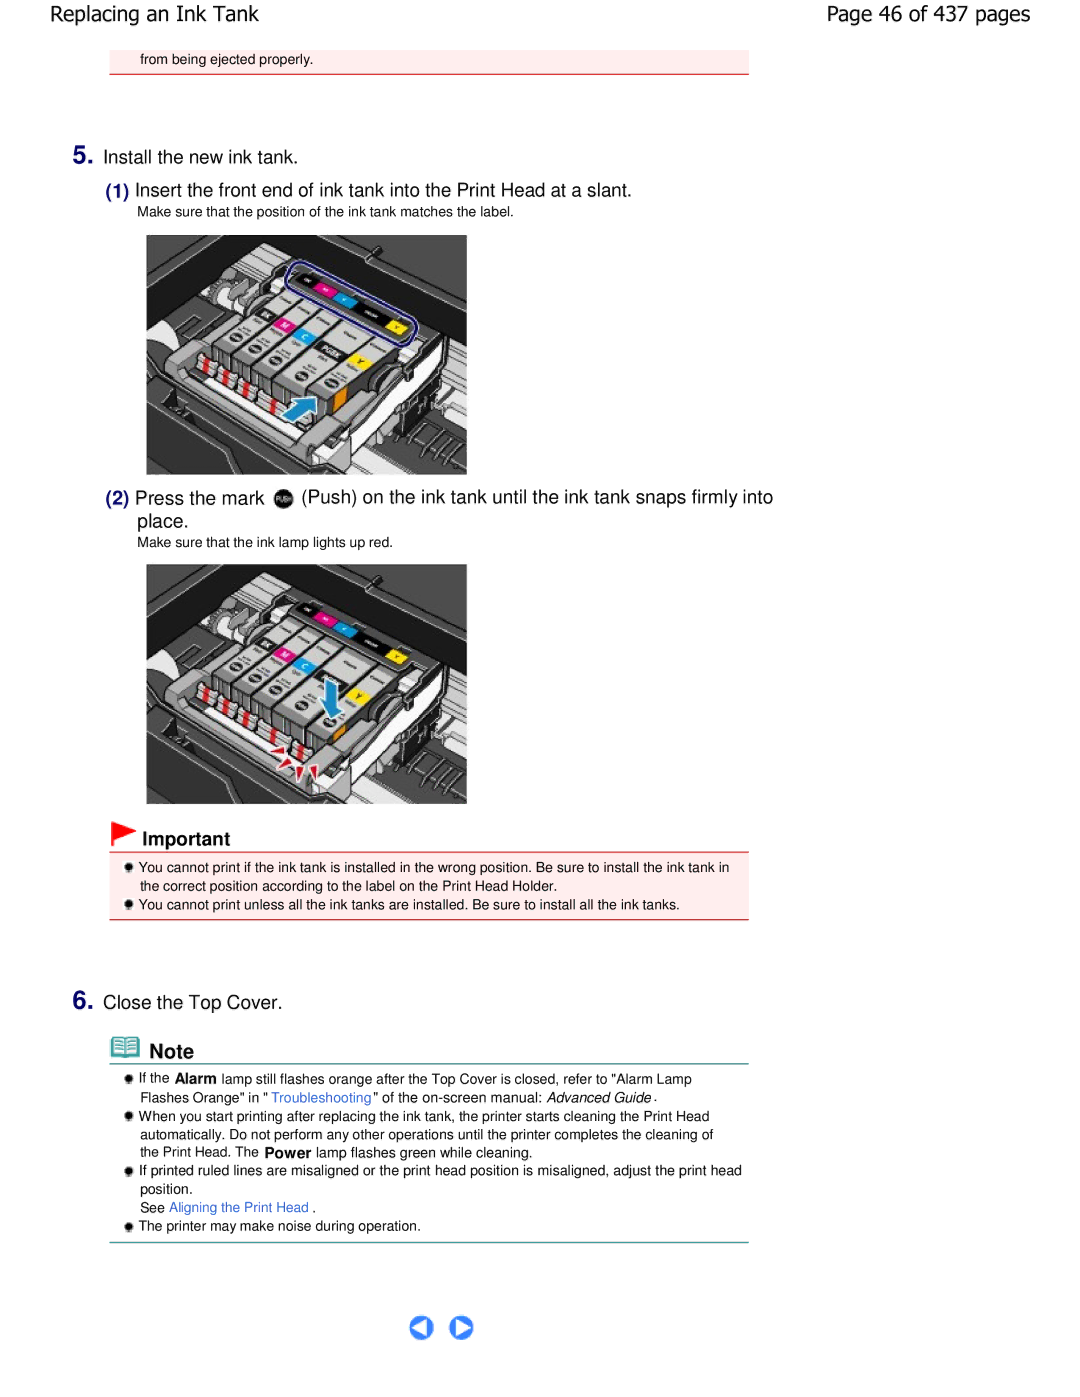
Replacing an Ink Tank
Replacing Procedure
43 of 437 pages
44 of 437 pages
Remove the ink tank with the lamp flashing fast
45 of 437 pages
Place
46 of 437 pages
Close the Top Cover
47 of 437 pages
Checking the Ink StatusPage 48 of 437 pages
Checking the Ink Status
With the Ink Lamps
Check the ink lamps
Checking the Ink Status
With the Computer Screen
49 of 437 pages
50 of 437 pages
When Printing Becomes Faint or Colors Are Incorrect
51 of 437 pages
52 of 437 pages
53 of 437 pages
Printing the Nozzle Check Pattern
Printing the Nozzle Check Pattern
Print the nozzle check pattern
Examine the nozzle check pattern
54 of 437 pages
Confirm the displayed message and click Print Check Pattern
Select Test Print in the pop-up menu
55 of 437 pages
56 of 437 pages
Examining the Nozzle Check Pattern
Examining the Nozzle Check Pattern
Take the appropriate action
57 of 437 pages
Cassette
Cleaning the Print Head
59 of 437 pages
Cleaning the Print Head
Select the ink group to clean
Click Execute
60 of 437 pages
61 of 437 pages
Cleaning the Print Head Deeply
Cleaning the Print Head Deeply
63 of 437 pages
Cleaning the Print Head Deeply
Confirm the displayed message and click OK
64 of 437 pages
65 of 437 pages
Aligning the Print Head
Aligning the Print Head
66 of 437 pages
67 of 437 pages
68 of 437 pages
69 of 437 pages
Cleaning the Paper Feed Roller
70 of 437 pages
71 of 437 pages
When the completion message appears, click OK
Clean the Paper Feed Roller without paper
Confirm the displayed message, and click OK
72 of 437 pages
73 of 437 pages
Clean the Pad a sideways with a moistened cotton swab
Cleaning the Pad in the Cassette
74 of 437 pages
Opening the Canon IJ Printer Utility Macintosh
Opening the Printer Driver Setup Window Windows
Opening the Maintenance Screens
75 of 437 pages
76 of 437 pages
Click Utility
Appendix
77 of 437 pages
Legal Limitations on Use of Your Product and Use of Images
78 of 437 pages
Tips on How to Use Your Printer
Why does the printer have two black ink tanks?
Ink lamp informs you when ink is running low
Does black-and-white printing use color ink?
Is the paper loaded in the correct orientation?
Tip! Check how to load the paper correctly
Is the inside of the printer smeared with ink?
Is the paper curled?
Tip! Carefully choose the area to place the printer
Follow the procedure below to disconnect the power plug
Tip! Do not place any object on the Top Cover
Print periodically
Lamp on the printer is flashing What can I do?
Alarm lamp is flashing orange
82 of 437 pages
83 of 437 pages
IP4700 series Advanced Guide
Printing from a Computer
84 of 437 pages
85 of 437 pages
Troubleshooting
Printing Photographs Directly from a Compliant Device
86 of 437 pages
Using Easy-PhotoPrint EX About Solution Menu
87 of 437 pages
How to Use This Manual
How to Use This Manual
88 of 437 pages
Operating the Contents Pane
Operating the Explanation Window
Operating the Explanation Window
90 of 437 pages
Printing This Manual
Printing This Manual
91 of 437 pages
Click Start Printing
92 of 437 pages
From Select Target, select Current Document
From Select Target, select Selected Documents
From Select Target, select My Manual
93 of 437 pages
From Select Target, select All Documents
Print My Manual
94 of 437 pages
Using Keywords to Find a Document
Using Keywords to Find a Document
95 of 437 pages
Documents Containing Perfect Match
96 of 437 pages
Display the document that you want to read
Documents Containing All Keywords
97 of 437 pages
Registering Documents to My Manual
Registering Documents to My Manual
Display the document
98 of 437 pages
Display My Manual
Symbols Used in This Document
Symbols Used in This Document
99 of 437 pages
100 of 437 pages
Trademarks
Exif Print
Printing from a Computer
Printing from a Computer
101 of 437 pages
Printing with the Bundled Application Software
Printing with the Bundled Application Software
102 of 437 pages
103 of 437 pages
What Is Easy-PhotoPrint EX?
What Is Easy-PhotoPrint EX?
About Exif Print
Supported Image File Formats Extensions
104 of 437 pages
File Formats Extensions Supported by Easy-PhotoPrint EX
105 of 437 pages
Printing Photos
Printing Photos
106 of 437 pages
107 of 437 pages
Starting Easy-PhotoPrint EX
Starting Easy-PhotoPrint EX
108 of 437 pages
109 of 437 pages
Selecting a Photo
Selecting a Photo
Click Photo Print from Menu
110 of 437 pages
Selecting the Paper
Selecting the Paper
111 of 437 pages
112 of 437 pages
Printing
Printing
Click Layout/Print
113 of 437 pages
Menu
Creating an Album
Creating an Album
114 of 437 pages
115 of 437 pages
116 of 437 pages
Selecting the Paper and Layout
Set the following items in the General Settings section
Selecting the Paper and Layout
117 of 437 pages
If you want to change the layout, click Layout
118 of 437 pages
If you want to change the background, click Background
119 of 437 pages
Click Select Images
120 of 437 pages
121 of 437 pages
Editing
Editing
Click Edit
122 of 437 pages
Click Print Settings
123 of 437 pages
124 of 437 pages
Printing a DVD/CD
Printing a DVD/CD
125 of 437 pages
Printing Calendars
Printing Calendars
126 of 437 pages
127 of 437 pages
128 of 437 pages
Click Calendar from Menu
129 of 437 pages
Select a layout for Design
130 of 437 pages
131 of 437 pages
132 of 437 pages
Edit the calendar if necessary
133 of 437 pages
134 of 437 pages
135 of 437 pages
Printing Stickers
Printing Stickers
136 of 437 pages
137 of 437 pages
138 of 437 pages
Click Stickers from Menu
139 of 437 pages
140 of 437 pages
Edit the stickers if necessary
141 of 437 pages
142 of 437 pages
Printing Layout
Printing Layout
143 of 437 pages
144 of 437 pages
Select a layout from Layouts
145 of 437 pages
Click Layout Print from Menu
146 of 437 pages
147 of 437 pages
Edit the layout if necessary
148 of 437 pages
149 of 437 pages
Correcting and Enhancing Photos
Correcting and Enhancing Photos
150 of 437 pages
151 of 437 pages
Using the Auto Photo Fix Function
Using the Auto Photo Fix Function
152 of 437 pages
Click Exit
153 of 437 pages
Click Save Selected Image or Save All Corrected Images
Using the Red-Eye Correction Function
Using the Red-Eye Correction Function
154 of 437 pages
Click Red-Eye Correction
155 of 437 pages
Click Red-Eye Correction Click OK
Make sure that Auto is selected
156 of 437 pages
Using the Face Brightener Function
Using the Face Brightener Function
157 of 437 pages
158 of 437 pages
Click Face Brightener
Using the Face Sharpener Function
Using the Face Sharpener Function
159 of 437 pages
160 of 437 pages
Click Face Sharpener
161 of 437 pages
162 of 437 pages
Using the Digital Face Smoothing Function
Using the Digital Face Smoothing Function
Auto Enhancement
Image
163 of 437 pages
Click Digital Face Smoothing
Manual Enhancement
164 of 437 pages
165 of 437 pages
Using the Blemish Remover Function
Using the Blemish Remover Function
Click Blemish Remover
166 of 437 pages
Adjusting Images
Adjusting Images
167 of 437 pages
168 of 437 pages
169 of 437 pages
Correct/Enhance Images Window
Correct/Enhance Images Window
1Toolbar
2Task Area
170 of 437 pages
Prioritize Exif Info
171 of 437 pages
172 of 437 pages
Face Brightener
173 of 437 pages
Blemish Remover
174 of 437 pages
Questions and Answers
Questions and Answers
175 of 437 pages
How Can I Move or Copy the Saved File?
How Can I Move or Copy the Saved File?
176 of 437 pages
177 of 437 pages
How Do I Print with Even Margins?
How Do I Print with Even Margins?
178 of 437 pages
What Is C1 or C4?
What Is C1 or C4?
179 of 437 pages
Photo Print Settings
Photo Print Settings
180 of 437 pages
181 of 437 pages
Printing on a DVD/CD
Printing on a DVD/CD
Select CD-R for Paper Size in the Select Paper screen
182 of 437 pages
Printing Vivid Photos
Printing Vivid Photos
183 of 437 pages
Reducing Photo Noise
Reducing Photo Noise
184 of 437 pages
Cropping Photos Photo Print
Cropping Photos Photo Print
185 of 437 pages
186 of 437 pages
Printing Dates on Photos Photo Print
Printing Dates on Photos Photo Print
187 of 437 pages
Printing Multiple Photos on One
Printing Multiple Photos on One
188 of 437 pages
Printing an Index
Printing an Index
189 of 437 pages
190 of 437 pages
Printing ID Photos ID Photo Print
Printing ID Photos ID Photo Print
191 of 437 pages
192 of 437 pages
Printing Photo Information
Printing Photo Information
193 of 437 pages
Saving Photos
Saving Photos
194 of 437 pages
195 of 437 pages
Opening Saved Files
Opening Saved Files
Edit the file if necessary
196 of 437 pages
Other Settings
Other Settings
197 of 437 pages
198 of 437 pages
Changing Layout
Changing Layout
Album
199 of 437 pages
Layout Print
Changing Background
When Select from samples is Selected
200 of 437 pages
When Image file is Selected
When Single color is Selected
201 of 437 pages
202 of 437 pages
Adding Photos
Adding Photos
203 of 437 pages
Swapping Positions of Photos
Swapping Positions of Photos
204 of 437 pages
Replacing Photos
Replacing Photos
205 of 437 pages
Changing Position, Angle and Size of Photos
Changing Position, Angle and Size of Photos
206 of 437 pages
Cropping Photos
Cropping Photos
207 of 437 pages
Framing Photos
Framing Photos
208 of 437 pages
209 of 437 pages
Printing Dates on Photos
Printing Dates on Photos
210 of 437 pages
211 of 437 pages
Attaching Comments to Photos
Attaching Comments to Photos
212 of 437 pages
213 of 437 pages
Adding Text to Photos
Adding Text to Photos
214 of 437 pages
Saving
215 of 437 pages
Setting Holidays
Setting Holidays
216 of 437 pages
217 of 437 pages
Setting Calendar Display
Setting Calendar Display
218 of 437 pages
219 of 437 pages
220 of 437 pages
Editing Album Editing Calendar Editing Stickers
Printing with Other Application Software
Printing with Other Application Software
221 of 437 pages
Various Printing Methods
Various Printing Methods
222 of 437 pages
Complete the setup
Printing with Easy Setup
Printing with Easy Setup
223 of 437 pages
224 of 437 pages
225 of 437 pages
Setting a Page Size and Orientation
Setting a Page Size and Orientation
Select the paper size
226 of 437 pages
Setting the Number of Copies and Printing Order
Setting the Number of Copies and Printing Order
Specify the number of copies to be printed
227 of 437 pages
228 of 437 pages
Setting the Stapling Margin
Setting the Stapling Margin
Set the margin width
229 of 437 pages
230 of 437 pages
Borderless Printing
Borderless Printing
Check the paper size
231 of 437 pages
Adjust the amount of extension from the paper
Expanding the Range of the Document to Print
232 of 437 pages
233 of 437 pages
Fit-to-Page Printing
Fit-to-Page Printing
Select the print paper size
234 of 437 pages
Scaled Printing
Set the scaling rate by using one of the following methods
Scaled Printing
235 of 437 pages
236 of 437 pages
Specify a scaling factor
237 of 437 pages
238 of 437 pages
Layout Printing
Layout Printing
Set page layout printing
Order
239 of 437 pages
Pages
Border
Poster Printing
Setting Poster Printing
Poster Printing
240 of 437 pages
Set the print range
241 of 437 pages
Printing Only Specific Pages
242 of 437 pages
243 of 437 pages
Booklet Printing
Booklet Printing
Set booklet printing
Insert blank
244 of 437 pages
Margin for stapling
Margin
Duplex Printing
Duplex Printing
245 of 437 pages
Performing Duplex Printing Manually
246 of 437 pages
Set duplex printing
Use normal-size printing
247 of 437 pages
Related Topic
Stamp/Background Printing
Click Stamp/Background... on the Page Setup tab
Stamp/Background Printing
248 of 437 pages
Select the background
249 of 437 pages
Set the stamp details
Set the background details
250 of 437 pages
Related Topics
251 of 437 pages
Registering a Stamp
Registering a Stamp
Click Define Stamp
Changing and Registering Some of Stamp Settings
Select the stamp for which the settings are to be changed
Configure the stamp while viewing the preview window
252 of 437 pages
Click Define Stamp... in the Stamp/Background dialog box
253 of 437 pages
Overwrite save the stamp
Select the stamp to be deleted
254 of 437 pages
Registering Image Data to be Used as a Background
Registering Image Data to be Used as a Background
Click Select Background
Select the image data to be registered to the background
Changing and Registering Some Background Settings
255 of 437 pages
Save the background
Select the background to be deleted
256 of 437 pages
Deleting an Unnecessary Background
257 of 437 pages
Printing an Envelope
Printing an Envelope
Select the media type
258 of 437 pages
Switching the Paper Source to Match the Purpose
Switching the Paper Source to Match the Purpose
259 of 437 pages
260 of 437 pages
Paper Allocation
261 of 437 pages
Displaying the Print Results before Printing
Displaying the Print Results before Printing
Set the preview
262 of 437 pages
Setting Paper Dimensions Custom Size
Setting Paper Dimensions Custom Size
Set the custom size in the application software
263 of 437 pages
Set the custom paper size
Changing the Print Quality and Correcting Image Data
Changing the Print Quality and Correcting Image Data
264 of 437 pages
265 of 437 pages
Setting the print quality and halftone expression method
266 of 437 pages
267 of 437 pages
Printing a Color Document in Monochrome
Printing a Color Document in Monochrome
Set grayscale printing
268 of 437 pages
Specifying Color Correction
Select the manual color adjustment
Specifying Color Correction
269 of 437 pages
Driver Matching
270 of 437 pages
None
271 of 437 pages
Optimal Photo Printing of Image Data
Optimal Photo Printing of Image Data
Color Management
Adjusting Colors with the Printer Driver
Adjusting Colors with the Printer Driver
272 of 437 pages
273 of 437 pages
Set the other items
Printing with ICC Profiles
Printing with ICC Profiles
274 of 437 pages
275 of 437 pages
276 of 437 pages
Select the input profile
277 of 437 pages
Adjust color balance
Adjusting Color Balance
Adjusting Color Balance
278 of 437 pages
279 of 437 pages
280 of 437 pages
Adjusting Brightness
Adjusting Brightness
Specify the brightness
281 of 437 pages
Adjust intensity
Adjusting Intensity
Adjusting Intensity
282 of 437 pages
283 of 437 pages
Adjust the contrast
Adjusting Contrast
Adjusting Contrast
284 of 437 pages
285 of 437 pages
286 of 437 pages
Simulating an Illustration
Simulating an Illustration
Set the Simulate Illustration
287 of 437 pages
Representing Image Data with a Single Color
Representing Image Data with a Single Color
Set Monochrome Effects
288 of 437 pages
289 of 437 pages
Presenting Image Data with Vivid Colors
Presenting Image Data with Vivid Colors
Set Vivid Photo
290 of 437 pages
Smoothing Jagged Outlines
Smoothing Jagged Outlines
Set image optimizer
291 of 437 pages
292 of 437 pages
Changing Color Properties to Improve Coloration
Changing Color Properties to Improve Coloration
Set Photo Optimizer PRO
293 of 437 pages
294 of 437 pages
Set Photo Noise Reduction
295 of 437 pages
Overview of the Printer Driver
Overview of the Printer Driver
296 of 437 pages
Printer Driver Operations
297 of 437 pages
Canon IJ Printer Driver
How to Use Printer Driver Help
Canon IJ Printer Driver
298 of 437 pages
299 of 437 pages
How to Open the Printer Driver Setup Window
How to Open the Printer Driver Setup Window
Select your model name and click Preferences or Properties
Related Features
Maintenance Tab
Features
300 of 437 pages
Canon IJ Status Monitor
When Errors Occur
Canon IJ Status Monitor
301 of 437 pages
Canon IJ Preview
Canon IJ Preview
302 of 437 pages
Printing on DVD/CDs
Printing on DVD/CDs
303 of 437 pages
Printing on the Label Side of DVD/CDs
Printing on the Label Side of DVD/CDs
304 of 437 pages
CD-R Tray
Items to Prepare
Items to Prepare
Cm CD-R Adapter
306 of 437 pages
Used
307 of 437 pages
Attaching/Removing the CD-R Tray
Attaching/Removing the CD-R Tray
Attaching the CD-R Tray
Removing the CD-R Tray
308 of 437 pages
Attach the CD-R Tray to the printer
Close the Inner Cover
309 of 437 pages
Remove the DVD/CD from the CD-R Tray
310 of 437 pages
311 of 437 pages
Printing with CD-LabelPrint from the Computer
Printing with CD-LabelPrint from the Computer
312 of 437 pages
313 of 437 pages
Printing Area
Printing Area
Printable DVD/CDs
Troubleshooting
314 of 437 pages
Message Appears on the Computer Screen
Errors About DVD/CD Printing Are Displayed
Message Appears on the Computer Screen
315 of 437 pages
316 of 437 pages
Error Number 1002 Is Displayed
Message 1850 Is Displayed
317 of 437 pages
Cannot Print on DVD/CDs
Cannot Print on DVD/CDs
DVD/CD Printing Does Not Start
318 of 437 pages
CD-R Tray Jammed
Printing Photographs Directly from a Compliant Device
Printing Photographs Directly from a Compliant Device
319 of 437 pages
320 of 437 pages
321 of 437 pages
322 of 437 pages
Start printing from your PictBridge compliant device
Settings on a PictBridge Compliant Device
About PictBridge Print Settings
About PictBridge Print Settings
323 of 437 pages
324 of 437 pages
Maintenance
Maintenance
325 of 437 pages
Cleaning Your Printer
Cleaning Your Printer
326 of 437 pages
Cleaning
Cleaning
327 of 437 pages
Cleaning the Exterior of the Printer
Cleaning the Exterior of the Printer
328 of 437 pages
Cleaning the Protrusions Inside the Printer
Cleaning the Protrusions Inside the Printer
329 of 437 pages
Performing Maintenance from a Computer
Performing Maintenance from a Computer
330 of 437 pages
331 of 437 pages
Cleaning the Print Heads
Cleaning the Print Heads
Check the results
332 of 437 pages
333 of 437 pages
Cleaning the Paper Feed Rollers
Cleaning the Paper Feed Rollers
Select Rear Tray or Cassette, and click OK
Aligning the Print Head Position
Aligning the Print Head Position
334 of 437 pages
Manual Print Head Alignment
Manual Print Head Alignment
335 of 437 pages
336 of 437 pages
337 of 437 pages
338 of 437 pages
Opening the Canon IJ Printer Utility Macintosh
339 of 437 pages
340 of 437 pages
341 of 437 pages
342 of 437 pages
Checking the Print Head Nozzles
Checking the Print Head Nozzles
Print a nozzle check pattern
Click Bottom Plate Cleaning on the Maintenance tab
Cleaning Inside the Printer
Cleaning Inside the Printer
Perform the bottom plate cleaning
Changing the Printer Settings
Changing the Printer Settings
344 of 437 pages
Changing Printer Settings from Your Computer
Changing Printer Settings from Your Computer
345 of 437 pages
Changing the Print Options
Click Print Options... on the Page Setup tab
Change the individual settings
Changing the Print Options
Registering a Frequently Used Printing Profile
Registering a Frequently Used Printing Profile
347 of 437 pages
Delete the printing profile
348 of 437 pages
Select the printing profile to be deleted
Deleting Unnecessary Printing Profile
Transmit the settings
Setting the Paper Source for Plain Paper
Setting the Paper Source for Plain Paper
Paper Source Setting for Plain Paper
Execute power off
Managing the Printer Power
Managing the Printer Power
If necessary, complete the following settings
351 of 437 pages
Reducing the Printer Noise
Click Quiet Mode on the Maintenance tab
Set the quiet mode
Reducing the Printer Noise
Custom Settings
Changing the Printer Operation Mode
Changing the Printer Operation Mode
353 of 437 pages
354 of 437 pages
Mac OS X Mac OS X v.10.4.x or Mac OS X
If an Error Occurs
355 of 437 pages
356 of 437 pages
Printer Cannot Be Powered On
Printer Cannot Be Powered On
357 of 437 pages
Alarm Lamp Flashes Orange
Alarm Lamp Flashes Orange
358 of 437 pages
359 of 437 pages
Positions
360 of 437 pages
361 of 437 pages
362 of 437 pages
Cannot Install the Printer Driver
Cannot Install the Printer Driver
Click Start then Computer
363 of 437 pages
Click Cancel on the Printer Connection screen
Other cases
Click Back on the screen that appears next
Cannot Connect to Computer Properly
Cannot Connect to Computer Properly
364 of 437 pages
Print Results Not Satisfactory
Print Results Not Satisfactory
365 of 437 pages
Check 1 Is the size of the print data extremely large?
Cannot Print to End of Job
Cannot Print to End of Job
366 of 437 pages
367 of 437 pages
Part of the Page Is Not Printed
Part of the Page Is Not Printed
Open the printer properties dialog box
Streaks
368 of 437 pages
Check 3 Is the orange tape or protective film remaining?
369 of 437 pages
Check 2 Perform Print Head Alignment
Lines Are Misaligned
Lines Are Misaligned
Check 3 Is the size of the print data extremely large?
Check 3 Is Photo Paper used for printing photographs?
Printed Paper Curls or Has Ink Blots
Printed Paper Curls or Has Ink Blots
371 of 437 pages
Check 3 Load the paper after correcting its curl
Paper Is Smudged/Printed Surface Is Scratched
Paper Is Smudged/Printed Surface Is Scratched
372 of 437 pages
373 of 437 pages
Check 9 Set Ink Drying Wait Time longer
Check 7 Is the Paper Feed Roller dirty?
Check 8 Is inside of the printer dirty?
374 of 437 pages
Check 10 Is the paper scratched by other loaded paper?
Select Custom Settings in the pop-up menu
375 of 437 pages
Back of the Paper Is Smudged
Back of the Paper Is Smudged
376 of 437 pages
Check 2 Is the size of the loaded paper correct?
Vertical Lines Are Printed on the Sides of the Printout
Vertical Lines Are Printed on the Sides of the Printout
377 of 437 pages
Check 3 Perform Print Head Alignment
Colors Are Uneven or Streaked
Colors Are Uneven or Streaked
378 of 437 pages
379 of 437 pages
Check 7 Make sure that the Inner Cover is closed
Printing Does Not Start
Printing Does Not Start
380 of 437 pages
Click the Ports tab to confirm the port settings
Check 9 Configure the printer port appropriately
Log on as a user account with administrator privilege
Check 10 Is the size of the print data extremely large?
Check 1 Is the Inner Cover opened while printing on paper?
Printing Stops Before It Is Completed
Printing Stops Before It Is Completed
Check 3 Is the paper loaded?
Check 1 Are the Print Head nozzles clogged?
Printer Moves But Ink Is Not Ejected
Printer Moves But Ink Is Not Ejected
Check 2 Has the ink run out?
Check 1 Is printing performed in Quiet Mode?
Printing Speed Is Not as Fast as Expected
Printing Speed Is Not as Fast as Expected
Check 2 Is the print quality set too high?
Check 2 Is the Alarm lamp flashing?
Check 1 Is the Power lamp off?
385 of 437 pages
Check 4 Confirm the paper source setting
Check 1 Make sure of the following when you load paper
Check 3 Make sure of the following when you load envelopes
Paper Does Not Feed Properly
Check 10 Is the Rear Cover closed completely?
Check 8 Clean the Paper Feed Roller
Check 7 Make sure that the Inner Cover is closed completely
387 of 437 pages
Paper Does Not Feed from the Paper Source Specified
388 of 437 pages
Paper Jams
389 of 437 pages
Paper Is Jammed in the Paper Output Slot or the Rear Tray
Paper Is Jammed in the Paper Output Slot or the Rear Tray
390 of 437 pages
391 of 437 pages
Paper Is Jammed inside the Printer at the Transport Unit
Paper Is Jammed inside the Printer at the Transport Unit
Detach the Rear Cover
392 of 437 pages
393 of 437 pages
Align the paper, then reload it in the Cassette
Other Cases
Other Cases
394 of 437 pages
395 of 437 pages
5100 or 5110 Is Displayed
Writing Error/Output Error/Communication Error
Error Regarding Automatic Duplex Printing Is Displayed
Error Regarding Automatic Print Head Alignment Is Displayed
396 of 437 pages
397 of 437 pages
Error Number 300 Is Displayed
Error Number 1700 Is Displayed
Ink Info Number 1600 Is Displayed
398 of 437 pages
399 of 437 pages
If you agree to participate in the survey program
400 of 437 pages
401 of 437 pages
To stop sending the information
Check Is the paper size or media type appropriate?
Cannot Print Properly with Automatic Duplex Printing
Cannot Print Properly with Automatic Duplex Printing
402 of 437 pages
403 of 437 pages
For Windows Users
For Windows Users
Printer Status Monitor Is Not Displayed
Error Message Appears on a PictBridge Compliant Device
Error Message Appears on a PictBridge Compliant Device
404 of 437 pages
FAQs
FAQs
405 of 437 pages
If You Cannot Resolve the Problem
If You Cannot Resolve the Problem
406 of 437 pages
407 of 437 pages
Instructions for Use Printer Driver
Instructions for Use Printer Driver
Restrictions on the Printer Driver
408 of 437 pages
Appendix
409 of 437 pages
410 of 437 pages
Borderless Printing
Other Sizes than Letter, Legal, Envelopes
Other Sizes than Letter, Legal, Envelopes
411 of 437 pages
Letter, Legal
Letter, Legal
412 of 437 pages
Envelopes
413 of 437 pages
Deleting the Undesired Print Job
Deleting the Undesired Print Job
414 of 437 pages
Updating the Printer Driver
Updating the Printer Driver
415 of 437 pages
Obtaining the Latest Printer Driver
Obtaining the Latest Printer Driver
416 of 437 pages
Deleting the Unnecessary Printer Driver
Deleting the Unnecessary Printer Driver
417 of 437 pages
418 of 437 pages
Delete the printer driver
Checking the Personal Computer Settings
Before Installing the Printer Driver
Before Installing the Printer Driver
419 of 437 pages
Installing the Printer Driver
Installing the Printer Driver
420 of 437 pages
421 of 437 pages
Uninstalling the On-Screen Manuals
Uninstalling the On-Screen Manuals
422 of 437 pages
Transporting the Printer
Transporting the Printer
423 of 437 pages
424 of 437 pages
Opening the Printer Properties Dialog Box Windows
Opening the Printer Properties Dialog Box Windows
Select your model name and click Preferences or Properties
Opening the Page Setup Dialog Box
Opening the Page Setup and Print Dialog Box Macintosh
Opening the Page Setup and Print Dialog Box Macintosh
425 of 437 pages
426 of 437 pages
Opening the Canon IJ Printer Utility Macintosh
Opening the Canon IJ Printer Utility Macintosh
Mac OS X
427 of 437 pages
Mac OS X v.10.4.x or Mac OS X v
Sharing the Printer on a Network
Sharing the Printer on a Network
428 of 437 pages
429 of 437 pages
Settings on Print Server
Settings on Print Server
Set sharing
Install the printer driver on the client systems
Settings on Client PC
Settings on Client PC
430 of 437 pages
431 of 437 pages
Restrictions on Printer Sharing
When You Are Sharing a Printer in a Network
Restrictions on Printer Sharing
432 of 437 pages
433 of 437 pages
Using Easy-PhotoPrint EX
Using Easy-PhotoPrint EX
Transforming Your Photos into Creative Works of Art
Create a Calendar Using Your Favorite Photos
434 of 437 pages
435 of 437 pages
About Solution Menu
About Solution Menu
436 of 437 pages
437 of 437 pages
Exiting Solution Menu
Restriction on Use of Solution Menu
Starting an Application