Notes
•If you connect a stereo VCR, connect the yellow plug to ![]() (the yellow jack) and the white plug to
(the yellow jack) and the white plug to ![]() (the black jack).
(the black jack).
•If you connect a VCR to the ù (antenna) terminal, preset the signal output from the VCR to the program number 0 on the TV.
•When no signal is input to the connected video equipment, the TV screen becomes blue.
CAUTION | Using | |
Do not connect the power cord until you have completed making all other | ||
Your | ||
connections; otherwise a minimum leakage current might flow through the antenna | ||
and other terminals to ground. | ||
Step 2 | New |
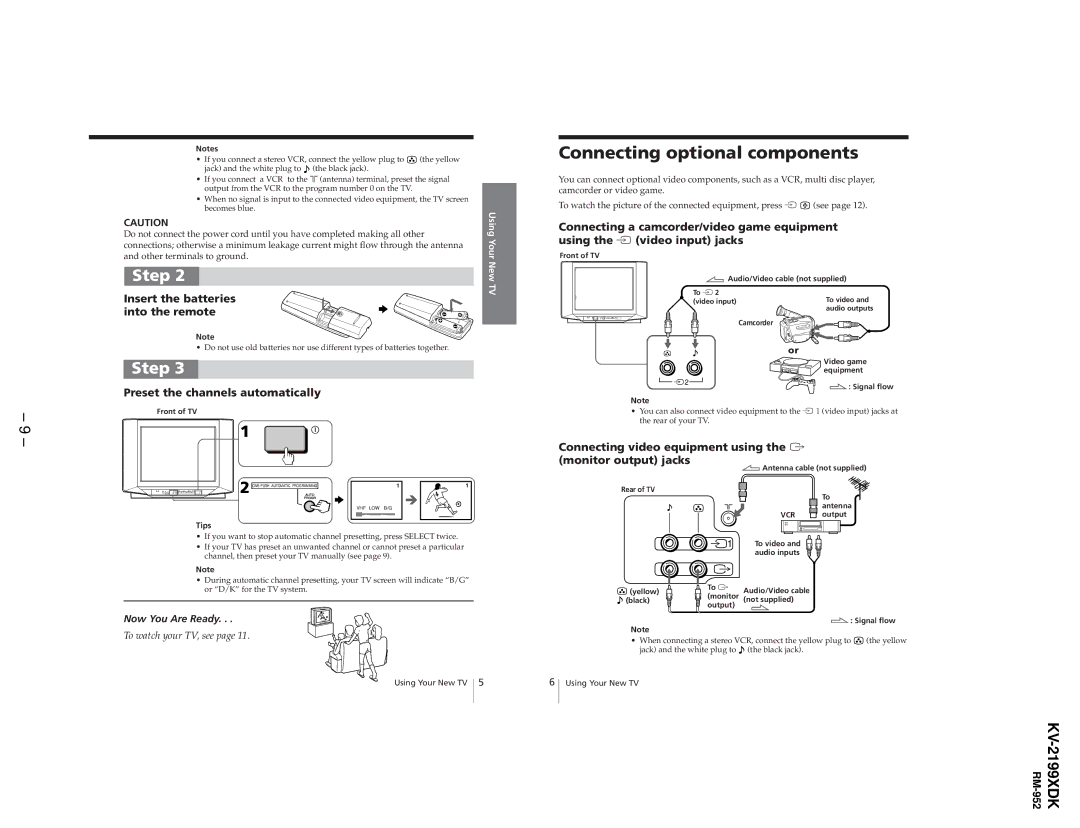
Connecting optional components
You can connect optional video components, such as a VCR, multi disc player, camcorder or video game.
To watch the picture of the connected equipment, press É ![]() (see page 12).
(see page 12).
Connecting a camcorder/video game equipment using the É (video input) jacks
Front of TV
Insert the batteries | TV |
| |
into the remote |
|
Note
• Do not use old batteries nor use different types of batteries together.
Step 3
Preset the channels automatically
![]() 2
2
Note
![]() Audio/Video cable (not supplied)
Audio/Video cable (not supplied)
To É 2
(video input)To video and audio outputs
Camcorder
or
Video game equipment
![]() : Signal flow
: Signal flow
– 9 –
Front of TV
1
2 | 1 | 1 |
VHF LOW B/G
Tips
•If you want to stop automatic channel presetting, press SELECT twice.
•If your TV has preset an unwanted channel or cannot preset a particular channel, then preset your TV manually (see page 9).
Note
•During automatic channel presetting, your TV screen will indicate “B/G” or “D/K” for the TV system.
Now You Are Ready. . .
To watch your TV, see page 11.
Using Your New TV 5
•You can also connect video equipment to the É 1 (video input) jacks at the rear of your TV.
Connecting video equipment using the ò
(monitor output) jacks
![]() Antenna cable (not supplied)
Antenna cable (not supplied)
Rear of TV
To
antenna
VCR ![]() output
output
![]() 1 To video and audio inputs
1 To video and audio inputs
(yellow) | To ò | Audio/Video cable |
(black) | (monitor | (not supplied) |
| output) |
|
 : Signal flow
Note
•When connecting a stereo VCR, connect the yellow plug to ![]() (the yellow jack) and the white plug to
(the yellow jack) and the white plug to ![]() (the black jack).
(the black jack).