Handling the pulse(earlobe) sensor
 Precautions
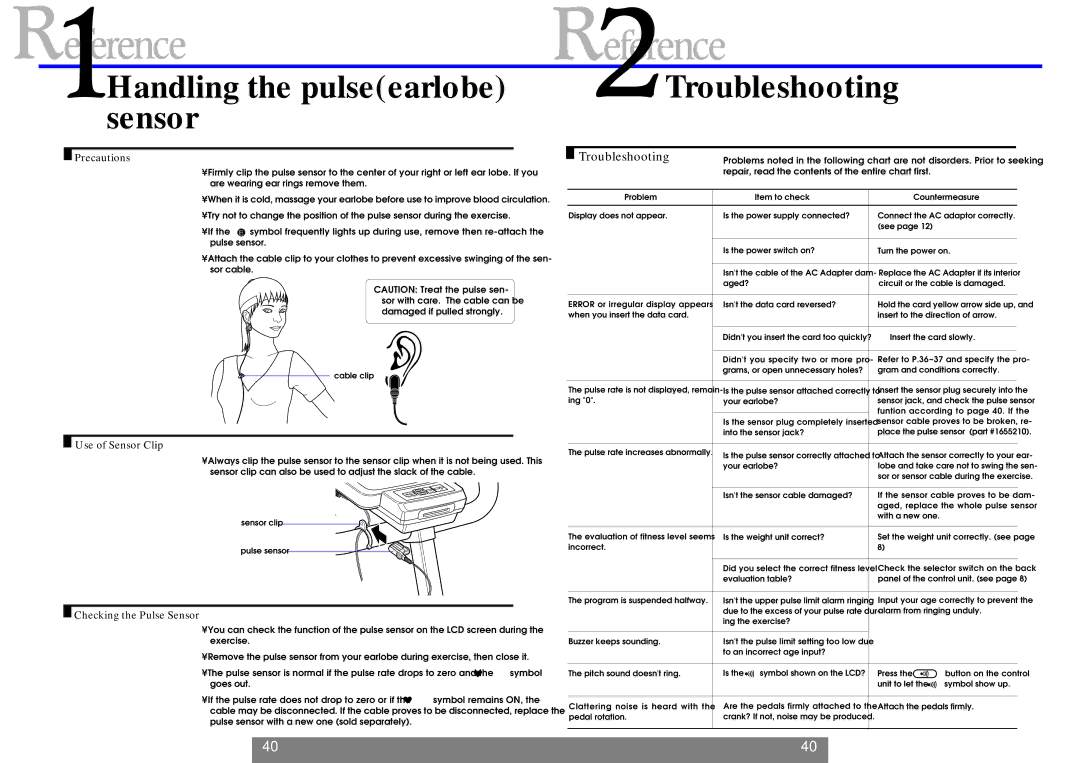
•Firmly clip the pulse sensor to the center of your right or left ear lobe. If you are wearing ear rings remove them.
•When it is cold, massage your earlobe before use to improve blood circulation.
•Try not to change the position of the pulse sensor during the exercise.
•If the E symbol frequently lights up during use, remove then
•Attach the cable clip to your clothes to prevent excessive swinging of the sen- sor cable.
CAUTION: Treat the pulse sen- sor with care. The cable can be damaged if pulled strongly.
cable clip
 Use of Sensor Clip
•Always clip the pulse sensor to the sensor clip when it is not being used. This sensor clip can also be used to adjust the slack of the cable.
sensor clip
pulse sensor
 Checking the Pulse Sensor
•You can check the function of the pulse sensor on the LCD screen during the exercise.
•Remove the pulse sensor from your earlobe during exercise, then close it.
•The pulse sensor is normal if the pulse rate drops to zero and the ![]() symbol goes out.
symbol goes out.
•If the pulse rate does not drop to zero or if the ![]() symbol remains ON, the cable may be disconnected. If the cable proves to be disconnected, replace the pulse sensor with a new one (sold separately).
symbol remains ON, the cable may be disconnected. If the cable proves to be disconnected, replace the pulse sensor with a new one (sold separately).
Troubleshooting
|
|
|
|
|
|
|
|
|
|
|
| Troubleshooting | Problems noted in the following chart are not disorders. Prior to seeking | ||||||
|
| ||||||||
|
|
|
| repair, read the contents of the entire chart first. |
|
| |||
|
|
|
|
|
|
|
|
| |
|
| Problem |
| Item to check |
| Countermeasure | |||
|
|
|
|
|
|
| |||
| Display does not appear. | Is the power supply connected? |
| Connect the AC adaptor correctly. | |||||
|
|
|
|
|
|
| (see page 12) |
|
|
|
|
|
|
|
|
|
| ||
|
|
|
| Is the power switch on? |
| Turn the power on. | |||
|
|
|
|
|
|
|
| ||
|
|
|
| Isn't the cable of the AC Adapter dam- |
| Replace the AC Adapter if its interior | |||
|
|
|
| aged? |
|
| circuit or the cable is damaged. | ||
|
|
|
|
|
|
| |||
| ERROR or irregular display appears | Isn't the data card reversed? |
| Hold the card yellow arrow side up, and | |||||
| when you insert the data card. |
|
|
| insert to the direction of arrow. | ||||
|
|
|
|
|
|
|
| ||
|
|
|
| Didn't you insert the card too quickly? |
| Insert the card slowly. | |||
|
|
|
|
|
|
|
| ||
|
|
|
| Didn't you specify two or more pro- |
| Refer to P.36~37 and specify the pro- | |||
|
|
|
| grams, or open unnecessary holes? |
| gram and conditions correctly. | |||
|
|
|
|
|
|
| |||
| The pulse rate is not displayed, remain- | Is the pulse sensor attached correctly to |
| Insert the sensor plug securely into the | |||||
| ing "0". | your earlobe? |
| sensor jack, and check the pulse sensor | |||||
|
|
|
|
|
|
| funtion according to page 40. If the | ||
|
|
|
|
|
|
| |||
|
|
|
| Is the sensor plug completely inserted |
| sensor cable proves to be broken, re- | |||
|
|
|
| into the sensor jack? |
| place the pulse sensor (part #1655210). | |||
|
|
|
|
|
|
|
|
| |
| The pulse rate increases abnormally. | Is the pulse sensor correctly attached to |
| Attach the sensor correctly to your ear- | |||||
|
|
|
|
| |||||
|
|
|
| your earlobe? |
| lobe and take care not to swing the sen- | |||
|
|
|
|
|
|
| sor or sensor cable during the exercise. | ||
|
|
|
|
|
|
|
| ||
|
|
|
| Isn't the sensor cable damaged? |
| If the sensor cable proves to be dam- | |||
|
|
|
|
|
|
| aged, replace the whole pulse sensor | ||
|
|
|
|
|
|
| with a new one. |
|
|
|
|
|
|
|
|
| |||
| The evaluation of fitness level seems | Is the weight unit correct? |
| Set the weight unit correctly. (see page | |||||
| incorrect. |
|
| 8) |
|
| |||
|
|
|
|
|
|
|
| ||
|
|
|
| Did you select the correct fitness level |
| Check the selector switch on the back | |||
|
|
|
| evaluation table? |
| panel of the control unit. (see page 8) | |||
|
|
|
|
|
|
| |||
| The program is suspended halfway. | Isn't the upper pulse limit alarm ringing |
| Input your age correctly to prevent the | |||||
|
|
|
| due to the excess of your pulse rate dur- |
| alarm from ringing unduly. | |||
|
|
|
| ing the exercise? |
|
|
|
| |
|
|
|
|
|
|
| |||
| Buzzer keeps sounding. | Isn't the pulse limit setting too low due |
|
|
|
| |||
|
|
|
| to an incorrect age input? |
|
|
|
| |
|
|
|
|
|
|
| |||
| The pitch sound doesn't ring. | Is the | symbol shown on the LCD? |
| Press the | button on the control | |||
|
|
|
|
|
|
| unit to let the | symbol show up. | |
|
|
|
|
| |||||
| Clattering noise is heard with the | Are the pedals firmly attached to the |
| Attach the pedals firmly. | |||||
| pedal rotation. | crank? If not, noise may be produced. |
|
|
|
| |||
|
|
|
|
|
|
|
|
|
|
40 | 40 |
|
|